|
|||||
Let's get down to the nitty-gritty of HTML authoring using the great Australian editor - Hot Dog Pro, paying particular attention to tables.
What is HotDog?
What is HotDog?
HotDog Pro is a Web page editor which gives access to common HTML tags through menus and button bars or you can type them yourself. While it is not a WYSIWYG editor it does make coding easier and because you see the tags on the screen, you'll learn as you go.
HotDog Pro's help information is excellent and for the type of table we'll be creating there are plenty of graphical examples to learn from, together with sample tag combinations you can copy and paste into your own Web documents.
This month we are using HotDog Pro as an example of a Web page authoring tool. We like it because it's a good local product. However, there are lots of other programs available including the recently released Microsoft FrontPage which offers WYSIWYG editing, site management and sophisticated Internet applications such as search engines.
An evaluation version of HotDog can be downloaded from Sausage Software's Web site at www.sausage.com.au.
Save the download! The HotDog trial versions for Windows 95 and 3.1 are on the March CD. Check out the Online Tools Section of Software to install it now.
Using tables
Before we begin we need to understand why tables are so important for laying out Web pages. A table is akin to a publisher's frame and because a table can have multiple columns, each cell can contain text and graphics independently of the other cells. This allows you to place two distinctly different items side-by-side without them collapsing into each other.
Starting the table
Using a new blank document, start by typing the title text between the <TITLE>...</TITLE> tags. A title is the text which appears on the titlebar of your browser and, as many search engines use this in their search results, you shouldalways include a title on your page.
The background graphic is a 960 x 1 pixel, 16-colour GIF file called strip.gif. Because this file is specified as a background picture, it is tiled repeatedly to fit the screen. At 1Kb in size this is a very small file for such a huge graphic effect. You can add a background graphic to your page by selecting Format, Document, and then the Graphics/Colours tab. Either type in the filename or locate it on your drive using the browse feature.
Other options for background graphics are JPG files -- you'll find plenty of sources of these on the Web you can download and use on your own page, or skip using a graphic altogether and use a background colour instead.
Adding the table
 As you can see from the picture of our
Web page, left, tables can control the placement of text
on the page.
As you can see from the picture of our
Web page, left, tables can control the placement of text
on the page.
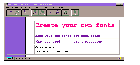 With borders turned on the underlying
structure of the table is apparent.
With borders turned on the underlying
structure of the table is apparent.
The document is based on a three-column, five-row table. You'll note that some of the cells span a number of rows or columns allowing us to use a variety of shapes of cells.
Your options for creating a table like ours is to type the tags yourself or create a table using the Table button. Alternately you may find a table in the Help information similar to the one you want to create and, if you do, you can cut and paste the tags directly into your document. Either way you'll have to do a fair bit of editing to get exactly what you want.
When you're creating a table it helps to set the border attribute on the table to one, even if it will eventually be invisible. This way you can see what the underlying structure looks like as you develop the page and, when everything looks as you want it to, just set the border to zero and it will disappear.
It is also a good idea to do as we have done and add only minimal text to your table while you are figuring out the correct tag combinations to use. Later you can return and pad out each cell with additional text.
To insert any of the standard table tags, select the Tags button or the Tags menu and choose the tag you want from the list. The table is created within a pair of <Table>...</Table> tags. Each row of the table appears between a pair of <TR>...</TR> tags and each cell's text and graphics appears between a pair of <TD>...</TD> tags.
To set a cell to span a number of rows, use the rowspec attribute in the cell's <TD> tag for example <TD rowspec = 2> will give you a cell spanning the current and the following row. The colspec attribute operates similarly to set a cell to span a number of columns.
If you have specified a cell to span a number of rows using rowspec (as we have in our table) just ignore that joined cell in every row except the first that it spans. Effectively it only exists for the first row it spans and doesn't exist in any other spanned row.
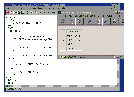 The picture, left, shows the foundations
of our table, the tags and the general form it will take.
The picture, left, shows the foundations
of our table, the tags and the general form it will take.
Adding a blank line between the tags for each row of the table will help understand what we're doing, as will liberal use of comments with the <!...> tag. None of these affect the final page but they can make a big difference to the ease of creating it.
See HTML code. The skeleton of the code used for our sample Web page.
More about HTML tags. A
listing of HTML tags and what they do.
Using lists
Inside each of our table cells we've used unordered
lists for our data. Unordered lists provide bullets,
indents and inter-element spacing so they make short work
of formatting text. Each unordered list is contained
within an <UL>...</UL> tag combination and
each element in the list commences with a <LI> tag
-- there is no closing tag.
Formatting text
You can colour your text by using the font colour attribute. Colours in HTML are represented as a six-digit hexadecimal number showing the amounts of red, green and blue in the colour. If you are familiar with hexadecimal coding you can calculate this number for any colour for which you know its RGB values. The pink heading on this document has a decimal RGB value of 255 red, 0 green, 128 blue, which converts to FF0080 in hexadecimal.
If all this sounds like too much hard work, HotDog has
a good, but by no means exhaustive, colour chart. It is
there under Background Colours in Help but don't let the
description fool you, the codes work for type too
Testing the page
When you've created your Web page, you can view it by selecting the Preview button and pointing HotDog to your Web browser. If you find that loading your browser also connects you to the Internet, check the FAQs in Help for a solution using a mock TCP/IP stack DLL file or just stop Trumpet Winsock and minimise it before it connects.
Once you've told HotDog which browser you're using it
will use this every time you ask for a preview. It pays
to preview your work regularly, the more changes you've
made before you discover that one has messed everything
up, the more difficult it is to locate the offender.
All Web browsers are not the same
Tables are new in HTML3 and you'll find that only the more recent browsers support them. Our table looks as if it was designed to look in Internet Explorer 3.0 and in Netscape 2.01 and in some other browsers. However, others either won't display it correctly or don't recognise table tags at all and display it as a single narrow column of text.
We can expect that in the future as table standards continue to develop and browsers will present the tables in a more consistent format. In the meantime, we have a situation where some browsers don't support tables and in others the algorithm used to calculate the display of a table can give unexpected results.
So where does all this leave us?
Firstly, where possible, check your page with as wide a range of browsers as you can to see how it will be rendered by each. And do this at 640 by 480 screen resolution too as you can't expect that everyone is using a high quality monitor.
Secondly, if your page views better with some browsers than others, add a brief statement to your page suggesting that the page is best viewed with, say, Internet Explorer 3.0 and Netscape 2.01. You can add additional functionality by providing links on your page for users to download these browsers.
Alternately you can provide different versions of your page for different browsers. This way you can take advantage of the tags supported by each browser to show your page neatly on whichever browser is being used.
To put this all into context, if a page works on Netscape you're probably satisfying around 80 percent of users. If it works on Netscape and Internet Explorer 3.0, you're probably covering 85 to 90 percent of users. You need to make the decision as to how far you'll go to support every possible user. If you are designing a page for a large corporation or a public sector organisation that wants to reach everyone, then it is vital to take different browsers into account.
If you're a home or small business user, it may be less important to you, although it will always be a good idea to offer your user an invitation to download the browser that displays your page to its best advantage.
When your Web page is ready to go you'll need a Web server to put it on. Many ISPs allow you to put a personal homepage on their server for little or no cost, or you can pay them to provide a more expensive setup with your own domain name, increased Web space and advanced facilities on a `virtual Web server'.
In either case you'll need to speak with someone from
your Web server company and ask how they want your file
uploaded. Some may take it by e-mail and load it for you,
others will sell you an FTP account and give you a
directory on the server so you can maintain your site
independently.
For more information on tables
In the meantime you may wish to build on the table skills learned this month by checking out the NCSA Mosaic Tables Tutorial at http://www.ncsa.uiuc.edu:80/SDG/Software/Mosaic/Tables/tutorial.html.
By Helen
Bradley & John
Hilvert

Top of page
|What's New | Software | Net Guides | Web Workshop | Net Sites | About PC User |
All text © 1997 Australian Consolidated Press - PC User Magazine