|
|||||
![]() Creating frames
Creating frames ![]() Linking to frames
Linking to frames ![]() The
tags
The
tags ![]() Design notes
Design notes
To use or not to use. Helen Bradley
and John Hilvert consider some circumstances in which
frames are a useful design choice to your Web page, and
others when they're not.
If you are a regular Internet surfer, you will have come across pages laid out using frames which divide the page up into a series of separate areas. You may also have come across the "No Frame" symbol on pages where the creator is an active campaigner against their use. Frames, it seems, are the cause of some polarisation among Internet users into "them that does" and "them that doesn't" use or like their use.
Be aware, though, that frames are not part of the newly ratified HTML 3.2 standard and not all browsers support them. Netscape 2.0 and Internet Explorer 3.0 do, but many others don't. So if your users are likely to be using a browser that doesn't support frames you may want to add a frame-free alternative to your site. You may also find that viewers who hate frames will use this, too.
![]()
tutorial Part 1
![]() Play ScreenCam
Play ScreenCam
tutorial Part 2

Figure 1: This is one of
the many sites on the Web that you'll find use frames for
site navigation.
![]()
![]()
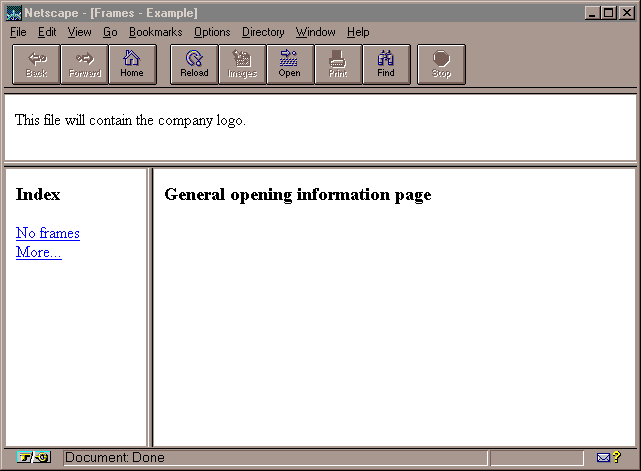
Figure 2: This simple frame layout is useful for providing users with quick navigation of indexed information.
![]()
click here to see example HTML pages
click here to view the source code for these pages
![]()
When you are creating a page with frames you will use two different types of HTML documents. One document will be used to divide the page into a number of different frames and the other will provide the source to be displayed in each frame.
The documents in HTML Source box 1 create the basis of the page in Figure 2 and divide it into two rows and two columns. Notice that there are two documents required (ours are called top.htm and bottom.htm) because a single <FRAMESET>...</FRAMESET> tag can only divide the page into a number of rows or columns -- not both. While you can nest FRAMESET tags within each other, this can unnecessarily complicate the HTML source.
The first document (top.htm) divides the page into two rows and fixes the top row at a height of 20 percent of the window height and the bottom row at the remaining 80 percent. The second (bottom.htm) document splits the second or bottom row into two columns, this time making the left column 150 pixels wide and the second the width of the remainder of the window (see box for details of how widths and heights can be specified).
Your choice of whether you use pixels or percentages or a combination is a balance between the demands of your information and graphics and what you know or can guess about your user's screen size. If you use pixels you get better control of the size of each frame, but if the user's screen is smaller than the total pixel width, they'll have to scroll to view your page. On the other hand, if you use percentages you can't always be sure exactly how large the frames will be on the page and whether they'll be big enough to view without scrolling. In our case we made an arbitrary choice so you can see how each will work in practice. Change the size of your browser window and see how the width of the left column, which is a fixed number of pixels wide, will never alter while all the other frames alter in width and height.

Figure 3: Document top.htm creates the two rows and document bottom.htm divides the second row into two columns.
In the document top.htm the <FRAME SRC = "logo.htm"> tag loads the document logo.htm into the first frame on the page and the tag <FRAME SRC = "bottom.htm"> loads the document bottom.htm into the second frame. In the file bottom.htm the file pgindex.htm and pgdata.htm are then loaded into the left and right frames respectively.
If you only create top.htm and bottom.htm and then load the file top.htm into your browser using File, Open you will encounter errors when the files logo.htm, pgindex.htm and pgdata.htm are not found. Create the files if you wish and eliminate these errors -- the source for each is in HTML Source Box 2.
So far, so good. The problems will begin when you want to load another document into one of the frames. If you include the usual <A HREF> tag, the document will be loaded in the current frame which may not be the one you want it loaded into. However, there are a number of options controlled by the value of the TARGET attribute in the <A HREF> tag which allow you to specify which frame to load your document into:
TARGET = _top: Replaces the whole window with the new page thus eliminating the frames you have created.
TARGET = _self: Places the document in the current frame. This is the default setting if the TARGET attribute is omitted.
TARGET = _parent: Replaces the document that set up the current frame (its parent frame) with the new document. In our example this would replace top.htm or bottom.htm depending on which frame was current.
TARGET = _blank: Opens a new copy of the browser to display the page.
TARGET = framename: Opens the document in the named frame. You name frames using the NAME attribute in the <FRAME>...</FRAME> tag.
Where you are using frames to create an indexed site such as our example, you'll find that the TARGET = framename is the most commonly used attribute value. To test this, create the documents from HTML Source Box 2 which give you two levels of index and a few simple sample documents using some of these options. Place all the documents in the one directory and load the document top.htm into your Web browser using File, Open.
To see how the TARGET attribute works, select No Frames from the page and notice how the TARGET = _top attribute works to open a document in place of the top-most document, effectively removing the frames altogether. Select Frames from this document to return to the frames version. Now test the More option to see how the second index replaces the first in the current frame when no TARGET attribute is used. Finally select Page 2 to see how, when a framename is used with the TARGET attribute, we can specify a frame for display of the document. The second column is named "data" in the document bottom.htm with the NAME = "data" attribute in the <FRAME> tag.
![]()
The <FRAMESET>...</FRAMESET> tags create the frame definition. You include in the <FRAMESET> tag either the ROWS or COLS option together with values specifying the size of each.
The <FRAME> tag allows you to place a document in a frame. It has a number of attributes:
SRC: Allows you to specify an html document to be displayed in a frame.
NAME: Allows you to name the frame so you can load other documents into it at a later stage by referencing this name.
NORESIZE: Prohibits the user from changing the frame's size.
FRAMEBORDERS: Allows you to choose to display borders or not using the values Yes (borders displayed) or No (borders not displayed). This is an IE3 compliant attribute and is not recognised by Netscape 3 -- this is not so unusual when you recall that frames themselves are not HTML 3.2 compliant.
SCROLLING: Which provides scrollbars for the frame. This attribute can take the value of Yes (scrollbars on), No (scrollbars off) or Auto (scrollbars as required).
The <NOFRAMES>...</NOFRAMES> tags allow you to display text on those browsers that do not create support frames. As well as text you can include a link to a non-frames version of your page. These tags must appear inside the <FRAMESET>...</FRAMESET> tags and are ignored by frames-aware browsers. We've used this option in the top.htm document.
![]()
So, there you have it. You can now create frames for your Web site and you know a little of why this could make your site easier to navigate or incur the wrath of your users. Now its up to you to decide whether you use them or not.
If you're interested in what the gurus of Web design think about them, have a look at one of these books:
* Creating Killer Web Sites, The Art of Third-Generation Site Design, by David Siegel, Hayden Books.
* Web Concept & Design, A Comprehensive Guide For Creating Effective Web Sites, by Crystal Waters, New Riders.
![]()

Top of page
|What's New | Software | Net Guides | Web Workshop | Net Sites | About PC User |
All text © 1997 Australian Consolidated Press - PC User Magazine