|
|||||
This month we look at using graphics on web pages -- in particular how to reconcile the trade off between looks and speed.
The key tag
The key tag
Adding graphics to your web page makes it visually more interesting although it will slow down the time it takes for your page to load. To add a graphic use the <IMG SRC="filename"> tag. This will result in your graphic appearing on the left of the page with any following text appearing to its right.
Aligning text and graphics
The ALIGN attribute allows you to align text at different positions around the graphic, figure 1 shows you some of the options. The VSPACE and HSPACE attributes (originally Netscape specific, but now adopted in HTML 3.2) allow you to set the number of pixels of spacing above and below and to the left and right of the graphic. For example the tag <IMG SRC="pcu_half.gif" ALIGN = TOP HSPACE = 20> will align any following text with the top of the graphic and include 20 pixels of space to the right and left of the graphic.
 The following are the tags for the four
images in this graphic (right):
The following are the tags for the four
images in this graphic (right):
<IMG SRC = "pcu_half.gif">This is a graphic called pcu_half.gif.<p><p>
<IMG SRC = "pcu_half.gif" ALIGN = TOP HSPACE = 20>Here the text has been aligned at the top of the graphic and extra horizontal spacing added.<p><p>
This text lines up<IMG SRC = "pcu_half.gif" ALIGN = middle> with the middle of the image and wraps to a new line too.<p><p>
<IMG SRC = "pcu_half.gif" ALIGN = right> This is a new HTML 3.2 extension which positions the graphic on the right of the screen and scrolls the text around it.
Wrapping text around graphics
In figure 1 you can see the ALIGN = right attribute being used with the IMG tag to 'float' the graphic on the right of the screen so that text following the image, or which is included in the paragraph containing the image, flows around the image. The ALIGN = left attribute has a similar effect floating the graphic on the left of the screen. These are, however, HTML 3 extensions and may not be supported by other browsers.
However, the only really effective way to control layout is to use a table which operates similarly to a frame in a DTP package or your word processor. Place the graphic in one cell and the text in one next to it. Tables are very flexible, and a table cell will usually automatically expand or contract around the size of its content, whether this is a graphic or text. So, in most instances, if you're using graphics and you want text to 'scroll' around them, a table is a better choice than using LEFT-align kludges.
 The graphics in the picture left are
placed in cells in a table, this is a workable abridged
form of the code used for this table:
The graphics in the picture left are
placed in cells in a table, this is a workable abridged
form of the code used for this table:
<TABLE>
<TR><TD><IMG SRC = "butfly1.gif"></TD><TD>Text for graphic one.</TD></TR>
<TR><TD>Text for graphic two.</TD><TD><IMG SRC = "butfly2.gif"></TD></TR>
<TR><TD><IMG SRC = "butfly3.gif"></TD><TD>Text for graphic three.</TD></TR>
</TABLE>
Notice that a table is created within a pair of <TABLE>...</TABLE > tags, each row of the table appears between a pair of <TR>...</TR> tags and each cell's text and graphics appears between a pair of <TD>...</TD> tags. Last month's column covered the use of tables in more depth.
Graphics as links
Apart from using a graphic for its own sake, you can also attach a graphic to a link and so provide a handy navigation tool. To do this you'll need to place the graphic tag inside the link tag. So this entered on our page would take us to the PC User home page when we click on the PC User graphic: <A HREF = "http://www.pcuser.com.au"><IMG SRC = "pcuser.gif"></A>
Using Alt
All this talk of graphics aside, your user may have opted not to load them. If this is the case and you've used graphics as a navigation tool, then they won't be able to navigate your page. Or, if you include graphics so that they can be downloaded, your user won't know what's there.
The solution is to use the ALT option inside your link tag, this provides the browser with text to display if images are not downloaded. You won't see the text if you download images but you will see it if you don't. This is also a courteous gesture to sight encumbered web users who surf the Net using text to speech devices.
Revamping our last example to provide text in place of the PC User graphic:
<A HREF = "http://www.pcuser.com.au"><IMG SRC = "pcuser.gif" ALT = "Go to PC User home page"></A>
![]() The picture left shows the result of
loading this code into a browser with image display
turned off.
The picture left shows the result of
loading this code into a browser with image display
turned off.
Recycling graphics
If you have used graphic elements on a page try to reuse the same graphic elsewhere on your site as much as possible. Most browsers cache graphics, so once a browser has downloaded a graphic file, a copy will be kept in its cache and it will load the image from your local computer, rather than the Internet when it is needed again. A typically recycled graphic element is a company logo or a navigation bar.
Sizing graphics
Sometimes what matters is not that your page actually loads fast but that it seems to load fast—your user's perception is often more important than what is actually happening. Specifying graphics sizes falls into the perception area. If you specify the size of your graphic image in your tag, Netscape will know how big your graphics are and how much room to leave for them. It will then display the text in your document leaving gaps where the graphics will appear. Your page won't necessarily load faster but your user at least has something to read while they are waiting.
Here's how we could speed up the display of a page containing this graphic by specifying its size using the WIDTH and HEIGHT tags:
<IMG SRC = "parrot.gif" ALT="A crimson parrot " WIDTH=200 HEIGHT=152>
The measurements are in pixels and you can find the size of any image by loading it into PaintShop Pro and reading the size information off the status bar in the bottom left corner of the screen.
You can also vary the size of a graphic using the WIDTH and HEIGHT attributes. One time you may choose to use this technique is where you are 'recycling' a graphic. To alter the size of a graphic, specify the new width and height, and, unless you want to deliberately distort your image, make sure these are calculated as a multiple of the image's original size. For example the PC User graphic in figure 1 is 134 x 40 pixels in size, this will render it double the size (and chunkier):
<IMG SRC = "pcuser.gif" WIDTH = 268 HEIGHT = 80>
Similarly, this will display it reduced by one half:
<IMG SRC = "pcuser.gif" WIDTH = 67 HEIGHT = 20>
Loading a small one first
Another solution to the problem of giving the user something to look at while a large image loads is to load a low resolution graphic first. This will be gradually replaced by the higher resolution image. Using the WIDTH and HEIGHT attributes you can scale up the smaller, low resolution graphic to the size of your high resolution one.
Here is the example from this month's web page:
<IMG SRC="parrot.gif" LOWSRC="parrot_s.gif" ALT="A crimson parrot " WIDTH=200 HEIGHT=152>
Our file parrot_s.gif is a small 3 Kb thumbnail graphic and parrot.gif is the full sized 22Kb file. The result is that the smaller sized image loads very quickly and even though it is only 50 x 38 in size, because we have given the dimensions of the larger file, Netscape will stretch our small file over the 200 x 152 display area. Notice that the relationship between the height and width of the two graphics, their aspect ratios, are the same so the smaller one will scale up in proportion.
The result is a dynamically changing display with the abstract parrot_s.gif appearing quickly and then being replaced by the fully detailed parrot.gif. Beware, though, that this is a Netscape extension and not incorporated into HTML 3.2, so not all browsers will support it. Because of this, some web designers are achieving a similar effect using animated GIFs.
File types
There are essentially two graphics file formats suitable for use on the Web and which are supported by most browsers; GIF and JPEG.
JPEG is a lossy file format meaning that the decompressed image isn't exactly the same as the one you started with. However, it does store full 24 bit per pixel color data (16 million colors) instead of GIF's 8 bit per pixel (256 colors) and it is often quite difficult for the human eye to tell the difference between graphics reduced significantly in file size using this format.
JPEG is good at compressing photographic and richly detailed images (ie those using at least 256 colors) and the user can tweak the image quality setting to trade off file size (speed) against image quality.
By contrast GIF has a lossless compression scheme which preserves all details when a file is converted from another larger format such as .BMP, for example. (It actually uses the controversial LZW (Lempel-Ziv-Welch) compression algorithm which Unisys claimed it had the patent for two years ago, causing much controversy.)
JPEG is the choice for storing large full-color or grey-scale images in particular, photos. However, for line art and simple graphics, GIF is the better format to use.
Borders
You can add a border to a graphic by specifying the BORDER attribute. For example a border setting of 0 means the graphic will have no border, whereas this will add a one pixel deep border around our parrot graphic:
<IMG SRC = "parrot.gif BORDER = 1>
Transparency
Transparency is something you probably won't notice when it's there but you will notice when it's not. You're sure to have come across pages displaying circular bullets with a grey square around them. This square, or edge, is simply the result of having to save files as rectangular objects even if they contain a circular image. However the unwanted edge can be eliminated by coloring it, specifying the color as transparent and saving it as a GIF89a format file.
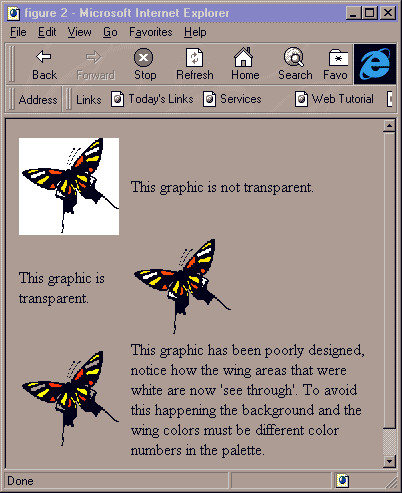
When this image is displayed in a browser those pixels
colored in the transparent color take on the color of the
background giving a transparent effect. You need to be
careful that none of the image that you want to display
is colored this color or 'holes' will appear in it. The
picture left shows the same graphic saved three ways: as
a GIF with no transparency information set, as a
transparent GIF and as a transparent GIF with a poor
choice of 'transparent' color.
PaintShop Pro allows you to save any file in a GIF89a format. With your file open in PaintShop Pro, click on the eye dropper tool and right click on the color you want to be the transparent color in your image (this sets it as the background color). Select File, Save As and in the List Files of Type: list box select the GIF - Compuserve option. From the File Sub-Format list select Version 89a - Interlaced or Version 89a - Noninterlaced (see below) and select the Options button. In the Options dialog box, select the Set the Transparency Value to the Background Color option and select OK. You can now name and save your file.
Interlaced
An interlaced GIF file is progressively drawn to the screen so that the viewer will first see a hazy version of the image which is then `filled in'. In contrast a noninterlaced graphic will display at full resolution and be drawn from the top down. Interestingly, although interlaced GIF files are slightly larger than noninterlaced GIFs, this is another case of the importance of user perception. An interlaced file "looks" as if it loads faster because the total picture space fills faster, albeit less clearly. Because a noninterlaced GIF draws line by line the user will have little feel for 'how much more' there is to come and it can appear to load more slowly. In practice however, an interlaced file will take longer to load fully than a non-interlaced file—so the trade-offs are ones of aesthetics rather than actual speed.
The GIF89a format supports interlacing (as well as transparency and animations) so it is a good format to use. If you have access to PaintShop Pro you have access to both the Interlaced and Noninterlaced GIF89a versions. In figure 4 we've caught a graphic screen half way through loading two GIF files, one interlaced and one non interlaced.
There is a progressive JPEG format which is similar to the interlaced GIF format in that the picture is drawn hazy and is progressively refined—many browsers now support this format.
Background graphics
In addition to placing graphics on your page you can also add a background graphic to your page. Your graphic doesn't have to be large, an image smaller than the browser's window will be tiled to fit, so you can use even a very small image. Be careful though, as you don't want your background image to overwhelm your page.
In last month's page we used a small 960 x 1 pixel, 16 color 1Kb GIF file called strip.gif. Your files can be any shape but always test them in your browser first to see how they look when tiled.
This is the tag we used in last month's page:
<BODY BACKGROUND = "strip.gif">
Of course, a simple colored background (or none at all) is a possibility you shouldn't ignore. It takes no time to load and can be very effective. Specify a colored background with a tag like this which sets a white background:
<BODY BGCOLOR = "#FFFFFF">
Horizontal lines
The <HR> tag provides a two pixel deep, shaded, horizontal line full width across the window. Using the WIDTH attribute you can set the width of your line to a percentage of the browser's viewing area or to a fixed number of pixels and using the SIZE attribute allows you to set its height in pixels.
You can turn off the shadow effect using NOSHADE and align the rule left, right or centre using the ALIGN attribute. This tag gives a centred, shadow free line, 5 pixels deep and 200 pixels in length:
<HR ALIGN = centre NOSHADE HEIGHT = 5 WIDTH = 200 >
References
For the main points of this article see Helen Bradley's graphics.htm page.
The Weblink ftp software site at http://www.acl.co.uk/weblink/ sftware.htm has a huge range of graphics and internet related information and you can download PaintShop Pro shareware version from here.

Top of page
|What's New | Software | Net Guides | Web Workshop | Net Sites | About PC User |
All text © 1997 Australian Consolidated Press - PC User Magazine