File Operations
This page deals with the file operations of Probe. They have been designed to provide maximal flexibility, but they're still easy to get started with, since they default to settings that are compatible to other file-managers.
File operations is the primary focus of Probe. Several concepts interact to provide flexibility and power in setting up, verifying, executing and logging file operations. They are:
File operations can be of two complexity types:
File operations of the complex type are always executed in a separate thread. This means that when the operation has been started, the Probe main window is still responsive. You can keep browsing folders while file transfer jobs are processed in the background.
Keyboard versus Mouse Operation
A file operation is typically invoked using either the mouse or the keyboard. The mouse may be more intuitive to start with. Also, when transferring files between Probe and some other application, in either direction, the mouse (or the clipboard) is the only choice.
There are a few advantages to using keyboard accelerators to start file operations:
For point 1 above, it can be noted that when dragging and dropping files using the right mouse button, there's an explicit choice of which operation to invoke when dropping. Also, Probe have alternatives for bringing up the File Operation dialog (fig 1) when dropping files, providing access to advanced file operation settings.
NOTE: The Settings pull-down menu, item 'Browsers', has an option to make Drag&Drop operations invoke the file operation dialog by default.
Fig 1: Using the right mouse button gives better control in Drag&Drop

The mouse based file operations of Probe are very similar to those used in the MS Windows desktop.
To move the cursor to an item, single click it. To edit the name of the item, click the name. Selecting items is done by drawing a rectangle around the items. File transfers are started by dragging either a single or a group of files with the left or the right mouse button.
Files can be copied and moved, shortcuts can be created, using Drag&Drop. Probe extends this concept by introducing a 'Jump!' step that can be used to navigate to a target folder while files actually are being dragged.
NOTE: A Drag&Drop operation can always be cancelled while in progress by keeping the mouse button used for dragging down, and clicking the other mouse button, or by pressing Esc on the keyboard.
Copy, move and shortcut creation can be carried out with the left mouse button. At drop-time, no confirmation is asked for before starting the operation. If no other key is pressed while dragging files, the operation defaults to:
Move The target folder (where files are dropped) is on the same drive as the source folder. Probe extends the concept of 'same drive' to 'same VDrive'. Copy The target folder is on a different drive than the source folder.
To force a certain file operation when using the left mouse button, the keyboard qualifiers Ctrl and Shift can be used when dropping the files:
Shift The operation defaults to a file move. Ctrl The operation defaults to a file copy. Ctrl + Shift The operation defaults to shortcut creation.
The mouse cursor indicates what operation is triggered by the drop:
The mouse cursor indicates file copy. The mouse cursor indicates file move. The mouse cursor indicates shortcut creation.
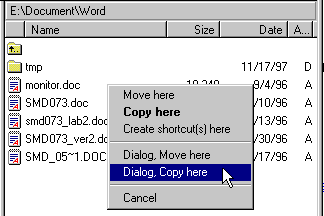
When dragging files using the right mouse button, a popup menu (fig 2) appears at drop-time. This gives an explicit choice of which operation to start, and a chance to cancel the operation.
Fig 2: Popup menu appearing when dropping with right mouse button.
The three topmost alternatives of the menu in fig 2 are equivalent to the Copy, Move and Create shortcut operations described in the section above.
"Dialog, Move here", "Dialog, Copy here", opens the Copy/Move dialog before starting the operation. This dialog gives access to Advanced File Operation Settings.
With Probe, browsing for a target folder while the Drag&Drop operation actually is in progress is possible. This allows for grabbing some files in one Folder Browser, jumping the same Folder Browser (or another) to some target directory and then dropping the files.
The 'jump' is triggered by holding the dragged files over some directory so that it's hi-lighted, and then pressing the spacebar to jump into that directory. In this way a target folder can be browsed for. It works in both Folder and Tree Browsers.
Fig 3: Opening a folder in the Tree Browser while dragging...
Fig 4: ...by pressing the spacebar
External Applications as Source/Target
Dragging files from Probe to other applications usually works fine. It depends on Probe and the other application knowing the same formats for shell data transfers.
Probe also accepts files dragged from other applications.
When transferring files from/to other applications, subfolder handling always defaults to 'treat as fully selected'.
Editing the Name of a File (F2, Ctrl-N)
To edit the name of a file using the mouse, make sure the cursor is located atop of the file, then single click the filename. The filename is turned into an edit control. Edit the name, then press Enter or click outside the filename to rename the file. Press Esc to regret the new name.
The name of a file can also be edited by either F2 or Ctrl-N.
Changing File Attributes of a File (Ctrl-B)
You edit the file attributes of a file in the same way as the name is edited. Make sure the cursor is on the file whose attributes are to be edited, then click the attributes with the left mouse button. Edit the name, then press Enter or click outside the attributes to change them. Press Esc to regret the attribute modification.
The file attributes can also be edited using Ctrl-B.
Basic File Operations Using the Keyboard
With basic file operations is meant Copying (F5), Moving (F6), Recycling (F8) and Deleting (Shift-F8) files. These operations all display the basic file operation dialog in fig 5.
From this dialog, the files included in the operation can be inspected, target space can be checked, a Log Window can be selected, subfolder handling and advanced settings can be manipulated.
Copy and Move operations started by F5/F6 requires two Folder Browsers to be attached to each other as companions. If they are, you can switch between the two by pressing TAB. A file operation started in one of the Folder Browsers will use the companion browser as target folder.
If they're not companions, you can make them so by using the ![]() button on the toolbar. When the mouse cursor changes, click on the Folder Browser to be made the companion.
button on the toolbar. When the mouse cursor changes, click on the Folder Browser to be made the companion.
The window caption of the dialog in fig 5 indicates a Copy operation. For a Move, Recycle or Delete operation, the window caption will change accordingly.
Click the various controls of fig 5 to jump to the associated help text.
Fig 5: The basic file operation dialog
The number of selected files and subfolders in the folder where the file operation is started from is displayed here. Contents of any subfolders are not counted here.
This control decides on how contents of selected subfolders of the source folder is to be handled during the file-transfer. Go to the Subfolder Handling section for more information on this.
Pressing this button will invoke the Selection Information dialog which provides detailed information on the selection as used by the file operation. The selected files can be browsed in a tree control.
This button allows for a Log Window to be selected for this particular file operation. This avoids mixing log information from several sources.
Progress information, notifications, warnings and error messages are always sent to a Log Window during file transfers in Probe. There's always at least one Log Window but it need not be visible.
If no Log Window is selected, the output goes to the default Log Window, whether visible or not.
Pressing this button brings up the File Clash Settings dialog. It allows for setting what default action to take when a name clash in the target folder occurs (an attempt is made to copy a file with identical name as one already existing).
When this happens Probe will stop to query on how to resolve the problem. When using Silent Mode file transfers, the default setting is automatically used.
Clicking this button opens the Advanced Settings half of this dialog. Further options relating to the file transfer are available here.
F5 copies selected files and folders from a source browser to a target browser.
F6 moves selected files and folders from a source browser to a target browser.
F8 or Delete sends the selected files and folders in the current browser to the recycle bin.
NOTE: Under the 'Settings' pull-down menu, item 'Browsers', there's an option 'Delete key defaults to...'. When this option is set, the Delete key will invoke file deletion instead of recycling.
Delete (Shift-F8, Shift-Delete)
Shift-F8 or Shift-Delete deletes the selected files and folders from the particular storage device. After doing this, the information deleted cannot be restored, and disk space is released.
Advanced Settings for Basic File Operations
Further settings for file operations are available when opening the advanced section of the basic file operation dialog. Fig 6 is the rightmost part of the dialog in fig 5, after the advanced section has been opened.
Click the controls of fig 6 to jump to associated help text.
Fig 6: The advanced settings of the basic file operation dialog
When attempting to move or delete a file which has any of the file attributes R(=ReadOnly), H(=Hidden), S(=System), Probe usually will query if the operation should be completed. You can disable this by clearing these three check boxes.
Silent mode means that Probe suppresses all dialogs that are shown when problems occur during a file operation. Instead default actions are taken. This means that file transfers can happen without user interference in case of any problems. The Log Window can be used to check for any problems during or after a silent file transfer.
The silent mode is intended for file transfers that progress without an operator being present at all times. Before using silent transfers, settings for File Clash Handling and attribute alerts should be setup. The Log Window can be used to verify that the file transfer performed as expected, when a silent file operation has completed.
This check box is normally checked, meaning that file operations can happen at the same time as the main window of Probe is used for browsing.
To disable this threaded operation, clear this check box.
With this setting, all files in the source are copied to a single destination folder regardless of how the files are organized in the source folder and its subfolders.
When doing file operations that includes both individually selected files inside a compressed archive, and files above this archive in the folder hierarchy, there's a choice of how to implement the target folder:
- VDrive in source becomes folder in target. The compressed archive will be re-created as an ordinary subfolder in the target.
- VDrive in source becomes VDrive in target. The compressed archive will be re-created as a compressed archive of the same type in the target.
For these options to be enabled, subfolder handling must be set to either 'Recursive selections' or 'Recursive filters'. In addition, the option 'Use selections/filters in VDrives must be checked.
A file clash refers to an attempt to create a file whose name is already in use in the target folder. Through comparing the existing file with the clashing file, Probe can handle this in a number of ways:
When the file clash happens, Probe brings up a dialog to resolve the situation. When silent file transfers are used (Probe don't display dialogs during silent transfers), default file clash settings are used instead. The dialog for file clash settings (fig 7) is available from the basic File Operation Dialog, through the button 'File Clash Settings'.
The file clash setting is quite useful in for example backup operations. It gives detailed control of what action to take when a filename with identical name already exists in the target folder. Using silent mode file transfers and file clash settings, backup operations can be automated.
Click the various controls of fig 7 to jump to their associated help text.
Fig 7: The File Clash Settings dialog:
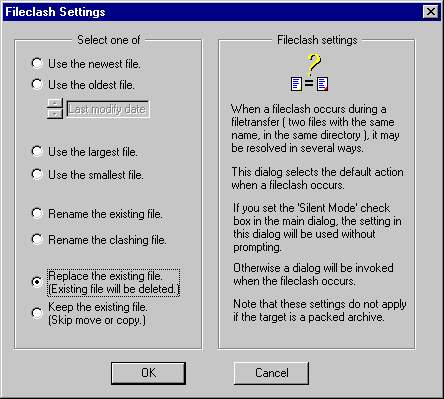
After comparing the dates (Creation/Modified/Accessed) of the existing and clashing files, Probe will keep the newest file.
After comparing the dates (Creation/Modified/Accessed) of the existing and clashing files, Probe will keep the oldest file.
Under MS Windows file systems, three types of dates are associated with each file:
- Creation date
- Last modify date
- Last access date
This setting decides which type of date to use in the date comparison.
NOTE: In compressed or FTP storage, only a single date type is available.
Probe compares the size of the clashing file with that of the existing file, and then keeps the largest of them.
Use the smallest file
Probe compares the size of the clashing file with that of the existing file, and then keeps the smallest of them.
When a file clash occurs, Probe defaults to renaming the existing file. Since this requires user interaction, the option is not available with silent file transfers.
When a file clash occurs, Probe defaults to renaming the clashing file. Since this requires user interaction, the option is not available with silent file transfers.
When using this option, Probe will delete the existing file and replace it with the clashing file. Using normal file transfers (not silent) Probe will confirm this with the user before deleting the file.
When using this option, Probe keeps the existing file and skips copying/moving the clashing file. Using normal file transfers (non-silent) Probe will query before skipping the file.
The File Operation Progress Dialog
The file operation progress dialog gives detailed information on the progress of a file operation in progress. When this dialog i minimized to the taskbar (fig 8), you can still monitor the progress by checking the percentage complete.
Fig 8: The progress dialog (middle), minimized at the taskbar
![]()
Click the controls of fig 9 to go to associated help text.
Fig 9: The file operation progress dialog
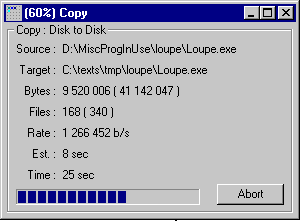
This shows the source and target file being handled presently.
This count how many bytes are left to handle. In the parenthesis, the total size of the file transfer is shown.
This indicates how many files are left to do. In the parenthesis, the total number of files in the file operation is shown.
This is the measured average rate so far in the file transfer.
This is a rough estimate of remaining time for the file operation.
This indicates how much time has elapsed since the file transfer started.
The progress bar shows an estimate of how much has completed of the file operation.
Pressing this button will query if the file operations should be aborted.
Ordinary disk folders, packed archives, remote connections,
etc, are all regarded as different types of folders in Probe. The new folder dialog is
invoked by the F7 keyboard accelerator. It can also be invoked using the
corresponding ![]() button on the
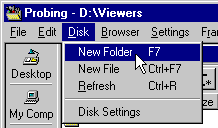
toolbar, or by using the storage specific menu of fig 10.
button on the
toolbar, or by using the storage specific menu of fig 10.
Fig 10: The storage specific menu, New Folder item
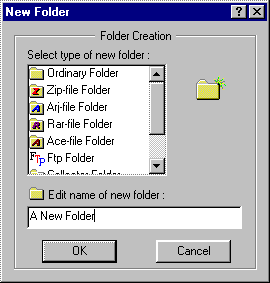
The New Folder dialog is shown in fig 11. Creating a new folder is a two stage process:
If an ordinary disk folder is created, stage 1 above can be ignored since this dialog defaults to ordinary disk folders. After creating the new folder, the Folder Browser will move the cursor to the new folder.
For information on compressed archives, remote sites and collector folder types, go to the Storage Specific section.
Fig 11: The New Folder Dialog
New empty files are created using the Ctrl-F7
keyboard accelerator. It can also be invoked using the corresponding ![]() button on the toolbar, or by using the storage specific menu of fig 10.
button on the toolbar, or by using the storage specific menu of fig 10.
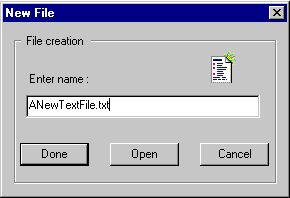
The New File dialog is displayed in fig 12. A new empty file is created as:
NOTE: The type of the file is determined by the filename extension. To create a file of a given type, the filename, in the edit box, must have that extension.
Fig 12: The New File dialog
To view/edit a file as text, press F4. This opens the file in Notepad by default.
To direct the F4 function to another text editor, use the 'Paths' alternative under the pull-down menu 'Settings'. Then press the button 'Browse for editor'.
The selection information dialog is invoked by the F9 keyboard accelerator. It displays summary information on currently selected files as viewed from the active browser. Detailed information on this dialog can be found at the Selection Information Dialog section.
This dialog is a valuable tool when carrying out file operations. It allows for verifying that exactly those files intended to be in the file operation actually are included. It also gives feedback on disk space used by the files in source folder and the potential destination folder.
This dialog can also be invoked from the basic file operation dialog, invoked by F5 (Copy), F6 (Move), F8 (Recycle) and Shift F8 (Delete), before starting the file operation.
Size of Directory Contents (Ctrl-F9)
This functionality enables finding out the sum of the sizes of all files and folders within a given subfolder. For more info, see the File Selection section, Size of Directory Contents.
Setting the Current Path (F10)
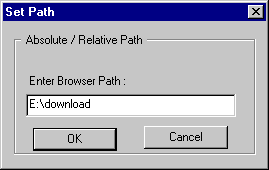
Probe supports navigating to a folder through typing the relative/absolute path of it:
Some examples of valid paths are:
| C:\Windows | A local drive relative path |
| ..\.. | Two folders up from the current folder |
| Desktop\My Computer | A desktop relative path |
| \\SomeComputer | The root of a computer in the local/private area network |
| \\Server\SharedDrive | A shared drive on a server computer |
| ~username | The home directory for a UNIX user |
Fig 13: The Path Dialog
Changing Attributes of Many Files (Shift-F3)
To change the file attributes for a number of files, do as follows:
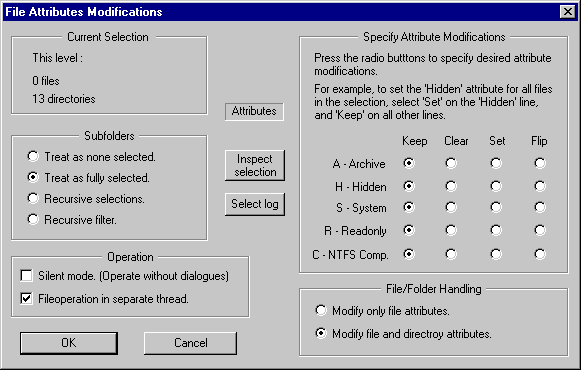
The dialog of fig 14 is very similar to the Basic File Operation Dialog regarding settings such as Subfolders, Operation etc. Two sections are unique to this dialog though:
Specify Attribute Modifications
This section edits how each attribute (A,H,S,R,C) is manipulated by the file operation. Each attribute for each file can be either kept / cleared / set / flipped.
File/Folder Handling
This setting decides whether only the attributes of files should be modified, or if the attributes of both files and folders should be manipulated, when subfolders are included in the selection.
Fig 14: The File Attributes Modifications Dialog
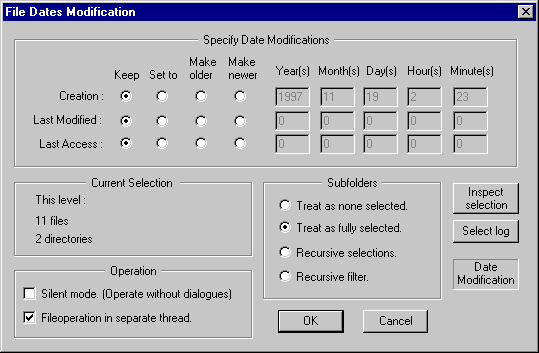
Changing File Dates of Many Files (Shift-F4)
NOTE: Modifying the dates of files may have consequences for backup programs and other applications.
To change the file dates for a number of files, do as follows:
The dialog of fig 15 is very similar to the Basic File Operation Dialog regarding settings such as Subfolders, Operation etc. One section is unique to this dialog though:
Specify Date Modifications
This section of the dialog specifies how the file dates of the selected files are to be modified. One or more of the three dates associated with a file can be modified:
- Creation Date
- Last Modified Date
- Last Access Date
Each such date can be:
- Kept (setting Keep)
- Set to an absolute date
- Made older (with a relative time offset)
- Made newer (with a relative time offset)
NOTE: The date of folders cannot not be modified.
Fig 15: The File Dates Modification Dialog
Invoking Custom Disk Commands on Many Files (Shift-F5)
NOTE: This command is only available in local/networked disks.
Probe allows for selecting a set of files, then invoking a custom DOS/CMD command onto each of the selected files. As an alternative, a single command for all files can be constructed.
This can be used to speed up repetitive command line work:
The custom disk command combines intuitive GUI selection with command line control. Invoking the custom command function is a three step process:
Detailed documentation on fig 16, and some examples are available below fig 16:
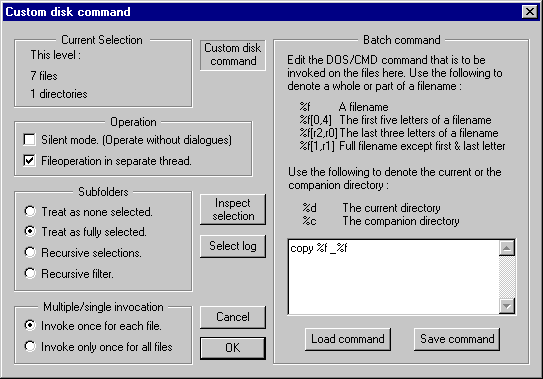
Fig 16: The Custom Disk Command Dialog
Details on Disk Custom Commands
The dialog of fig 16 is very similar to the Basic File Operation Dialog regarding settings such as Subfolders, Operation etc. Some sections are unique to this dialog though:
You edit a one or multiline command to be invoked here. Type the command as you would in the DOS/CMD prompt, but instead of using filenames, directory names, use symbols %f, %d, %c:
Symbol Expanded to in command %f One of the selected files (iterates through all) %d The directory the command was invoked from (source) %c The current directory of the companion browser Each of the symbols above can be modified to include only a range of the basic string, by appending a [begin,end] section according to:
Symbol Expanded to in command %f[0,4] The first five letters of a filename %f[r2,r0] The last three characters of a filename %f[1,r1] All but the first and the last characters of a filename In the table above, using only a number points that many characters into the string. Using r together with a number points that that many characters from the end of the string. These modifiers may be applied to the %c and %d symbols as well.
Extracting sub strings of filenames can be useful when renaming a selection of files.
This allows for loading a previously saved command into the command line edit box. (*.ccd file)
This will save the contents of the command line edit box to a (*.ccd) file.
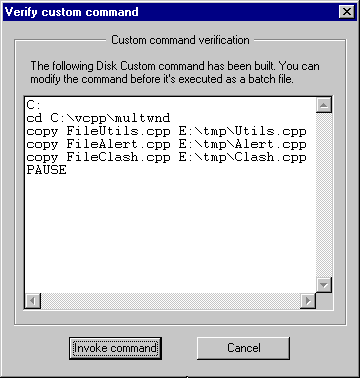
The custom command can be built in one of two ways:
- One command is built for each file in the selection. This case is used for example when renaming a set of files:
move file1.txt old_file1.txt
move file2.txt old_file2.txt
move file3.txt old_file3.txt
This example is invoked by commandline: move %f old_%f and selecting 'Invoke once for each file'.
- One command is built for all the files. This is the case when putting multiple filenames onto a single command line:
arj.exe a file.arj file1.txt file2.txt file3.txt
This example is invoked by command line: arj.exe a file.arj %f and selecting 'Invoke only once for all files'.
To rename a set of selected files
- filename1 -> filename1.old
- filename2 -> filename2.old
- ...
use the command line
- move %f %f.old
and the option 'Invoke once for each file'.
To apply the transform bmp2gif.exe onto selected image (*bmp) files, use the command line:
- bmp2gif.exe %f
and the option 'Invoke once for each file'.
NOTE: 'bmp2gif.exe' is not a DOS/CMD nor a Probe utility. It can be found through FTP though.
To copy selected files to the companion browser, removing the first four letters of filenames:
- mt16CmdCtrl.cpp -> CmdCtrl.cpp
- mt16Engine.c -> Engine.c
- mt16Doc.txt -> Doc.txt
- ...
use the command line:
- copy %f %c\%f[4,r0]
and the option 'Invoke once for each file'.
To compress selected files to a single ARJ archive, use the command line:
- arj.exe a MyArchive.arj %f
and the option 'Invoke once only for all files'.
NOTE: Compressing files to an ARJ archive is normally done using the Alt-F7 functionality.
DOS/CMD prompts cannot be used in networked (UNC) paths (paths such as \\SomeServer\SomeDrive\...). But Disk Custom Commands can actually be invoked on files within such paths, by prefixing the filenames with their full paths.
To prefix the names of a set of files with an '_', in such a networked path, use the command line:
- move %d\%f %d\_%f
and the option 'Invoke once for each file'.
Fig 17: Inspecting and modifying command before execution
Selection algebra is a method to relate selected files and folders in one subfolder with those of another subfolder. It can be used to track similarities and differences of two directories, or to uncover modifications of a certain folder structure during a given time period. For more information, go to the Selection Algebra section of the File Selection page.
Creating Directory Listings (Shift-F7)
A directory text listing is a text file containing a list of all selected files and folders within a given subfolder structure in the storage tree. This functionality is available in all sorts of storage: local, compressed, remote and also in file collectors.
As an example, this is a directory listing created from within an FTP subfolder of Probe with the Shift F7 function:
| Selected files in:
C:\ftp\sigma.ftp\auto/bart/v4/d94/asn 11/26/96 DRWXR_XR_X [matlab] 11/27/96 DRWXR_XR_X [smd023] Contents of: C:\ftp\sigma.ftp\auto/bart/v4/d94/asn\matlab 365 b 11/18/96 _RW_R__R__ dbplot.m 301 b 11/17/96 _RW_R__R__ lpw.m 386 b 11/17/96 _RW_R__R__ nwplot.m Contents of: C:\ftp\sigma.ftp\auto/bart/v4/d94/asn\smd023 11/28/96 DRWXR_XR_X [lab1] 12/2/96 DRWXR_XR_X [lab2] Contents of: C:\ftp\sigma.ftp\auto/bart/v4/d94/asn\smd023\lab1 2,33 kb 11/28/96 _RW_R__R__ Calcengine.class 1,41 kb 11/28/96 _RW_R__R__ Calcstack.class 669 b 11/28/96 _RW_R__R__ Calctoken.class Contents of: C:\ftp\sigma.ftp\auto/bart/v4/d94/asn\smd023\lab2 3,19 kb 11/28/96 _RW_R__R__ Calcdisplay.class 2,69 kb 11/28/96 _RW_R__R__ Calcengine.class |
NOTE: The attributes listed are UNIX attributes. On a Windows machine this field would contain FAT/NTFS file attributes.
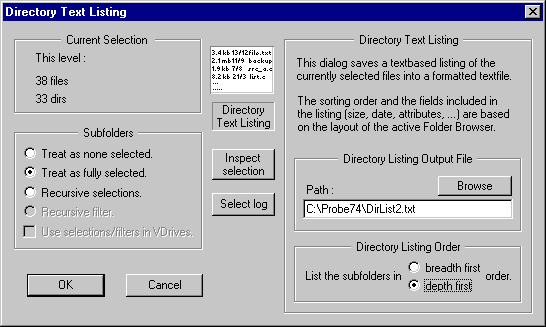
You invoke the function from a Folder Browser, by pressing Shift-F7. A dialog as in fig 18 appears. The dialog of fig 18 is very similar to the Basic File Operation Dialog regarding controls such as Subfolders, Inspect Selection etc. A few items of this dialog are unique though:
After Probe has generated a text listing of all selected files, this listing is saved to a file using the path in this edit box.
A folder structure is a type of a tree. Trees can be traversed in two different ways, either 'breadth first' or 'depth first'. In the first case, all items located at a certain depth of the storage tree are listed before all items at a deeper level. Using 'depth first', the text listing will finish listing a complete subfolder branch before starting to list the next subfolder at the top level.
Fig 18: The Directory Text Listing dialog
Extracting Compressed Archives (Alt-F9)
Compressed archives such as ZIP, ARJ, RAR, TAR, ...etc, are expanded to a target folder using the Alt-F9 function, or by selecting 'Extract Archive' from the file popup menu of a compressed archive.
Go to Compressed Archives for more information on this.
Realizing Compressed Archives (Alt-F10)
In order to access the contents of compressed archives, they need not be expanded, they may be realized instead.
Realizing archives means Probe extracting and managing temporary files automatically. After realizing an archive, programs may be run from within them.
To realize a compressed archive:
Go to Compressed Archives for more information on this.
Below are some hints and fixes to some common problems.
Deleting Files Instead of Recycling
If you'd rather delete files by default than sending them to the recycle bin, there's a setting to achieve this:
- Under the main window menu 'Settings', select 'Browsers'.
- Check the 'Delete key defaults to file deletion...' option.
Now the Delete key will delete files. The F8 key still recycles them.
Disable Editing Name by Mouse Click
Filenames can be edited by single clicking them. You can disable this through:
- Under the main window menu 'Settings', select 'Browsers'.
- Check the 'Don't edit filename by...' option.
To get started using keyboard accelerators for file operations, the Function Bar (fig 19) can be of help. Most file operations are mapped to accelerators using the function keys (F1..F10).
The Function Bar provides the following:
- It displays the available function keys for the current combination of Ctrl, Shift and Alt qualifiers.
- File operations can be invoked by pressing the buttons of the Function Bar.
- Popup help tips are displayed when holding the mouse over the button.
- All keyboard accelerators for the current combination of Ctrl, Shift and Alt qualifiers are available through the Accelerator Guide (
).
Fig 19: The Function Bar
Next: File Search
Back: File Filters