File Search
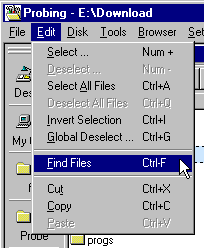
The File Search Dialog of Probe is a versatile tool for searching any of the storage types browsable with Probe. It is invoked from the Edit Menu (item Find Files) or by keyboard accelerator Ctrl-F.
Searching for Files using Probe
Using Probe, searching files within local disks, compressed archives, the local/private area network and remote connection, is done using the File Search Dialog of Probe (Ctrl-F).
A set of search criterions is similar to a selection criterion. It must contain at least one of the following items:
The difference between a search criterion and a selection criterion is that for the search criterion, a file contents criterion can also be used. This adds the sort of functionality available through UNIX 'grep' style command line utilities.
The File Search Dialog allows for searching a single folder, searching a folder structure recursively, and also for searching a selected subset of all subfolders recursively. Furthermore, it is easy to specify, for example, a set of compressed archives, or a set of FTP connections to be searched.
File search take place in separate threads, leaving the Probe user interface responsive. This also allows for having several search processes in progress at once.
Finally, Probe allows for presenting the output from the search process in two different ways:
Once the search has been performed, the found files may be selected in Probe to be part of a file operation, or the search results may be saved for later use, through the concept of file collectors.
The File Search Dialog (Ctrl-F)
The File Search Dialog is invoked by either selecting the Find Files item, see fig 1, in the Edit menu, or by pressing the keyboard accelerator Ctrl-F.
Fig 1: The Find Files item

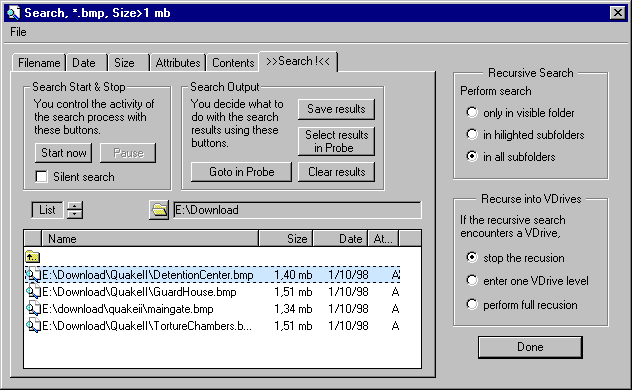
Fig 2 shows the File Search Dialog. It contains six tabbed dialog pages (Filename, Date, ..., Search). The leftmost five of them, up to and including Contents, are used to specify a set of search criterions. The sixth tab, Search, is used to start the search, control it's progress, and to view and access the search results.
NOTE: Not all five tabbed dialog pages for the search criterion must be used. It it is sufficient to use only a single search criterion, such as filename, file size or file contents.
NOTE: A short presentation of the active search criterion is available in the caption bar of the dialog.
Click the controls of the dialog in fig 2 to jump to their associated help texts.
Fig 2: The File Search dialog

Filename, File Size, File Date, File Attributes Tabs
These tabbed dialog pages function as described under the Advanced File Selection dialog section.
This tabbed dialog (fig 3) allows for specifying a file contents criterion to be matched in the search. The criterion may be one of:
- A plain string. To search for files containing the word Generator:
- Check the topmost radio-button (Only files containing a certain plain string)
- Enter the word Generator in the edit-box.
- A text wildcard (regular expression). To search for a line of text containing a word such as electricity or electrical, and the word generator:
- Check the second radio-button from the top (Only files that have a line ... a wildcard)
- Enter the word electri*generator in the edit-box.
- A hexadecimal sequence. To search for an occurrence of the sequence 0xBF37AC40:
- Check the third radio-button from the top (Only files ... binary hex sequence)
- Enter the hexadecimal number BF37AC40.
NOTE: When specifying a contents criterion, and some other criterion such as a filename, the contents criterion will be tested last of all criterions, since it is the slowest one to evaluate.
Fig 3: The File Contents Tab
The caption bar recapitulates the current search criterion. An example is seen in fig 4.
Fig 4: The Caption Bar displaying the search criterion
The search criterion is abbreviated according to:
Criterion Example Filename criterion *.doc,*.txt,*.pdf Date criterion Date>5/23/98 Size criterion Size>500 kb Attribute criterion Attrib +R Contents criterion {STR: generator} or {WC: electri*generator} or {HEX: BF37AC40}
The File menu lets you save, load, and clear file search criterions.
Fig 5: The File Menu
The search tab is activated after a file search criterion has been edited, as described above. This tabbed dialog page is used for:
- Starting, stopping and pausing the search process.
- Browsing the output of the search process in one of
- Interaction with the Probe main window such as
Press this button to start the search. After doing so, the button changes to a Stop Now button, which can be pressed to abort a search in progress.
If you temporarily want to halt a search in progress, use this button. After pressing it, it turns into a Resume button.
This button will disable all dialogs that normally may occur during a search. They include:
- Notifications, Warnings and Error dialogs, in cases where some problems happens while opening or listing the contents of a folder.
- Cancel Dialogs for folders taking long time to open.
- Logon dialogs for remote connections and networked folders.
The idea is to let a lengthy search process proceed without manual assistance. The Log Window provides information on any problems occurring during the search.
NOTE: In Silent Search, in case of any problems occurring while opening a folder, the particular folder, and its subfolders, will not be searched. The search proceeds in the parent folder though.
By putting the cursor of the Result Browser on a certain file/folder and pressing the 'Go to in Probe' button, Probe will navigate a Folder Browser to the particular file/folder. This works with both List and Tree output modes.
The search results can be a saved to a File Collector. This enables browsing and accessing the search results at a later point.
Through this functionality, the selection state of all found items can be set/cleared/toggled. This makes it easy to apply a file operation onto all found items.
This will clear all items from the search result browser.
This sets the folder where the search starts in. It can be any folder browsable by Probe, such as a desktop folder, a local disk folder, an FTP connection, a packed archive, a computer available through the local/private area network.
NOTE: The Search Base Folder cannot be modified while a search is in progress.
This toggles how the results of the search is presented, see fig 6. In the List View mode, all items are presented as a single listing. In the Tree View mode, the folder structure of the found items, relative the search base folder can be browsed.
NOTE: The List or Tree mode should be selected before starting the search. If in List View mode and wanting to browse the results in Tree View mode, select Tree Mode, clear the current results and and restart the search.
Fig 6: The List View /Tree View selector
This area of the File Search dialog lets you browse the found items. Items are dynamically added to this browser while the the search is in progress. You can start accessing the search results as soon as the first item has been added, there is no need to wait for the search to complete before doing so.
The Search Result Browser can be in one of two modes, described below:
In this mode (fig 7), all search results are output to a single folder and therefore browsed as a flat listing. This list browser has the same functionality as the Folder Browsers of the Probe main window, so files are accessed the same way, meaning that Drag&Drop, file popup menus and the Windows clipboard can be used.
Fig 7: The Search Results Browser in List View
Putting the Search Results Browser in Tree Mode provides a better overview of which folders the search results are located in. This can be valuable in a recursive search, where the search results may be scattered in several deeply branching subfolders.
The Tree View browser does not provide the same rich UI as the List View browser though, meaning that Drag&Drop mechanisms, file context menus, and the Windows clipboard cannot be used from within it.
In order to access the contents from within the Tree View browser, one can temporarily go into List View, using the control of fig 6.
Fig 8: The Search Results Browser in Tree View
This control specifies whether only a single folder is to be searched, or if all subfolders are to be searched recursively.
With this setting, only the File Search Base Folder (see fig 9) is searched. The search process will not go into any of it's subfolders.
Fig 9: The File Search Base Folder (left)
This setting causes the search process to go into the Search Base Folder, and all selected subfolders of that folder. Within those folders in turn, the search process will enter all subfolders.
Example:
When pressing Ctrl-F in fig 10, and activating the 'In hi-lighted subfolders' setting, the following folders will be searched:
- C:\vcpp
- C:\vcpp\CabFci and all its subfolders
- C:\vcpp\common and all its subfolders
- C:\vcpp\download and all its subfolders
Fig 10: Preparing for searching hi-lighted subfolders
With this setting, the Search Base Folder, and all its subfolders are searched recursively.
As a recursive search process traverses subfolders, it may encounter storage type boundaries (VDrives, such as compressed archives, remote connections, ...etc). In that case the search process has a choice of either searching the contents of the VDrive, or ignoring the contents of the VDrive.
In some situations, when for example wanting to search multiple compressed archives, it can be handy to control what the search process does in such situations.
This is the default setting. When activated, and the search process encounters a VDrive, it will not search the contents of that VDrive.
This setting enables the search process to enter a VDrive. However, if within that VDrive, any nested VDrives are encountered, it will not go into those.
Example 1
In fig 11, when wanting to search the drives C:, D:, E: the settings:
- 'Enter one VDrive level'
- 'In hi-lighted subfolders'
should be activated.
The items C:, D:, E: are VDrives, since they are a different browsing space, relative the desktop relative shell structure.
Fig 11: Preparing to search three drives
Example 2
In fig 12, we want to search six compressed archives, but in the case when any of these archives contains a nested archive or remote connection, we don't want to search them.
The settings:
- 'Enter one VDrive level'
- 'In hi-lighted subfolders'
should be activated.
Fig 12: Preparing to search six archives
This setting will cause a search process to recursively go into all VDrives encountered, also nested VDrives. If, for example, a remote connection is encountered within a compressed archive, it will searched.
NOTE: This setting can potentially result in a very time-consuming file search process.
NOTE: Before activating this setting, it is good to be aware of which nested VDrives exist within the subfolders of the Search Base Folder.
Exit the search dialog using this button.
Next: Storage Specific
Back: File Operations