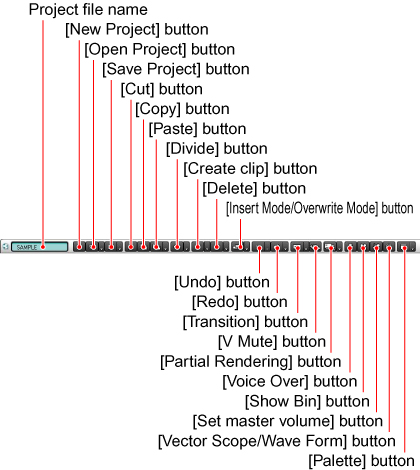
| Project file name | Shows the current project name. | ||
| [New Project] button | Shows the [Project Settings] dialog box to start creating a new project. If the [New Project] button is clicked when the current project has unsaved information, a message appears to ask whether to save the current project or not. | ||
| [Open Project] button | Shows Windows' [Open] dialog box to let you select a file you wish to open. If there is any clip whose original file is not found, the [Restore offline clip] dialog box appears . | ||
| [Save Project] button | Saves the project. You can select the following options
for saving from the list shown by clicking on the [ ]
button. ]
button. |
||
| Save Project | Saves the project. | ||
| Save As | Shows the [Save As] dialog box to let you specify the filename and saving location of the project file. | ||
| Project Settings | Shows a part of the [Project Settings] dialog box to let you change the settings under the [Preset] and [Setup] tabs before saving the project. | ||
| [Cut] button | Cuts a clip on a track. | ||
| [Copy] button | Copies a clip on a track. | ||
| [Paste] button | Pastes a clip to the position of the timeline cursor. You
can select paste options from the list shown by clicking on the []
button. |
||
| Cursor | Pastes a clip to the position of the timeline cursor. | ||
| In | Pastes to the In point of the selected clip. | ||
| Out | Pastes to the Out point of the selected clip. | ||
| Replace | Pastes the cut or copied clip by overwriting the currently selected clip. | ||
| Replace parts |
|
||
| Paste transition |
|
||
| [Divide] button | Divides the selected clip at the timeline cursor position.
You can select the following options for division from the list shown
by clicking on the [] button.
|
||
| Cursor |
|
||
| In/Out |
|
||
| [Create clip] button | Create title in current track | Create a title clip on the selected track. | |
| Create title in T1 track | Create a title clip on the track selected in the menu. | ||
| Create title in new title track | Create a title clip on new track. | ||
| You can create the following clips from the list shown by clicking on the [] button. | |||
| Color Bar | Shows the [Color Bar Setup] dialog box. The clip will be created at the timeline cursor position on the selected track. | ||
| Color Matte | Shows the [Color Matte Setup] dialog box). The clip will be created at the timeline cursor position on the selected track. | ||
| [Delete] button | Deletes the selected clip. You can select the following
options for deletion from the list shown by clicking on the []
button. |
||
| Delete | Deletes the selected clip. | ||
| Ripple delete | When a clip selected, shifts clips after the deleted clip to the left to fill the gap made by the deletion. At the same time, clips on other tracks are also shifted to the left. When a clip unselected, shifts clips to the left to fill the space. |
||
| Video | Deletes only the video part of the selected clip. | ||
| Audio Clip | Deletes only the audio part of the selected clip. | ||
| Transition |
|
||
| Mixer |
|
||
| Filter |
|
||
| Audio rubberband |
|
||
|
|||
| [Insert Mode/Overwrite Mode] button | The [Insert Mode/Overwrite Mode] button allows you to select whether to insert between or overwrite existing clips when you move a clip or place a new clip on a timeline clip. | ||
| Overwrite Mode | When you place a clip on another clip, the existing clip will be deleted. | ||
| Insert Mode | When you place a clip on another clip, the existing clip will be shifted backward. | ||
| Ripple Mode | If the Ripple mode has been enabled, when you move or delete a clip on a track, clips on other tracks will also be shifted forward along with the move/deletion of the clip. | ||
| [Undo] button | Undoes an executed operation. You can select operations
to undo from the list of operation history which is shown by clicking
the [] button. |
||
| [Redo] button | Redoes a canceled operation. You can select operations to
redo from the list of canceled operations which is shown by clicking the
[] button. |
||
| [Transition] button | Set the default transition between clips. You can select
the following options for specifying the transition position from the
list shown by clicking on the []
button. |
||
| Cursor | Sets a transition at the position of the timeline cursor on the selected clip. | ||
| In | Sets a transition at the In point on the selected clip. | ||
| Out | Sets a transition at the Out point on the selected clip. | ||
| [V Mute] button | Sets V mute based on the timeline cursor position. | ||
| Partial Rendering |
render In/Out |
|
|
| render non-realtime area | All | Renders red segment between thetimeline. | |
| Between In/Out | Rrenders red segment between the In and Out points on a timeline | ||
| Delete temporary files | Deletes rendered files saved for replay. | ||
| Render and add to timeline | You can render the range between the In and Out points on a timeline and save it as a file. You can position the saved file onto a timeline as a usual clip. | ||
| [Voice Over] button | Shows the [Voice Over] dialog box . | ||
| [Show Bin] button | Shows the Bin window . | ||
| [Set master volume] button | Shows the [Audio mixer] dialog box . | ||
| [Vector Scope/Wave Form] button | Shows the [Vector Scope] dialog box . | ||
| [Palette] button | Toggles between showing and hiding of palettes. You can
select palettes to display from the list shown by clicking the []
button |
||
| Effect palette | Displays [Effect] palette. | ||
| Information palette | Displays [Information] palette. | ||
| Marker palette | Displays [Marker] palette. | ||
| Show All Palettes | Displays all palettes. | ||
| Hide All palettes | Close all palettes. | ||
