Apache2 SSL on Windows |
I'm running Apache 2.0.x on Windows for Subversion and I needed to get SSL working so I could access my repository securely (e.g. with a "https" URL). This turned out to be a bit more difficult than I thought it would be. The Apache2 installer for Windows does not come with SSL, because that requires OpenSSL which is a completely different package. You can get a version containing it, but you won't get a fancy installer.
So ... this tutorial will show you how to manually install Apache2 with SSL support. I will show you how to create a self-signed certificate which is secure, but will cause web browsers to issue a warning, because it won't be from/signed-by a trusted Certificate Authority such as GeoTrust or Verisign.
So ... this tutorial will show you how to manually install Apache2 with SSL support. I will show you how to create a self-signed certificate which is secure, but will cause web browsers to issue a warning, because it won't be from/signed-by a trusted Certificate Authority such as GeoTrust or Verisign.
|
Attention Apache 2.2.x Users! Luke Holladay wrote up a doc on modifying these instructions for use with Apache 2.2.x. I haven't tried them myself and cannot answer questions about it; I'm still using Apache 2.0.x and the instructions on this page are targeted to that version which I sometimes refer to as Apache2 for short.
|
| ||
1. Install OpenSSL

OpenSSL is free, but the main site only distributes source code. They have a binary distributions page, but it only links to an installer made by Shining Light Productions. I haven't tried that, because I don't want any more crap in Add/Remove Programs.
Instead, I download the latest Openssl-version-Win32.zip from hunter, which is presently Openssl-0.9.8b-Win32.zip. It's about 1mb and is usually about the second link on the page. Don't get the links that say "Apache" in them just yet, be patient.
Unzip the file somewhere on your computer and copy all the libeay32.dll and ssleay32.dll to your Windows\System32 directory. If you've dealt with SSL at all before, especially as a developer, you might already have copies of these there. Keep whatever is newest.
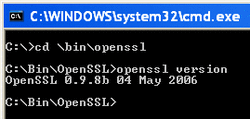
For a basic sanity check, open a command prompt and go to the directory where you unzipped OpenSSL. Run openssl version and it should report both the version of OpenSSL, matching what was embedded in the ZIP you downloaded, as well as when it was built. Generally the more recent, the better.
You'll also need an openssl.cnf which is an OpenSSL configuration file that, for some reason, doesn't come with Hunter's distribution. Download this one and save it to the folder where you unzipped OpenSSL.
You'll also need an openssl.cnf which is an OpenSSL configuration file that, for some reason, doesn't come with Hunter's distribution. Download this one and save it to the folder where you unzipped OpenSSL.
| openssl.cnf |
2. Create Self-Signed Certificate
Several files related to your your SSL certificate will be created in this section, so choose a common base name to use. In my examples I use "blarg", which I've italicised to show it should be replaced by your choice. In practice, I recommend extracting the essence from your domain name; for example, if I was creating a certificate for https://www.neilstuff.com/ then I'd use "neilstuff".
Open up a command prompt and go to the directory where you unzipped OpenSSL and run the following command to create a new certificate request:
Open up a command prompt and go to the directory where you unzipped OpenSSL and run the following command to create a new certificate request:
openssl req -config openssl.cnf -new -out blarg.csr -keyout blarg.pem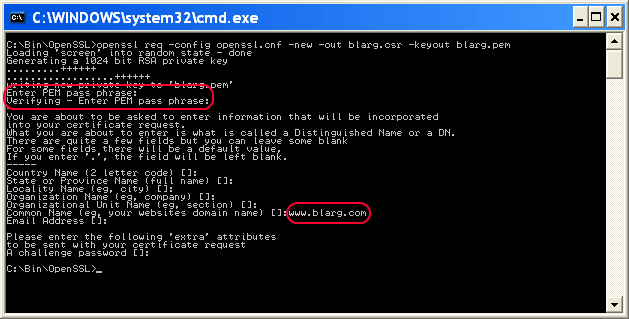
You'll be prompted to answer many questions, which ones depend on your openssl.cnf file; all except two of these can be left blank:
Now it's time to create a non-password protected key for Apache 2.0.X by executing the following:
- PEM pass phrase: Password associated with the private key (blarg.pem) you're generating. Since we'll be removing this for the benefit of Apache 2.0.X, I suggest using something like "none" or "password".
- Common Name: The fully-qualified domain name associated with this certificate. In my example, I use www.blarg.com which means I damn well better use that certificate onhttps://www.blarg.com/. For personal security, testing, or intranets it's okay for this to not quite match -- just be prepared to deal with warnings from web browsers and such.
Now it's time to create a non-password protected key for Apache 2.0.X by executing the following:
openssl rsa -in blarg.pem -out blarg.keyThe only thing you'll be asked is the password you had used. Your resulting KEY file is essential the same thing as the PEM, just not password protected.
Before we go on, delete the .rnd file. This contains entropy information which could be used by malicious people to try and crack your certificate later on (if they get a hold of it).
Finally, run the following command to create an X.509 certificate, e.g. the kind of certificate that SSL likes to munch:
openssl x509 -in blarg.csr -out blarg.cert -req -signkey blarg.key -days 365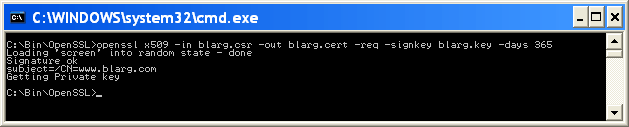
Congratulations, you've created a self-signed certificate! Keep the KEY and CERT files some place safe, we'll be using them soon.
3. Install Apache 2.0.X w/ mod_ssl.so
You can skip this section if you already have Apache 2 installed with mod_ssl.so.
Back to hunter to download the latest Apache2 binary distribution for Windows with SSL, which is presently Apache_2.0.59-Openssl_0.9.8b-Win32.zip. It's about 6.5mb and is usually about the third link on the page.
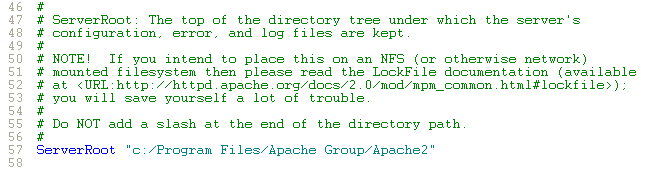
Create a folder for this such as C:\Program Files\Apache Group\Apache2 and unzip the contents there.
Open conf\httpd.conf in a text editor and ...
Change the line that says ServerRoot "c:/apache" to indicate the folder where you unzipped Apache2, i.e. ServerRoot "c:/Program Files/Apache Group/Apache2". The quotes are important, and remember to change all backslashes (\) to forward ones (/).
Back to hunter to download the latest Apache2 binary distribution for Windows with SSL, which is presently Apache_2.0.59-Openssl_0.9.8b-Win32.zip. It's about 6.5mb and is usually about the third link on the page.
Create a folder for this such as C:\Program Files\Apache Group\Apache2 and unzip the contents there.
Open conf\httpd.conf in a text editor and ...
Change the line that says ServerRoot "c:/apache" to indicate the folder where you unzipped Apache2, i.e. ServerRoot "c:/Program Files/Apache Group/Apache2". The quotes are important, and remember to change all backslashes (\) to forward ones (/).
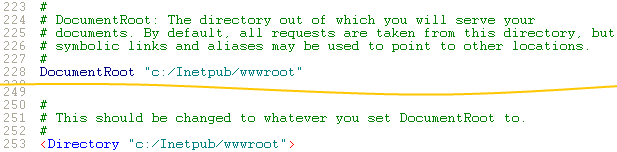
Replace both instances of "c:/apache/htdocs" with your web root path.
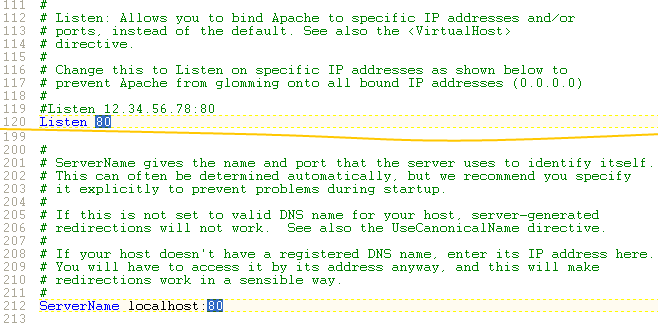
If you want to have Apache2 listen on a different port than 80 (the default), change the Listen and ServerName directives in conf\httpd.conf.
Open a command prompt, get to the bin directory (under the folder you created), and run the following command to install Apache2 as a service:
apache -k install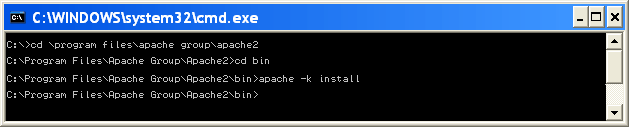
Anytime you wish to start Apache2, you can go to the same directory and run apache -k start. Restarting and stopping are much the same except you'll specify "restart" and "stop" after the "-k". It's also possible to just use the NET START and NET STOP commands you're probably familiar with; the name of the service for those commands will be "Apache2".
4. Enable SSL in Apache 2.0.X
Open up conf\httpd.conf in a text editor and look for the line LoadModule ssl_module modules/mod_ssl.so and remove any pound sign (#) characters preceding it. If you don't see that line where it probably should be (among the other LoadModule lines), then your installation may not have mod_ssl.so ... can't help you there!
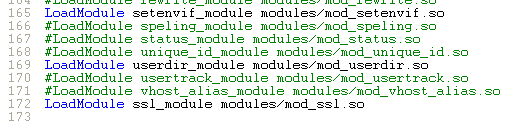
Also, while you're in conf\httpd.conf, make sure the following lines exist somewhere (they should if you got Apache2 from hunter):
	<IfModule mod_ssl.c>
	    Include conf/ssl.conf
	</IfModule>
Create a directory under conf called ssl and copy the blarg.key and blarg.cert files there; the ones you created in step 2.
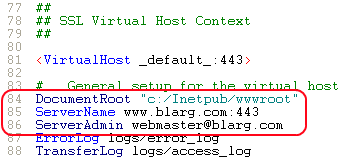
Crack open conf\ssl.conf in a text editor and ...
Crack open conf\ssl.conf in a text editor and ...
- Remove the <IfDefine SSL> and matching </IfDefine> lines.
- Correct the DocumentRoot, ServerName, and ServerAdmin lines as per your needs. If you want the https version of your site to point to the same web root, make DocumentRoot match the exact value in conf/httpd.conf. The other two values will be reported by your server to any HTTPS clients, so make sure they're valid if you're doing this for public consumption.
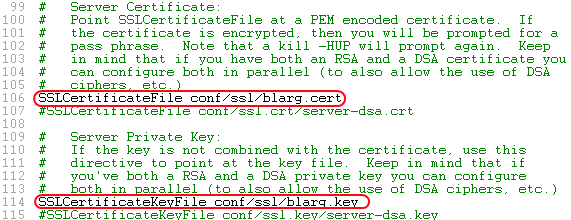
- Finally it's time to use your self-signed certificate! The lines you'll want to change are SSLCertificateFile andSSLCertificateKeyFile which should point to your CERT and KEY files respectively.
If IIS is installed, it will listen on port 443 (default for HTTPS) and drop any connections made to it. Apache2 doesn't appear to report a problem when it can't listen for SSL, so you might just see that weird dropped connection behavior. I recommend using a port besides 443 if you're running Apache2 side-by-side with IIS.
Restart the Apache2 service and voila! You got Apache2 running with SSL on Windows!
Restart the Apache2 service and voila! You got Apache2 running with SSL on Windows!
References
- Hunter (OpenSSL and Apache binaries).
- Apache 2 + SSL + Windows (thombsonbd.com).
- OpenSSL.
- Apache HTTP Server Project.
- Apache+SSL WIN32 HOWTO (openssl.cnf).
Legacy Info: http://www.neilstuff.com/apache/apache2-ssl-windows.htm (19,187 hits in 2013)