| cmu | Introduction | Download | Setup | Advanced Users | Sample Templates | Meeting Places |
| Home | User Manual | Installation | Requirements | Trouble Shooting | Tribe of the Challenged | Discussion Group |
| DIPS (Dynamic IP Server) - visit http://DIPS.home.ml.org/ to find out more... |
| Please Note: | I accepted a job with Credit Suisse Group (Group Risk Management) and will be moving back to Europe. Because of this relocation (first to Switzerland, then to the U.K.) I can only offer reduced support for DynamIP. Please try peer support in the DynamIP Discussion Group if you don't get a timely response to your e-mail inquiry. |
 Setup |
Setting up DynamIP is relatively easy. While you can fiddle around with most of the settings until DynamIP does exactly what you want it to do, it is probably a good idea to keep some of the default settings unless you are an experienced user... If you are a first-time user you should probably have a look at QuickSetup.
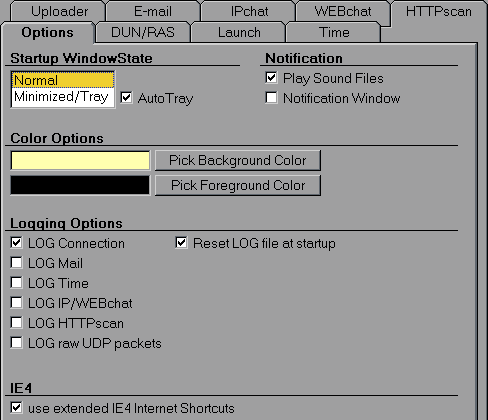
| Startup Window State | Normal DynamIP starts with a normal size window. DynamIP remembers the last position before it was shut down and will restore the main window in the same place. Minimized/Tray |
| AutoTray | If AutoTray is checked DynamIP will automatically start in the Tray (if Minimized/Tray is selected) and put itself into the Tray whenever the ONline event occurs (only if IPchat is off). Note that the AutoTray setting is ignored under Windows NT3.x because there is no tray. |
| Play Sound Files | DynamIP plays sound files when notification events occur (sound files must be defined in the appropriate location, e.g. IPchat). |
| Notification Window | DynamIP brings up a notification window when notification events occur. This is helpful if you don't have a sound card. |
| Background Color | Color used to paint the background of the main DynamIP window. Note that all the other color settings of DynamIP are taken from the registry; you can change them from the Control Panel [Icon Display]. |
| Foreground Color | Color of fonts in the main DynamIP window. Note that all the other color settings of DynamIP are taken from the registry; you can change them from the Control Panel [Icon Display]. |
| LOG Connection | If checked DynamIP will write all Connection activities to the log file |
| LOG Mail | If checked DynamIP will write all Mail activities to the log file. |
| LOG Time | If checked DynamIP will write all Time activities to the log file. |
| LOG IP/WEBchat | If checked DynamIP will write all chat activities to the log file. |
| LOG HTTPscan | If checked DynamIP will write all server scan activities to the log file. |
| LOG raw UDP Packets | If checked DynamIP will write all UDP packets that come in at the chat port to the log file. I use this mainly for debugging purposes... |
| Reset LOG file at Startup | If checked DynamIP will delete the log file each time you start DynamIP; this prevents your log file from filling up your harddrive... |
| IE4 Internet Shortcuts | If checked DynamIP will use the extended format for Internet Shortcuts (adds extra information like Accessed and Modified to Internet Shortcuts). Unless you have IE4 installed this setting won't matter. |
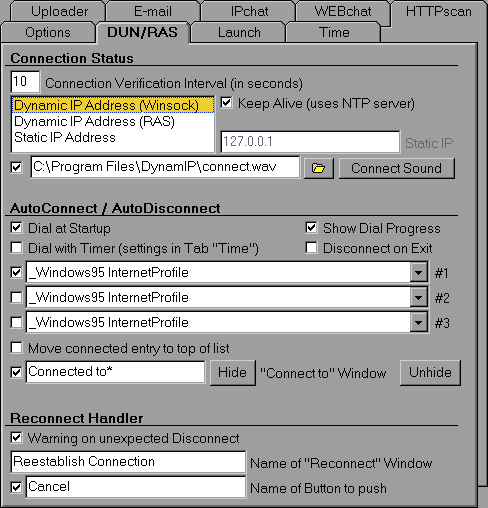
| Connection Verification Interval | Interval (in seconds) between consecutive connection checks. Obviously, the smaller this value, the faster DynamIP will be aware of lost or newly established connections (on the other hand, smaller values increase the load on your system). The value must be between 5 and 60. |
| Keep Alive | If Keep Alive is checked DynamIP will connect to the NTP server specified in the Time Tab roughly every 2 minutes (DynamIP won't set your PC clock, it will just connect to the NTP server in order to generate some traffic). This is useful if your ISP disconnects you unless there is some traffic. |
| IP Method | Choose one of the
following three methods:
|
| Static IP | Enter your static IP address here if you select the IP Method "Static IP Address"; this field is disabled/ignored otherwise. |
| Connect Sound | Check this box if you want DynamIP to play a sound file whenever the Connect Event occurs. You can choose any WAV file you like. Clicking on the button "Connect Sound" will play the sound so that you can test your settings. |
| Dial at Startup | Check this box if you want DynamIP to establish a RAS connection whenever you start DynamIP. |
| Show Dial Progress | Check this box if you want DynamIP to open up the progress window each time the RAS dialer gets activated (a side effect is that DynamIP becomes the active application). If this box is unchecked DynamIP will dial in the background. |
| Dial with Timer | Check this box if you want DynamIP to automatically connect/disconnect at certain times. Note that you must define the times to connect/disconnect in the tab Time. |
| Disconnect on Exit | Check this box if you want DynamIP to disconnect all your RAS connections whenever you exit DynamIP. |
| #1, #2, and #3 | Check the box to activate the
particular entry and then choose the Dial-Up connection
you want DynamIP to use when
establishing a RAS connection. If unchecked, DynamIP
will not use the particular entry even if it is a valid
one. With Win95 you can also choose "_Windows95 InternetProfile" which allows you to set your options from the Icon "Internet" in the Control Panel). If your ISP (= Internet Service Provider) has multiple phone numbers (or you have multiple ISPs) you can define a Dial-Up connection for each phone number (or ISP). This way DynamIP will behave as follows: it will first try to establish a connection using your first active entry, and if this fails, DynamIP will try your next active entry until a connection can be established. |
| Move connected entry to top of list | Check this box if you want DynamIP to automatically move the last connected entry to the top of the list. This way your "bad" connections will move to the bottom of the list and DynamIP won't waste time trying to establish a connection that won't go through anyway. |
| Hide "Connect to" Window | DynamIP can hide the annoying "Connected to ..." window. Simply check the box and enter the name of the window in the appropriate field (the name depends obviously on the language version of your Windows95; the US version requires an entry of Connected to* where the star "*" is a place holder for any sequence of characters...). |
| Warning on unexpected Disconnect | Check this box if you want DynamIP to issue a warning (sound notification) if your connection breaks unexpectedly. |
| Name of "Reconnect" Window | If a connection is lost unexpectedly, DynamIP can click a button for you so that the dialer kicks in or the "Reconnect" window gets properly closed. The default value is Reestablish Connection. You can use the star "*" as a placeholder for an arbitrary sequence of characters. |
| Name of Button to push | Check this option to
activate DynamIP's reconnection
handler. You can then select the button you want DynamIP
to click whenever a connection is lost and the
"Reconnect" window pops up. The default value
is Reconnect... which will cause DynamIP
to automatically redial and reestablish the connection.
You can use the star "*" as a placeholder for an arbitrary
sequence of characters. Use the ampersand "&" if the button has underlined characters
in its name (e.g. Connect would be specified as
&Connect). Important
Note: |
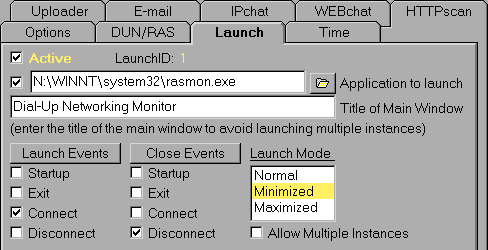
| Active | Check this box if you want to enable the program launcher. |
| Application to launch | Check this box if you
want to activate this particular entry (you can define up
to 5 applications and you can enable/disable them all
individually with this check box). You can either use the
file dialog button to select your application or simply
enter the path and name of it. The above screen shot
shows you how to launch "rasmon.exe" (the
Windows NT4 Dial-Up Networking Monitor). The following 2 methods are the most useful ones to launch an application:
|
| Title of Main Window | Enter the title of the main window of the application (as displayed when it is running). You can use the star "*" as a placeholder for an arbitrary sequence of characters. This information is absolutely needed for 2 purposes:
|
| Launch Events | DynamIP can launch applications on occurrence of any of the following events:
You can click on the button "Launch Events" to launch your application (e.g. to test your inputs). Note that you might have to click the button "Apply" first to save your changes to the INI file. |
| Close Events | DynamIP can close applications on occurrence of any of the following events: Startup, Exit, Connect, and Disconnect (see above for an explanation). Note that this functionality requires correct information in the field "Title of Main Window" to work properly. |
| Launch Mode | Choose the startup mode of your application. Note that not all applications support this feature, i.e. some applications start in normal mode regardless of this setting. |
| Allow Multiple Instances | Check this box if you want DynamIP to launch the application even if another instance is already active. Note that some applications do not support multiple instances, i.e. you will only have 1 copy of your application running at any time even if you check this box. |
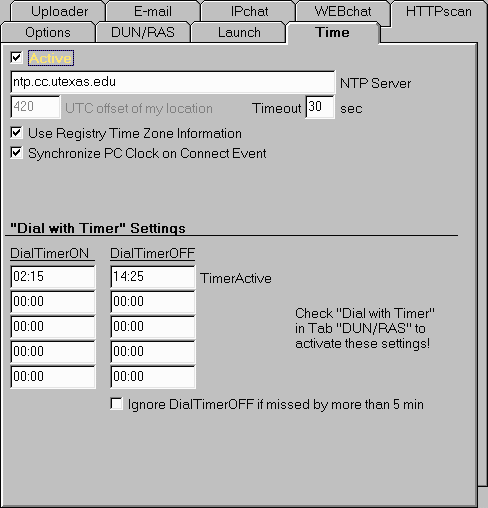
| Active | Check this box if you want to enable the PC Clock Synchronizer. |
| NTP Server | Name (or IP address) of an NTP server. DynamIP uses "ntp.cc.utexas.edu" as the default server, but that does obviously only make sense for users in the US (users in Europe might try "swisstime.ethz.ch"). Lists of public NTP servers are available at http://tycho.usno.navy.mil/clocks1.html and http://tycho.usno.navy.mil/clocks2.html. Please be considerate and use only those NTP servers that are "open access". |
| UTC offset of my location | The UTC offset is simply the time difference between UTC and your location (in minutes). For example, if your time zone is PDT (summer in Palo Alto!) then the correct entry is "420" (without the quotes). Unless you are on Windows NT3.x (the registry time zone setting does not work properly) you probably want to get the offset automatically from your registry (see option "Use Registry Time Zone Information"). |
| Timeout | DynamIP aborts the connecting process if the operation is not completed within the user-defined interval. |
| Use Registry Time Zone Information | Check this box if you want DynamIP to get the UTC offset directly from your registry (the manually entered offset in the field "UTC offset of my location" is then disregarded). This does no work with Windows NT3.x. |
| Synchronize PC Clock on Connect event. | Check this box if you want DynamIP to synchronize your PC clock with the NTP server as soon as a Internet connection is established. |
| Synchronize PC Clock on ONline event | Check this box if you want DynamIP to synchronize your PC clock with the NTP server whenever the ONline event occurs. |
| DialTimerON | Enter the time you want DynamIP to establish a connection automatically (note that you must check the box "Dial with Timer" in Tab DUN/RAS for this to work). All times are diplayed in 24 hour format. |
| DialTimerOFF | Enter the time you want DynamIP
to disconnect automatically (note that you must check the
box "Dial with Timer" in Tab DUN/RAS for this to work). All times are diplayed in 24
hour format (although you can enter them in any time
format).. The above screen shot
shows the following example: Important Note: |
| Ignore DialTimerOFF if missed by more than 5 min | Check this box if you
don't want DynamIP to
disconnect active connections unless the current time is
no more than 5 minutes past an active DialTimerOFF
setting. This is useful if you have "Dial with
Timer" in Tab DUN/RAS checked and
want to establish (or keep alive) a connection outside of
any of the intervals specified with DialTimerON and
DialTimerOFF. For example, assume DynamIP
is set to automatically connect at 2.15am and disconnect
at 2.25pm (DialTimerON = 02:15 and DialTimerOFF = 14:25).
If the box "Dial with Timer" in Tab DUN/RAS is checked, DynamIP would basically not allow
you to establish a connection at 3pm (DynamIP
would disconnect you automatically because 3pm is not
bracketed by 2.15am and 2.25pm. If you check the box
"Ignore DialTimerOFF if missed by more than 5
min", however, you would be able to establish a
connection at 3pm without DynamIP interfering. If this box is unchecked, DynamIP strictly enforces the settings of DialTimerON and DialTimerOFF. |
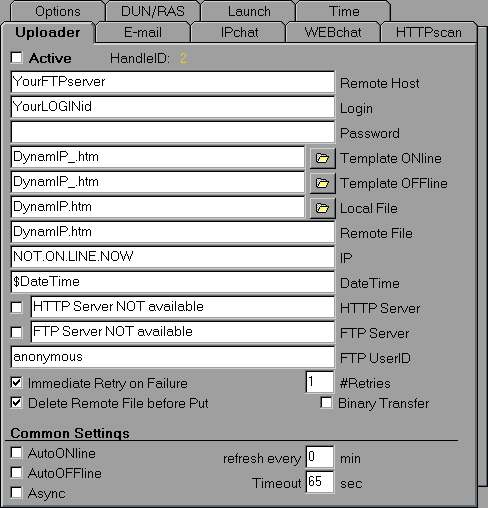
| Active | Check this box if you want to enable this particular connection. |
| Remote Host | Name (or IP address) of
your FTP server (e.g. ftp.alpha.edu). Do NOT put any
paths or directory names into this field (the remote path
must be specified together with the name of the remote
file). Tip: |
| Login | Your login id (for the FTP server). |
| Password | Your password (for the FTP server). Warning: although all passwords are encrypted before they get stored to the file DynamIP.INI you should be aware of the fact that the encryption algorithm is rather simple and won't hold up serious hackers for too long... |
| Template ONline | Path and file name of the
ONline template (the file containing place holders for IP
address, Date and Time, etc. that will be uploaded to the
server when you go ONline); this file is a read-only file
and DynamIP will never change
this file. The updated file will be stored as LocalFile.
Make sure that the template file name is different from
the local file name; DynamIP
does NOT work properly if these two file names are
identical! Tip: |
| Template OFFline | Usually the same as
Template ONline. However, if you want to upload a
different page when you go OFFline you can choose a
different template here. Tip: |
| Local File | Path and file name of the updated file (local copy). Make sure that the template file names are different from this local file name; DynamIP does NOT work properly if these two file names are identical! |
| Remote File | Path and file name of the
remote file (the Local File will be uploaded to this
location). If your HTML file goes into your root
directory on the server then you don't need to specify
the path (e.g. DynamIP.htm will work fine). However, you
can specify the path if your HTML file must go into a
particular directory (e.g. WWW/DynamIP.htm if the file
goes into your directory WWW). Do NOT put the IP address
or the host name into this field! Tip for GeoCities users: |
| IP | Place holder for your IP
address; this can be any string you like (NOT.ON.LINE.NOW
works just fine and is probably quite useful). This entry
must obviously agree with the appropriate text string in
your template. Note: The strings for IP, DateTime, WEBchat, HTTP Server, and FTP Server must be different if you don't want to end up with a total mess being posted… |
| DateTime | Place holder for the current date/time; this can be any string you like ($DateTime works just fine). This entry must obviously agree with the appropriate text string in your template. |
| HTTP Server | Place holder for your HTTP Server. This is NOT the IP address (or URL) of your HTTP server, but a placeholder which DynamIP will replace with a piece of HTML code that will become a link to the HTTP server at your current IP address. This entry must obviously agree with the appropriate text string in your template. |
| FTP Server | Place holder for your FTP Server. This is NOT the IP address (or URL) of your FTP server, but a placeholder which DynamIP will replace with a piece of HTML code that will become a link to the FTP server at your current IP address. This entry must obviously agree with the appropriate text string in your template. |
| FTP UserID | User ID that is inserted into the template if you check FTP Server. Default value is anonymous, but you can change this if you want your users to login with a particular ID (for example to find out from which particular web site they access your FTP server). |
| Immediate Retry on Failure | If set to True DynamIP will immediately retry the failing operation. If set to False then DynamIP will wait for a while before retrying (this waiting period depends on the "idle-disconnect" period of your ISP). |
| #Retries | Specifies the number of attemps DynamIP makes to upload the file if it doesn't work out the first time. |
| Delete Remote File before Put | This switch indicates whether you want DynamIP to delete the remote file before it uploads the new file. If the box is not checked, DynamIP attempts to overwrite your existing file which should preserve the file permission settings. Note, however, that some FTP servers do not allow overwrites. If you get the impression that your uploaded file never changes then you must probably check this option so that DynamIP deletes the old remote file before uploading the new one. |
| Binary Transfer | Leave this option unchecked to upload web pages (or any other text file). If this option is checked DynamIP will upload the file in binary mode (this is only useful for non-text files, e.g. WebCam pictures). |
The following settings are common to all connections:
| AutoONline | If AutoONline is checked DynamIP automatically uploads the ONline templates of all active Uploader entries whenever the IP address changes (this includes the change from 127.0.0.1 [not connected] to something else [connected]). |
| AutoOFFline | If AutoOFFline is checked DynamIP automatically uploads the OFFline templates of all active Uploader entries before disconnecting or shutting down. Note however, that this doesn't work if you lose your connection unexpectedly (e.g. if you ISP drops the connection). |
| refresh every | If you are connected DynamIP
automatically uploads the ONline templates of all active
Uploader entries at user-defined intervals (this is quite
handy, for example, if you want to update a WebCam
picture once a minute or so). Tip: |
| Timeout | DynamIP aborts the going ONline/OFFline process if the operation is not completed within the user-defined interval. This setting should be left at 65 seconds until multi-threading works properly. |
| Async | If this option is checked DynamIP uploads the file in asynchronous mode (that means DynamIP does not "lock up" until the file has finished uploading). Note, however, that the path and the file name get converted to all CAPs if you check this option (the problem is a bug-ridden VB5 FTP control!). If you uncheck this option DynamIP "locks up" until the file has finished uploading, but at least the file name does not get changed. |
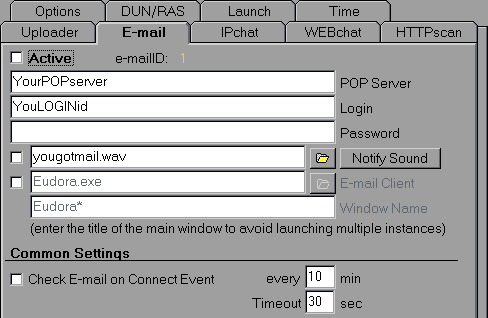
| Active | Check this box if you want to enable this particular e-mail account. |
| POP Server | Name (or IP address) of your POP server (note that an error message "bad IP?" usually indicates that you did not enter a valid POP server name. |
| Login | Your login id (for the POP server). |
| Password | Your password (for the POP server). Warning: although all passwords are encrypted before they get stored to DynamIP.INI you should be aware of the fact that the encryption algorithm is rather simple and won't hold up serious hackers for too long... |
| Notify Sound | Check this box if you want DynamIP to play a sound file whenever you receive new mail. You can choose any WAV file you like. Clicking on the button "Notify Sound" will play the sound so that you can test your settings. |
| E-mail Client | Check this box if you
want DynamIP to automatically
start your e-mail client whenever you receive new mail.
Some clients (e.g. Eudora) can be launched by directly
executing the EXE file, others must be launched via a
shortcut. Generally speaking, the following two methods
should work in most cases:
|
The following settings are common to all connections:
| Check E-mail on Connect | If this option is checked DynamIP automatically checks all active mail boxes whenever a Connect event occurs. |
| every ... min | If you are connected DynamIP automatically checks all active mail boxes at user-defined intervals. Hint: you can also use this as a "Keep Alive" feature. |
| Timeout | DynamIP aborts the mail checking process if the operation is not completed within the user-defined interval. |
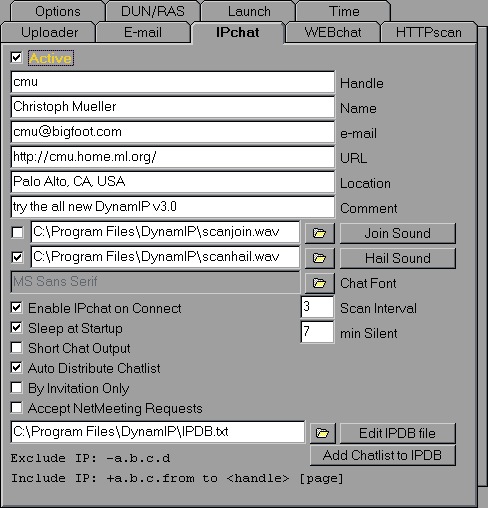
| Active | Check this box if you want to enable IPchat. | ||||
| Handle | Enter your handle, nickname, pseudo, whatever. | ||||
| Name | Enter your name*. Note that this information is also used in WEBchat. |
||||
| Enter your e-mail address*. Note that this information is also used in WEBchat. |
|||||
| Location | Enter your location (e.g. city, country)*. | ||||
| Comment | Enter anything you like (e.g. your quote of the day). | ||||
| Join Sound | Check this box if you want DynamIP to play a sound file whenever a new participant joins IPchat. You can select any WAV file. Click on the button "Join Sound" to test your settings. | ||||
| Hail Sound | Check this box if you want DynamIP to play a sound file whenever another chat participant hails you. You can select any WAV file. Click on the button "Join Sound" to test your settings. Note that WEBchat uses the same WAV file to notify you of incoming WEBchat messages. | ||||
| Chat Font | You can select any font you like. The default font is MS Sans Serif. | ||||
| Enable IPchat on Connect | If this option is checked DynamIP automatically turns on IPchat whenever a connection is established. | ||||
| Scan Interval | DynamIP scans all IP addresses (as defined in IPDB.txt) at user-defined intervals. | ||||
| Sleep at Startup | If this option is checked DynamIP automatically turns on IPchat's "Sleep" mode whenever a connection is established. | ||||
| Silent | Chat participants are automatically removed from your chat list if their IPchat engine has kept silent for more than the specified number of minutes. This setting should be somewhat higher than your scanning interval, otherwise you loose participants. The Silent setting is used to clean out those chat participants who got disconnected on their side before their IP chat engine was able to sign off. | ||||
| Short Chat Output | Click this box if you don't need detailed information about the sender of each IPchat message (e.g. time the message was sent, IP address, etc.). | ||||
| Auto Distribute Chatlist | Check this box if you want DynamIP to pass on your complete chat list to all new participants as they join. This makes for somewhat more transparent communication (if you know what I mean...). | ||||
| By Invitation Only | If you don't want to be bothered by people who just happen to scan your IP range you can check this box. Only people with an IP address in your very own scanning range (as defined in IPDB.txt) are allowed to join your chat list. | ||||
| Accept NetMeeting Requests | Check this box if you don't mind other chat participants establishing a NetMeeting connection with you. Unchecking the box helps you keep away those lamers who don't get it if you tell them to stop bothering you (after all, it takes a couple of seconds to fire up NetMeeting even on a fast P200...). | ||||
| IPDB file | Enter the name of the
file that contains the IP addresses you want DynamIP
to scan. Clicking the button "Edit IPDB file"
starts your text editor (the one that is associated with
the file extension TXT, usually Notepad.exe). Clicking on
the button "Add Chatlist to IPDB" adds all your
current chat participants to your IPDB file. You can specify IP address ranges to be scanned as follows: each IP address range must start on a new line, either with a "+" or a "-" (without the quotes). Here is how it works:
|
* While I personally think that it is rude not to disclose your true identity I'm also aware of the fact that doing so might expose you to unwanted harrassment. Use your own judgement as to how much information you want to disclose and what data you want to keep private.
Note that the fields "Name" and "e-mail" are also used by WEBchat. Other WEBchat settings must be made in Setup|WEBchat.
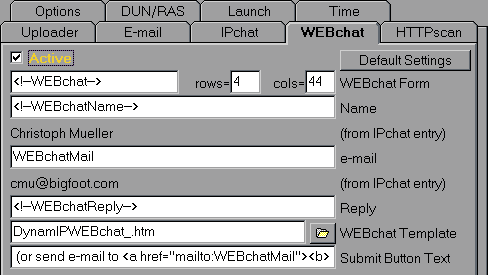
| Active | Check this box if you want to enable WEBchat. |
| WEBchat Form | Place holder for WEBchat
form; this can be any string you like (the default value
is <!--WEBchat-->). This entry must obviously agree with the
appropriate text string in your template. You can also
specify the number of rows and columns of the WEBchat
form in the appropriate fields. Note: The strings for WEBchat Form, Name, e-mail, and Reply must be different if you don't want to end up with a total mess being posted… |
| Name | Place holder for your
name (WEBchat uses the same name entry as IPchat)*. The
default value is <!--WEBchatName-->. Note: The strings for WEBchat Form, Name, e-mail, and Reply must be different if you don't want to end up with a total mess being posted… |
| Place holder for your
e-mail address (WEBchat uses the same e-mail entry as
IPchat)*. The default value is WEBchatMail. Note: The strings for WEBchat Form, Name, e-mail, and Reply must be different if you don't want to end up with a total mess being posted… |
|
| Reply | Place holder for the
reply box. The default value is <!--WEBchatReply-->. Note: The strings for WEBchat Form, Name, e-mail, and Reply must be different if you don't want to end up with a total mess being posted…Enter your location (e.g. city, country)*. |
| WEBchat Template | You can optionally define
a template that DynamIP will
use as your WEBchat reply page (if you don't define a
template DynamIP generates a
simple standard reply page). Important: Because the DynamIP WEBchat reply page is not served from the standard HTTP port (usually port 80) relative links on your page will not work properly. You must either define all links as absolute links (i.e. they must start with http:// ...) or not use any links at all. For the same reason you will also have to define all images, sounds, etc. with absolute references. |
| Submit Button Text | DynamIP
places this text to the right of the button
"Submit" in the WEBchat form . The default
value is (or send e-mail to <a href="mailto:WEBchatMail"><b>WEBchatMail</b></a>), but you just about anything goes. DynamIP will automatically replace the substring WEBchatMail with your e-mail address. As my e-mail address is "cmu@bigfoot.com" the text to the right of the submit button will look as follows: (or send e-mail to cmu@bigfoot.com) |
If you click on the button "Default Settings" DynamIP will reset all the entries to their default values which are guaranteed to work with the sample WEBchat template.
* While I personally think that it is rude not to disclose your true identity I'm also aware of the fact that doing so might expose you to unwanted harrassment. Use your own judgement as to how much information you want to disclose and what data you want to keep private.
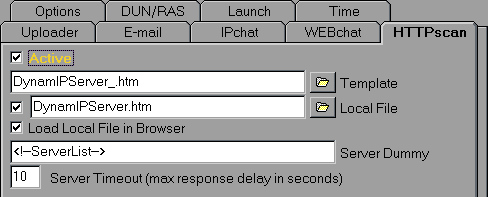
| Active | Check this box if you want to enable HTTPscan. |
| Template | This is the file that is read after a successful HTTPscan, updated (only if it contains the string specified in ServerDummy) and then saved to LocalFile (only if the LocalFile box is checked). |
| Local File | This is the file where the updated Server Template is written to after a successful HTTPscan (only if the LocalFile box is checked). |
| Server Dummy | Specification of the string contained in ServerTemplate that is replaced with the list of HTTP servers found by HTTPscan. This is a place holder for the list of HTTP servers found by DynamIP. The default value is <!--ServerList-->. |
| Server Timeout | Time in seconds DynamIP is waiting for a reply from an HTTP server when scanning a particular IP address. Bigger values slow down the search, but they increase the chances of finding HTTP servers (especially if they are slow). Values too small make it more difficult to find HTTP servers because they might not respond within the timeout period. A value of 5 should be ok for most practical purposes, but you might want to increase this if you have a slow link… |
| Load Local File in Browser | Check this box if you want DynamIP to automatically load the updated web page into your favorite browser as soon as HTTPscan is finished. |
Please refer to IPchat for information on how to define IP address ranges to be scanned.
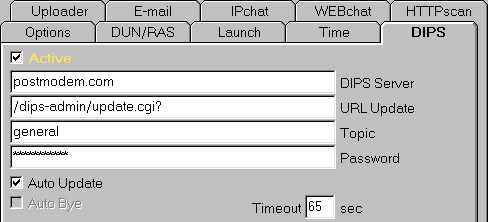
Please note the information provided below might be outdated. For the most recent DIPS setup information you should connect directly to the DIPS site at http://DIPS.home.ml.org/. Also, if you run into problems using DIPS please send e-mail directly to DIPS@bigfoot.com and not to me. Thanks!
| Active | Check this box if you want to enable DIPS. |
| DIPS Server | The name of the DIPS server. At the time of writing this was postmodem.com, but make sure you check out the DIPS site at http://DIPS.home.ml.org/join.htm for the latest version of this entry. |
| URL Update | Enter the URL of the update script. At the time of writing this the correct entry was /dips-admin/update.cgi?, but make sure you check out the DIPS site at http://DIPS.home.ml.org/join.htm for the latest version of this entry. |
| Topic | Enter the name of the topic that you want your site to be listed under. The topic name should not contain any special characters (i.e. only "A".."Z", "a".."z", and "0".."9" are allowed). |
| Password | Here you should enter the password that DIPS sent you with e-mail when you joined the service (you can join DIPS at http://DIPS.home.ml.org/join.htm). |
| Auto Update | Check this box if you want DynamIP to automatically update DIPS information. For example, as soon as DynamIP detects your web server (HTTPD) it updates the information with the DIPS server. |
| Timeout | Time in seconds DynamIP is waiting for a reply from the DIPS server. Bigger values increase the chances of successfully updating your DIPS info with the server. Values too small make it more difficult to properly connect and update the information. I recommend to keep this value at the maximum of 65. |
Again, much more detailed information is available at http://DIPS.home.ml.org/.
| Warning | Changing ports is for advanced users only! If you don't know exactly what you're doing chances are you're in for some serious trouble down the road if you change them. Please do not play around with these settings, it's really only for experts! |
DynamIP uses the following standard port settings:
| FTP | 21 | |
| NTP | 37 | |
| HTTP | 80 | |
| DIPS HTTPD | 80 | This is the port of your local web server (HTTPD on your machine). DIPS verifies the existence of a web server before DIPS information is uploaded. |
| POP | 110 | |
| WEBchat | 1498 | |
| UDPchat | 1499 |
If you need to change any of the above ports you have to edit the file DynamIP.INI as follows (note that the standard ports are not written to the file, you only have entries for those ports that are non-standard):
| To change this port | Add the following line to DynamIP.INI | Example with default values |
| FTP | PortFTP=<PortNumber>; | PortFTP=21; |
| NTP | PortNTP=<PortNumber>; | PortNTP=37; |
| HTTP | PortHTTP=<PortNumber>; | PortHTTP=80; |
| DIPS HTTPD | PortDIPSHTTPD=<PortNumber>; | PortDIPSHTTPD=80; |
| POP | PortPOP=<PortNumber>; | PortPOP=110; |
| WEBchat | PortWEBchat=<PortNumber>; | PortWEBchat=1498; |
| UDPchat | PortUDPchat=<PortNumber>; | PortUDPchat=1499; |
If you change the UDPchat port, you will obviously not be able to chat with any other DynamIP user (unless she/he changed the port to the same number...).
If you want to revert to the standard ports you simply delete the non-standard entries from the file DynamIP.INI. (do this when DynamIP is not running!).
| cmu | Introduction | Download | Setup | Advanced Users | Sample Templates | Meeting Places |
| Home | User Manual | Installation | Requirements | Trouble Shooting | Tribe of the Challenged | Discussion Group |
| DIPS (Dynamic IP Server) - visit http://DIPS.home.ml.org/ to find out more... |
| Please Note: | I accepted a job with Credit Suisse Group (Group Risk Management) and will be moving back to Europe. Because of this relocation (first to Switzerland, then to the U.K.) I can only offer reduced support for DynamIP. Please try peer support in the DynamIP Discussion Group if you don't get a timely response to your e-mail inquiry. |
 |
cmu@bigfoot.com http://cmu.home.ml.org |
 hits since October 16, 1996
Last modified: July 27, 1997