
|
Spotlight marks a watershed in operating system history. For years people have been talking about making the file system as quick and easy to search as the web as well as using meta-data to make those searches more accurate. For years it's been all talk. Other operating systems have long promised it. Third party add-ons are starting to appear that provide it. Tiger, however, is the first industrial-strength operating system to feature a fully integrated, fast, and efficient search across all of the files on a system. Make no mistake about it, Spotlight isn't "bolted on" to the system. It's a completely new search technology that is tightly integrated with a fundamental part of the OS: The file system. Every time a file is created, saved, moved, copied, or deleted, the file system automatically ensures that the file is properly indexed, cataloged, and ready for whatever search query might be issued—all in the background. These abilities build on the already impressive capabilities of the journaled HFS+ file system. Not only is Spotlight available to end users, but the array of search technologies that make up Spotlight are also available to developers. This means that you'll be able to tap into these powerful search technologies to find files to display, plugins to load, and data to mine in your applications. No restrictions. No limits. The technologies that power Spotlight are:
But more than a collection of individual technologies that work together, Spotlight gives you the ability to plug your application into the operating system and work with files in a totally new way. For example, if you were building an asset management application you could use Spotlight to find all of the files that match certain criteria rather than trying to slog through the file system yourself. Or, if your application specialized in supporting various kinds of workflows, you could use Spotlight to find all of the files that needed to be marked with a particular keyword. Once you get used to working with files in this new way, you'll never want to go back. This article shows you how Spotlight works, how to programatically query the Spotlight Store, and how to create your own file format importers. As you can see, there is quite a bit of ground to cover. First, however, let's start out by defining what meta-data is. What is Meta-data?Meta-data is, succinctly stated, data about data. It provides a description about the data contained in a file such as (but not limited to) its height, width, size, creator, copyright holder, title, editor, created date, and last modification date. In practice, there is so much data that can be considered meta-data that these descriptions usually are generalized as a dictionary of descriptive attributes indexed by keys. You can think of it as the "what, when, and who" of a piece of data. Some kinds of meta-data, such as file modification dates, ownership, and access permissions are kept external to the file by the file system and have been accessible via a variety of mechanisms. But the most interesting kinds of metadata are found inside the file. For example, digital cameras embed all sorts of data, such as exposure information and whether a flash was used, into the image files that they produce. As well, files written by most applications, including Adobe Photoshop and Microsoft Word, contain quite a bit of meta-data. Until now, this data has been buried in individual files, which has made it hard to work with and to search against. Spotlight gathers all of this information into the Spotlight Store allowing for quick, easy, and effective searches. The Spotlight StoreThe Spotlight Store is a file system-level database that holds all of the meta-data attributes about the files, as well as an index of their contents, on a file system. As each file is created, copied, updated, or deleted, Spotlight will ensure that both the content index and the meta-data store entries for that file are updated. 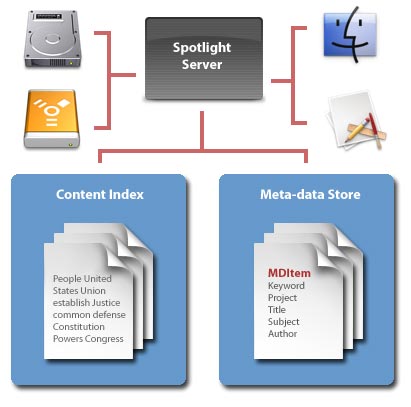
The content index is built using an evolved and optimized version of the Search Kit technologies that were introduced with Mac OS X 10.3 Panther. And by optimized, we don't mean that it's a little bit faster. No way. Search Kit in Tiger is three times faster at indexing content and up to 20 times faster at incremental searching than in Panther. The meta-data store, on the other hand, is a totally new hand-tuned database designed explicitly to handle the unique needs of meta-data. Internally, it represents each file as an MDItem object. Each MDItem contains a dictionary of the various meta-data attributes of that file organized by unique keys. A sample of these keys is listed in the following table.
Notice that these keys are abstract rather than the name of a key in a particular format. This is because different file formats might express the same meta-data using different terms. The normalization of terms into a single namespace simplifies creating constrained searches. Tiger ships with a large number of keys defined to handle a variety of meta-data types. One more thing to note about the Spotlight Store: There is one content index and one meta-data store per file system. This keeps the content indexes and meta-data stores with the files they belong to—crucial when using external FireWire drives that travel from Mac to Mac. Now that you know how Spotlight stores meta-data and content indexes for files, lets look at how to access that information programmatically. Examining a File's Meta-data
The easiest way to take a look at a file's meta-data is to simply create a
CFStringRef path = CFSTR("/Users/erika/Pictures/vacation.jpg");
MDItemRef item = MDItemCreate(kCFAllocatorDefault, path);
To get a list of the attribute names: CFArrayRef attributeNames = MDItemCopyAttributeNames(item); Then, to get a particular attribute: CFTypeRef ref = MDItemCopyAttribute(item, attributeName); As you can see, a MDItem is a simple wrapper around a file's meta-data attributes and is accessed much the same way as any dictionary. But if this were all there is to Spotlight, there wouldn't be that much to talk about. The magic is in being able to query Spotlight for all the files that match a set of conditions. Creating QueriesThe ability to create queries, and get a list of files in response to those queries, is what allows Spotlight to transcend the typical behavior of a file system and enables you to build a totally new category of applications. When you build a query, there are three things you can base your search on:
A query is built using a simple language that uses C-like expressions. For example, a query to search all files with the keyword "Tiger" would be written as follows: kMDItemKeywords == "*Tiger*" In a program, once again using the CoreServices framework, this query could be constructed using the following code:
MDQueryRef query;
query = MDQueryCreate(kCFAllocatorDefault,
                      CFSTR("kMDItemKeywords == '*Tiger*'"),
                      NULL,
                      NULL);
Then, to start the query running: MDQueryExecute(query, kMDQueryWantsUpdates); Once the query has been run, you can read the results:
CFIndex count = MDQueryGetResultCount(query);
for (i = 0; i < count; i++) {
    MDItemRef item = MDQueryGetResultAtIndex(query, i);
}
Queries can be run either in one-shot mode (shown above) or as live queries that work with run loops. Live queries are useful when you have a need to monitor the file system over time. As new files are saved that match the query, your code can be called allowing you to act on the new information. We showed a very simple query above. To give you an idea of the kinds of queries that you could build, here's a more complex query: ((kMDItemTextContent = "Tiger*"cd)) && (kMDItemLastUsedDate >= $time.yesterday) && (kMDItemContentType != com.apple.email.emlx) && (kMDItemContentType != public.vcard) This query will match all files that have the word "Tiger" in their content and were used in the last day but which aren't an email message or a contact in the Address Book. And, if that's not enough, even more complex queries are possible that use grouping and sorting. One of the best ways to find examples of complex queries is to use the Finder. Build a query using the Finder's Find feature and then save it. Then, navigate to the Saved Searches folder in your Home folder. You'll see the saved search as a Smart Folder. Get Info about the folder and you'll see the query nicely listed for you to examine. 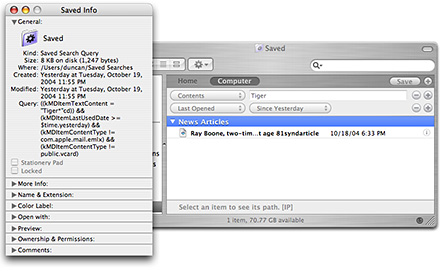
Meta-data ImportersTiger ships with importers for a variety of common file formats as well as all the important file formats used by Apple's applications such as iTunes and the Address Book. A partial list of file formats includes:
If your application, however, uses its own file format or an unsupported file format, Spotlight will need a little bit of help in order to understand them. To give Spotlight this help, you can provide a meta-data importer plug-in with your application that understands the in-and-outs of your file formats. There are three primary steps to creating a meta-data importer plug-in:
Defining a GUUIDA GUUID is a 128-bit value guaranteed to be unique. Spotlight uses it to identify its various file system meta-data importer plug-ins. To define a GUUID, use the uuidgen command on the command line: $ uuidgen 09B33E82-226B-11D9-9B1C-000D932ED97A Create a new Xcode ProjectYou will find a project for building meta-data plug-ins in Xcode's New Project dialog box under "Standard Apple Plugins". 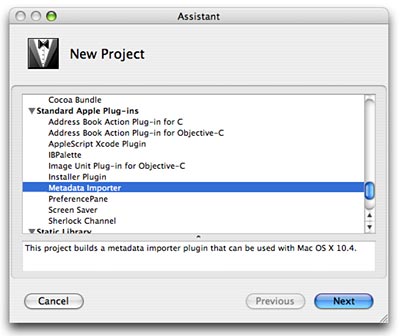
Once you've created the new project, you'll need to edit the following keys in the Info.plist:
Next, define the GUUID in your code with the following: #define PLUGIN_ID "09B33E82-226B-11D9-9B1C-000D932ED97A" Implement the GetMetadataForFile MethodThe last step is to actually write the code. The method prototype is:
Boolean GetMetadataForFile(void *thisInterface,
                           CFMutableDictionaryRef attributes,
                           CFStringRef contentTypeUTI,
                           CFStringRef path)
{
	/* do the actual work of pulling meta data from the file */
	return TRUE;
}
In this method, you should open the file at the given path and extract the meta-data from it. Next, set the meta-data attribute values and keys into the given attributes dictionary. And then finally, return TRUE if successful or FALSE if no data was provided. Once the meta-data plug-in is built and has been tested, you can make it available for Spotlight's use by putting it into one of the following directories: ~/Library/Spotlight /Library/Spotlight You can also include importers in an application's bundle in the
One last point about writing an importer: It's important to make an importer as efficient as possible. After all, it is going to be executed each and every time a file of the type it handles is created, updated, or destroyed. Be sure to be a good citizen to both CPU and memory. Cocoa API SupportTiger includes full support for working with Spotlight using the NSMetadataItem, NSMetadataQuery, NSMetadataResultGroup, and NSPredicate classes. The Cocoa API offers support for the same features as the CoreServices APIs discussed in this article. As well, the Cocoa meta-data APIs are fully key-value coding/observing compatible. This means that you can use the API along with Cocoa Bindings in your applications. As far as the meta-data plug-in API, it's easy to use your existing Cocoa based file handling code. Simply change the .c extension on the files to .m, import the Foundation framework, and link away. Command-Line IntegrationThere's one more thing about Spotlight that should be mentioned. Since the core of Spotlight lives at the very lowest levels of the operating system, it is only natural that there are some command-line tools for power-users to work with file system meta-data and perform queries. The first command is mdls. Just as traditional Unix ls command will list all of the files in a directory, mdls will list all of the meta-data attributes for a file. Here's an example of running the command on an image:
$ mdls metadata.jpg
kMDItemAttributeChangeDate = 2004-10-20 01:00:15 -0700
kMDItemBitsPerSample       = 24
kMDItemColorSpace          = "RGB "
kMDItemContentType         = "public.jpeg"
kMDItemContentTypeTree     = ("public.jpeg",
                              "public.image",
                              "public.data",
                              "public.item",
                              "public.content")
kMDItemDisplayName         = "metadata.jpg"
kMDItemFSContentChangeDate = 2004-10-19 00:13:04 -0700
kMDItemFSCreationDate      = 2004-10-19 00:13:04 -0700
kMDItemFSCreatorCode       = 0
kMDItemFSFinderFlags       = 0
kMDItemFSInvisible         = 0
kMDItemFSLabel             = 0
kMDItemFSName              = "metadata.jpg"
kMDItemFSNodeCount         = 0
kMDItemFSOwnerGroupID      = 501
kMDItemFSOwnerUserID       = 501
kMDItemFSSize              = 21917
kMDItemFSTypeCode          = 0
kMDItemID                  = 246476
kMDItemKind                = "JPEG Image"
kMDItemLastUsedDate        = 2004-10-19 00:13:04 -0700
kMDItemPixelHeight         = 213
kMDItemPixelWidth          = 624
kMDItemResolutionHeightDPI = 72
kMDItemResolutionWidthDPI  = 72
kMDItemUsedDates           = (2004-10-19 00:13:04 -0700)
You can also run queries from the command line using the mdfind tool. For example: $ mdfind "kMDItemAcquisitionModel == 'Canon PowerShot S45'" /Users/erika/Documents/vacation1.jpg /Users/erika/Documents/vacation2.jpg /Users/erika/Documents/vacation3.jpg Not only are these command-line tools useful for the power-user, but they can also be put to good effect in a shell script. For example, you could create a backup of files that contained the keyword "Tiger" with the following script:
for i in `mdfind Tiger`
do
    cp $i /Volumes/Backup/$i
done
ConclusionAs you have seen, Spotlight is much more than just a cute gray search box in the upper-right corner of the screen. And it's even more than the advanced new search features in Finder. It's an entirely new way of working with files. And, Apple is the first to bring you this kind of functionality built into the operating system. Even better, it's all available to you to use in your applications via a set of easy-to-use APIs. It's fast, efficient, and will change your user's experience of your application forever. How You Can Get StartedGetting started couldn't be easier. The first thing you should do, if you haven't already, is to become an Apple Developer Connection member. A free ADC Online membership provides access to the latest Xcode updates and other developer tools. An ADC Select Membership goes further by providing shipping versions of Mac OS X Tiger and Xcode 2 on disc, along with download access to Mac OS X Tiger Server. Select membership also includes direct, one-on-one consultation with Tiger support engineers, a discount on hardware through the ADC Hardware Purchase Program, and ongoing access to pre-release software. Next, you'll want to set yourself up with the Xcode 2.2 developer tools. It ships as part of each and every copy of Mac OS X Tiger on the Install DVD. Just double-click on the Xcode 2.2 package on the DVD and the developer tools—as well as a set of example code projects and comprehensive documentation in the ADC Reference Library—will be installed on your system. The documentation and sample code will help you learn more about the technologies covered in this article. For More Information
Updated: 2006-06-13 |
|
Get information on Apple products. Copyright © 2010 Apple Inc. |