
|
Tiger introduces a new feature called Dashboard, which provides a new and unique class of mini-applications called Widgets. While Dashboard will be a powerful feature for Tiger users, for developers it introduces a rich new development environment. Widgets are quick to develop and easy to deploy, and they can leverage all of Tiger's advanced technologies. Widgets are perfect for working with small amounts of data or interacting with other applications, both on your desktop and across the web. And they provide an excellent way to add functionality to an existing application. This means there are many opportunities for developers, whether creating new products, or adding market-differentiating value to an existing one. Based on Web Kit technologies, Dashboard Widgets are created using a mix of HTML, JavaScript, and CSS. This extends the ability to develop Widgets to a very wide audience. If you know how to create a web page, then you know how to create a capable Widget. But Widgets aren't limited by their use of web-based technologies. They can tap into the immense power of Mac OS X. Better yet, you can create great Widgets in hours or days, instead of months or years. With Tiger, Xcode 2.0 includes the information and examples you need to get you started. The documentation for Dashboard is located in the ADC Reference Library (under the Apple Applications) and will help you learn more about the technologies covered in this article. For Dashboard sample code and sample Widgets, install the Tiger
Developer Tools and go to This article shows you how Dashboard Widgets work, and provides an introduction to how to develop and deliver modular functionality in bite-sized pieces. Understanding WidgetsWidgets are ready to use when Dashboard is activated and disappear when the Dashboard is put away, allowing quick "at-a-glance" usage. Since Dashboard is part of the system and doesn't require the installation of any additional components, Widgets can become essential tools for users. Each Widget is task-specific and lightweight. And if a Widget needs a little bit more interface room for setting preferences, Dashboard lets them "flip" over and use the back of the Widget. Widgets fall into one of the following three categories:
Dashboard Architecture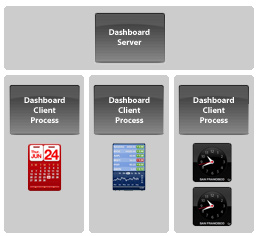
The runtime architecture of Dashboard consists of the following components:
Each Widget is run inside a separate client process which provides a sandbox so that it doesn't affect any other Widgets or applications. For reliability, Dashboard also carefully manages Widgets. If a Widget crashes, it is automatically restarted so that it simply reappears in the Dashboard. If it misbehaves, crashing more than three times in a row, it is automatically removed from the Dashboard. What's Inside a Widget?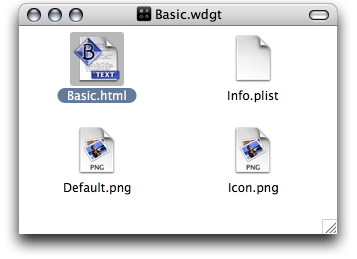
At its simplest, a Widget is simply a web page that is displayed in the Dashboard rather than in a browser, such as Safari. A Widget is contained on disk in a bundle—a directory that groups all the needed resources for the Widget together in one place. Widget bundles are named with the .wdgt extension. Like any other bundle, a Widget's bundle is managed by the Finder as a single entity. A basic Widget contains the following files:
As a Widget grows, you can place other files, such as images and external CSS and JavaScript files, into the Widget's bundle. Let's take a look at the various components of a Widget, starting with HTML. HTML MarkupAs stated earlier, if you know how to write content for the web, you can write a Widget. To adhere to current web-standard best practices, it's recommended that you create content that complies with the XHTML 1.0 (Strict, Transitional, or Frameset) standard. For example, here's the HTML for a "Hello World" Widget:
<!DOCTYPE html PUBLIC "-//W3C//DTD XHTML 1.0 Transitional//EN"
        "http://www.w3.org/TR/xhtml1/DTD/xhtml1-transitional.dtd">
<html xmlns="http://www.w3.org/1999/xhtml">
<head>
<title>Hello World</title>
</head>
<body background="Default.png">
<h1>Hello, World!</h1>
</body>
</html>
Since a Widget is defined using HTML, you can preview the Widget using Safari while writing the markup in your text editor of choice. HTML provides most of the functionality needed for Widgets to be built, but a few extensions have also been added that give Widgets some unique capabilities you'll want to use. Specifically, there are three extensions to HTML used by Widgets. These are:
It is important to note that these are a very small number of changes to the HTML specification and are designed to work in any application context where HTML could be used to create a user-interface. Apple is working with other vendors to ensure that these changes are adopted and become standardized. Cascading Style Sheets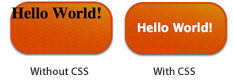
If you were to load the basic "Hello World" Widget above, you'll see that the "Hello World" text won't look acceptable. End users won't appreciate misplaced text. The solution is to use Cascading Style Sheets (CSS), the web standard for styling HTML. Here's an example of using CSS to style the text in the Widget:
<!DOCTYPE html PUBLIC "-//W3C//DTD XHTML 1.0 Transitional//EN"
        "http://www.w3.org/TR/xhtml1/DTD/xhtml1-transitional.dtd">
<html xmlns="http://www.w3.org/1999/xhtml">
<head>
<style>
body {
	margin: 0;
}

.helloText {
	font: 24px "Lucida Grande";
	font-weight: bold;
	color: white;
	position: absolute;
	top: 24px;
	left: 30px;
}
</style>
</head>
<body background="Default.png">
<h1 class="helloText">Hello, World!</h1>
</body>
</html>
Of course, it's also possible to put the CSS into a separate stylesheet file and refer to it using a import statement, as shown here:
<style>
    @import "HelloWorld.css";
</style>
As you can see, HTML and CSS give you a rich set of tools to create interesting user interfaces. Now, let's look at how to make those interfaces dynamic. JavaScriptIn keeping with the use of web technologies, Widgets use JavaScript to provide dynamic behavior. JavaScript in Dashboard works the same way as it does in any browser with the single addition of the widget object. The widget object gives you the ability to do the following:
For example, to access preferences, you can use the following: widget.setPreferenceForKey(preference, key); widget.preferenceForKey(key); Dashboard activation events are important for a Widget to handle so that it doesn't consume CPU time or network resources unless it is visible. The following example code shows how to do this:
if (window.widget) {
    widget.onhide = onhide;
    widget.onshow = onshow;
}

function onshow() {
    if (timerInterval == null) {
        timerInterval = setInterval("updateTime(true);", 1000);
    }
}

function onhide() {
    if (timerInterval != null) {
        clearInterval(timerInterval);
        timerInterval = null;
    }
}
As in any HTML page, you can attach JavaScript actions to any user interface element. For example, a calculator Widget can perform an action when a user clicks an equals image as follows: <img id="equal" src="equal.png" onmousedown="equalAction(event);"> An important note about the widget object: It is only available while running in Dashboard. It's not available when you run an object in Safari. The Info.plist File
The Info.plist file contains the essential information about a Widget. This information is used by Dashboard to identify the Widget and where to find its resources. The easiest way to create a property list is to use the Property List Editor application, located in A few of the keys that can, or must, appear in a Widgets Info.plist file:
Creating a WidgetCreating a new Widget is easy and straightforward. Use the following process to get started:
This is a fast, easy, iterative approach familiar to legions of web
developers. Of course, there's an even faster way to get started that
will also be familiar to web developers: copy one of the working
examples from the Dashboard SDK and use it as a starting point. For
Dashboard sample Widgets, go to From the Widget bundle, you can enter straight into the test environment for Widgets: Safari. A simple double-click on the main HTML file opens it in Safari where you can interact with and reload it as you make changes to the Widget's contents. 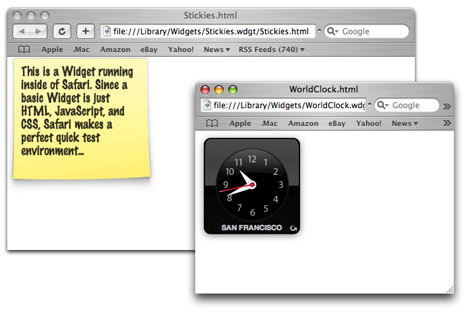
You should keep in mind that Safari serves as a basic test environment for Widgets and it doesn't support all of the functionality available in the Dashboard. To test a Widget in the Dashboard, simply double-click on a .wdgt package. To see any changes, reload with Command-R. You'll know it has reloaded by the cool spinning effect that Dashboard performs on the Widget. Note: Through the Web Kit open source project, you can test your widget content with a nightly build of Safari to
ensure compatibility with future releases. Leveraging Mac OS X TechnologiesThe capabilities of HTML, CSS, and JavaScript don't define the entire spectrum of what is possible in a Widget. In fact, they just mark the starting point. From there, you can access the deep capabilities of Mac OS X. UNIX CommandsAny UNIX command or script, including those written in sh, tcsh, bash, tcl, Perl, or Ruby as well as AppleScript, can be accessed from the widget object. This ability to tap into the command-line means that an amazing amount of power can be accessed from any Widget. See the Dashboard Tutorial for details. Quartz Drawing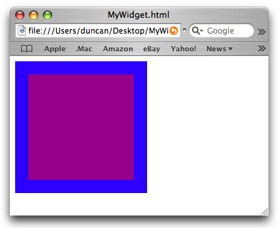
Not only can Dashboard Widgets use HTML markup to display a user interface, they can also draw arbitrary graphics using a canvas tag. The drawing methods provided closely follow the capabilities of Quartz and provide the ability to composite images, draw antialiased lines, and even create complex quadratic-based paths. An example of this functionality is the World Clock Widget, which rotates and composites several images into the interface you see. There are two steps in using a canvas in a Widget. The first is setting up an area in the HTML body to draw within, and then drawing into that canvas from JavaScript. The following simple example shows a canvas object being set up, then a blue square drawn, and then a red square drawn with transparency. The result of this code, shown to the right, is a purple square surrounded by a blue square.
<html>
<head>
</head>
<body>
<canvas id="canvas" width="200" height="200"></canvas>
<script>
    var canvas = document.getElementById("canvas");
    var context = canvas.getContext("2d");
    context.clearRect(0, 0, 200, 200);
    context.setFillColor(0.0, 0.0, 1.0, 1.0);
    context.fillRect(0, 0, 200, 200);
    context.setFillColor(1.0, 0.0, 0.0, 0.5);
    context.fillRect(20, 20, 160, 160);
</script>
</body>
</html>
If you compare the simple calls here to those used to access Quartz 2D functionality from C or Objective-C code, you will recognize the form and naming of the calls. Internet Plug-insSince Widgets are built using Web Kit, any Internet plug-in can be run from within the Widget. For example, a Widget could display a QuickTime-based movie using the QuickTime Internet plug-in. As well, a complex Shockwave-based application could be reused in the scope of a Widget. Widget Plug-InsIf you need to dig deeper into the system, or if you need to tap into your own application to create a Widget that closely interacts with it, you can create your own Cocoa-based plug-in. These plug-ins work by providing a JavaScript object that's made available to the Widget. Widget plug-ins are created in Xcode using the "Cocoa Bundle" template. Once the project has been set up, the main class of the plug-in must implement the following methods: - (id) initWithWebView:(WebView *) webView; - (void) windowScriptObjectAvailable:(WebScriptObject *) windowScriptObject; The first method is called when your Widget first loads the plug-in. The second method is then called and allows you to provide a JavaScript object that your Widget can use. This bridges the gap between JavaScript and Objective-C. For example, the following implementation creates a JavaScript object with the name MyScriptObject and allows methods on that object to be called from JavaScript:
- (void) windowScriptObjectAvailable:(WebScriptObject *) windowScriptObject
{
    MyScriptObject *myObj = [[MyScriptObject alloc] init];
    [windowScriptObject setValue:myObj forKey:@"MyScriptObject"];
}
The object can be accessed from JavaScript as follows:
<script>
 if (window.MyScriptObject) {
        MyScriptObject.someMethod(someArg);
}
</script>
Using this plug-in model, you can expose most any kind functionality from the system or from your application to a Widget. Deploying a WidgetOnce you have created a Widget, the next step is to get it into the hands of your users. For a Widget to be found by the Dashboard, it needs to be located in one of the following locations:
ConclusionAs you can see, Dashboard provides a great new development environment. Widgets are easy and fast to create, and yet very powerful. They have full access to the Internet, can use the advanced drawing capabilities of Quartz, and the rest of the functionality available in Mac OS X. The opportunities to be creative are enormous. How You Can Get StartedGetting started couldn't be easier. The first thing you should do, if you haven't already, is to become an Apple Developer Connection member. A free ADC Online membership provides access to the latest Xcode updates and other developer tools. An ADC Select Membership goes further by providing shipping versions of Mac OS X Tiger and Xcode 2 on disc, along with download access to Mac OS X Tiger Server. Select membership also includes direct, one-on-one consultation with Tiger support engineers, a discount on hardware through the ADC Hardware Purchase Program, and ongoing access to pre-release software. Next, you'll want to set yourself up with the Xcode 2.2 developer tools. It ships as part of each and every copy of Mac OS X Tiger on the Install DVD. Just double-click on the Xcode 2.2 package on the DVD and the developer tools—as well as a set of example code projects and comprehensive documentation in the ADC Reference Library—will be installed on your system. The documentation and sample code will help you learn more about the technologies covered in this article. Reference MaterialSince Widgets heavily utilize web technologies, some of the best reference material for building Widgets has already been published: For More Information
Also, for detailed information about Web Kit's support for various web standards check the Safari Developer FAQ Updated: 2007-02-09 |
|
Get information on Apple products. Copyright © 2010 Apple Inc. |