
|
From creating new solutions for print, photography, scientific visualization, and film post-production to enhancing your application's user interface with innovative and effortless visual effects, Core Image performs the heavy lifting that enables the next generation of imaging applications. In the past, creating high-performance and accurate image processing solutions was not easy. To do so required a deep knowledge of complex algorithms, color management techniques, and hardware-specific APIs. Only a handful of developers have had this level of expertise. Once these solutions were created, they were neither easy to reuse in other applications nor adapt to the latest hardware. In addition, these solutions have typically been limited to using eight bits per color channel per pixel. With many of the latest prosumer and professional digital cameras capable of capturing up to 12 bits of color data—and the latest scientific devices capable of capturing even more—using an 8-bit solution means a loss of image quality and precision throughout the image processing pipeline. Core Image changes the game. Developers can now easily create real-time capable image processing solutions that automatically take full advantage of the latest hardware without worrying about future architectural changes. Even better, Core Image can perform its processing using 32-bit floating point math. This means that you can work with high bit-depth images and perform multiple image processing steps with no loss of accuracy. Core Image also provides a plug-in architecture for accessing filters, transitions, and effects packages called Image Units. Image Units provide centralized management for image processing plug-ins that can be shared across applications. You can create your own Image Units by describing filters and effects in the CIKernel language, a derivative of the Open GL Shading Language, or you can access any of the one hundred Image Units bundled in Mac OS X Tiger. This article shows you how Core Image works, how you can access its power from your applications using Image Units, and how you can create your own Image Units to deliver custom image processing functionality to any application that supports the Image Unit plug-in API. Using Image Units
For many developers, the primary use of Core Image will be to use Image Units in their applications to process and manipulate images. The Image Units bundled with Tiger cover a wide spectrum of image manipulation needs, including:
To give you a feel for how an Image Unit can be used, let's look at how to apply a hue adjustment to the following image: 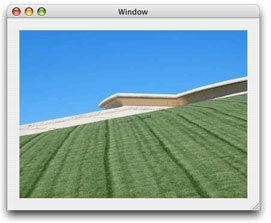
To use the hue adjustment Image Unit, you will need to use two classes. First is the CIFilter class, the programatic interface to the Image Unit. The second is the CIImage class which contains the data for both the source and result images. The use of these classes, as well as the configuration of the filter to perform the hue adjustment, is illustrated in the following code:
NSURL *url; When this code is run against the original image above, the result looks like this: 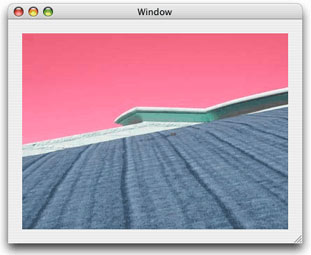
As you can see, Core Image lets you easily modify an image with just a few lines of code. And, you aren't just limited to performing one operation on an image. You can apply as many Image Units as you want to an image by chaining the results of one Image Unit to the input of another. How Core Image WorksIn a nutshell, an Image Unit performs pixel-level operations on image data that results in the creation of a new image. When an Image Unit is loaded and configured with an image (or images), as well as any needed parameters that define the settings that the Image Unit can take, pixels are fetched from the input image by a sampler object that handles any needed coordinate transformation and scaling. These pixels are provided to the Image Unit's processing kernel which then performs its calculations and returns a result pixel. When multiple Image Units are combined to process an image, Core Image calculates the processing pipeline path for each pixel. It then dynamically concatenates the entire recipe for each result pixel from all of the Image Units into a single optimized operation. Furthermore, Core Image uses lazy evaluation. Only the pixels that need to be processed for a given destination will be processed—and only when they are drawn to their destination. This behavior dramatically minimizes the amount of work that Core Image needs to perform in order to create a final result image. Core Image operates non-destructively on image sources. Since Image Units execute in near real-time, and only on the pixels that need to be processed, it is possible to keep the original state of the source images and reprocess the displayed pixels as needed. This lets you adjust the effects of an Image Unit and see the changes immediately. For example, a user can adjust the level of sharpening applied to an image and see the changes without delay. Parallel ExecutionWhile it is easy to think of the per-pixel operations that an Image Unit performs as happening one-by-one in a linear fashion, Core Image executes these operations, whenever possible, using either the Velocity Engine in the PowerPC G4 or G5 CPUs or the high performance GPUs on the latest video cards. These SIMD (Single Instruction, Multiple Data) hardware solutions allow the same code to be executed on multiple data sets in parallel. This use of parallelism is a perfect match for manipulating images where the same operation is performed over and over on hundreds or thousands of pixels. Core Image AccuracyBecause Core Image uses 32-bit floating point numbers instead of fixed scalars, it can handle over 1025 colors. Each pixel is specified by a set of four floating point numbers, one each for the red, green, blue, and alpha components of a pixel. This color space is far greater than the human eye can perceive. This level of precision in specifying color components allows image fidelity to be preserved even through a large number of processing steps without truncation. Creating Your Own Image UnitsIf the large number of Image Units that come with Tiger don't perform the image manipulation that you need, you can create your own Image Unit to do so. An Image Unit consists of the following:
The CIKernel Language is a C-like language that is a derivative of the more general purpose OpenGL Shading Language. It includes only those features that are needed for image processing and omits the OpenGL Shading Language features that are related to 3D operations. The CIKernel language is hardware independent, allowing execution of image processing kernels on either the CPU or GPU. To give you a taste of the CIKernel Language, here's an example haze removal filter:
kernel vec4 myHazeRemovalKernel(sampler src, __color color, float distance, float slope) This kernel code takes four input parameters and returns a vector that represents the processed pixel. When properly combined with the Objective-C based glue code needed to enable and configure the filter, it can be used in an application like any other Core Image filter. The results of running this kernel are shown in the following image: 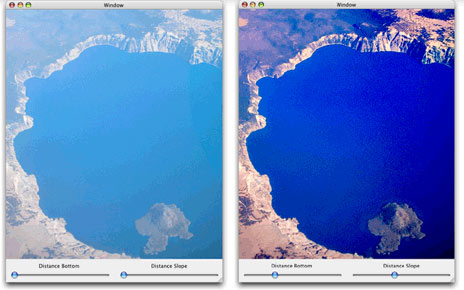
Here's an example of another CIKernel routine that computes a brightening effect:
kernel vec4 brightenEffect(sampler src, float k) This routine gets the color value for the source pixel and then adds a bias to the pixel value. The bias, k, is scaled by the alpha value of the pixel. The changed pixel is then returned. Learning the CIKernel Language
The best way to learn how to create CIKernel based filters is to study the book OpenGL Shading Language, by Randi J. Rost. There are a few things to note, however, since the CIKernel language is a subset of the OpenGL Shading Language. In particular, Core Image does not support the OpenGL Shading Language source code pre-processor. As well, the following are not supported:
As well, the if, for, while, and do while flow control statements are supported only when the loop condition can be inferred at the time the code is compiled. Not Just for Still ImagesCore Video, joining Core Image in Mac OS X Tiger, delivers a modern foundation for video services, providing a bridge between QuickTime and the Quartz Core framework for hardware-accelerated video processing. In the same way that you can insert filters into the rendering pipeline for images, you can insert filters into the video display pipeline. Like Core Image, a Core Video pipeline reduces CPU load and increases performance for other operations. And Core Video allows developers to apply all the benefits of Core Image to video—blazingly fast performance of filters and effects, per-pixel accuracy and hardware scalability. Tools for Exploration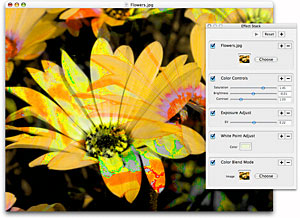
Tiger comes with two tools that are extremely useful for exploring the capabilities of Core Image. The first is Core Image Fun House, pictured to the right. Core Image Fun House is a simple test bed application that allows you to get started and experiment with Image Units. You can start out with a base image, apply a color control filter, an exposure adjust filter, white point adjust filter, and a color blend mode filter—all the while watching the filters being applied to the source image in real time. By using Core Image Fun House and seeing how Image Units work, you can get a feel for how Image Units could be used in your own applications. 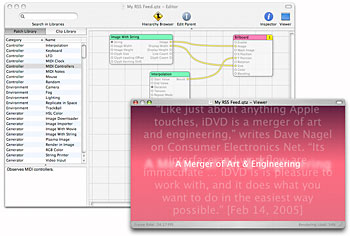
Another tool for exploring the abilities of Core Image is Quartz Composer, shown to the left. It allows you to combine Core Image filters with a rich set of graphical and nongraphical technologies, such as OpenGL, QuickTime, and RSS. Compositions created with Quartz Composer can be run standalone or can be incorporated into other applications. You can also save Quartz Composer compositions as screen savers. ConclusionAs you have seen, Core Image changes the game of image processing. It gives application developers the ability to create applications that can fully utilize the performance and capabilities of modern graphics hardware. It allows for manipulation of deep bit images with incredible accuracy and color fidelity. And finally, Image Units defines a new way to share image processing capabilities between applications and paves the road for a marketplace of plug-ins that can be used by any image processing application on the system that supports Core Image. How You Can Get StartedGetting started couldn't be easier. The first thing you should do, if you haven't already, is to become an Apple Developer Connection member. A free ADC Online membership provides access to the latest Xcode updates and other developer tools. An ADC Select Membership goes further by providing shipping versions of Mac OS X Tiger and Xcode 2 on disc, along with download access to Mac OS X Tiger Server. Select membership also includes direct, one-on-one consultation with Tiger support engineers, a discount on hardware through the ADC Hardware Purchase Program, and ongoing access to pre-release software. Next, you'll want to set yourself up with the Xcode 2.2 developer tools. It ships as part of each and every copy of Mac OS X Tiger on the Install DVD. Just double-click on the Xcode 2.2 package on the DVD and the developer tools—as well as a set of example code projects and comprehensive documentation in the ADC Reference Library—will be installed on your system. The documentation and sample code will help you learn more about the technologies covered in this article. For More Information
Updated: 2006-03-06 |
||||
|
Get information on Apple products. Copyright © 2010 Apple Inc. |