
|
Automator, one of the powerful new features in Mac OS X Tiger, helps you streamline repetitive everyday manual tasks quickly, efficiently, and effortlessly without programming. You can easily automate tasks such as renaming a large group of files, manipulating dozens of images, or creating a calendar using people from your Address Book. Once automated, you can repeat those tasks again and again. The basic building block in Automator is an Action. Each Action is designed to perform a single task, such as finding linked images in a Web page or copying files from one folder to another. Instead of being a do-it-all tool, an Action is purpose-designed to perform a single task well. The power in Automator comes from sequencing Actions into a Workflow. By combining several Actions into a Workflow, you can quickly and easily accomplish a specific task that no one Action can accomplish on its own. This idea of building functionality from small, discrete components dates back to the early days of UNIX. The breakthrough that Automator brings is allowing you to assemble small tools in an easy, intuitive GUI. Anyone with scripting or development skills is a prime candidate for creating Actions, and in most cases they'll be able to do it much faster than scripting by hand. The beauty of an Action is that it can take advantage of many sources of functionality. Actions can access the functionality of the core OS frameworks (such as Core Image and Core Data), leverage the command-line tool environment, or take advantage of the specialized features of a particular application. Even better, it's easy to create your own Actions with either AppleScript or Objective-C. If you are an application developer, creating Actions for your users is a great opportunity. It allows you to provide extended functionality in small, bite-sized units for use in their Workflows. Creating great Actions and Workflows can help expose key features of your application, making it even more valuable to your users. Creating Actions and Workflows that access functionality in other applications on a user's system is another tremendous opportunity to extend the value of your application. For example, iPhoto includes Actions for dealing with iPhoto albums and images. You could easily create a powerful Workflow that integrates your application with these features—something that would otherwise require writing some complex Carbon/Cococa code. This article shows you how Automator works, how you can build your own Actions to use in Automator, and how you can distribute those Actions to users. Using AutomatorAutomator comes preloaded with a large library of Actions. These Actions expose functionality built into the operating system, such as finding files with Spotlight, or the various applications that ship with the system, such as iPhoto, Mail, and iCal. There are also Actions that let you write shell scripts and AppleScripts. You can use these Actions to rename a group of files, create a new event in an iCal calendar, or to resize an image. This library of Actions is accessed and organized on the left hand side of the Automator window. 
To assemble a Workflow from a set of Actions, simply drag-and-drop the Actions from the library into the sequence in which you want them to run. Each Action in the Workflow corresponds to an individual step that you would need to perform manually. Each Action comes with a small GUI panel that lets you tweak its options and settings. Automator shows these panels connected, along with the types of data that are flowing from one Action to another. 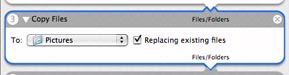
Once you have created a Workflow, you can save it as an editable document. This lets you re-open, edit, and run the Workflow inside of Automator. There are two more options for saving Workflows so that they can be run without Automator. The first is as a standalone application. This will create a double-clickable application that can be run from the Finder, moved around, and even shared with your friends and coworkers. The second is as an Automator Plug-In. Several parts of the system support Automator Plug-Ins including the Finder, Font Book, and iCal. When saved as a plug-in, your Workflow will automatically appear in, and be useable from, the application you select when saving the plug-in. Developer Related ActionsAutomator's Action library comes with several Actions related to development work, making it a powerful tool for developers. These are:
These Actions, and the many more that are part of the standard Automator library, will be useful in any developer's day-to-day work. Creating an ActionAs you can see, Automator is a powerful and flexible tool for users of all experience levels. If you are an application developer, it should be clear that letting users access the functionality of your application from Automator will enhance its value to them. Providing Actions is a powerful additional path to the features and services that make your products unique. 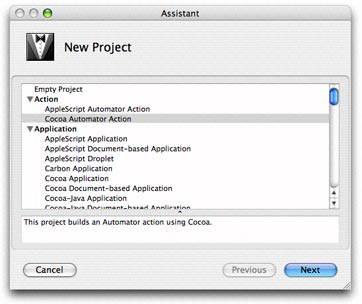
Actions are easy to create. There are Xcode templates for creating either AppleScript or Objective-C based Actions. These templates create the loadable bundles that Automator uses. The choice of language you use depends on the type of Action you want to create—as well as your own personal skill set. There are three general types of Automator Actions that you can create:
When a Workflow is run, the entry point of each Action is called in turn. The entry point of the Action depends on whether the Action is written in AppleScript or in Objective-C. AppleScript Action Entry PointFor an AppleScript-based Action, the entry point is the on run handler. Here's a skeleton implementation:
on run {input, parameters,}
    set output to {}
    if |ignoresInput| of parameters is false then
    -- process input items into output items
    end if
    return output
end run
The input object contains the output of the previous Action of the Workflow, usually in the form of a list. The parameters object contains any settings made in the Action's user interface. Once your Action is done, it needs to return an object which will be passed to the next Action. Objective-C Action Entry PointFor an Objective-C based Action, the entry point is the runWithInput:fromAction:error method. Here's a skeleton implmentation:
- (id) runWithInput:(id)input fromAction:(AMAction *)anAction error:(NSDictionary **)errorInfo
{
    NSMutableArray *output = [NSMutableArray array];
    // process input items into output items
    return output;
}
The input object, as well as the object you should return from this method, are almost always NSArray objects. The exact types of these objects, however, are defined outside of the code. Defining Inputs and OutputsThe expected input to, and output from, an Action is defined by its bundle's Info.plist file. The input types that an Action can take is defined by the AMAccepts key. This required property has three subproperties:
The outputs returned by the Action are defined by the AMProvides key. This property has two subproperties:
Here's an example of both of these keys in an Action that processes images:
<key>AMAccepts</key>
<dict>
    <key>Container</key>
    <string>List</string>
    <key>Optional</key>
    <true/>
    <key>Types</key>
    <array>
        <string>public.image</string>
        <string>public.item</string>
    </array>
</dict>
<key>AMProvides</key>
<dict>
    <key>Container</key>
    <string>List</string>
    <key>Types</key>
    <array>
        <string>public.image</string>
        <string>public.item</string>
    </array>
</dict>
Defining an Action's User InterfaceThe user interface for an Action is defined by a standard Interface Builder nib file. The nib file is predefined by the Xcode Action project templates and contains the following:
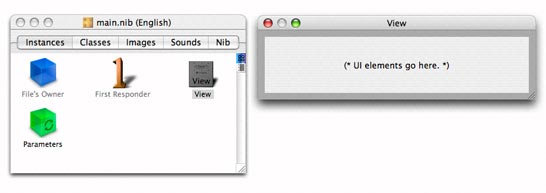
The user interface for an Action is constructed the same way as any other interface using Interface Builder. However, there are some additional user interface objects designed explicitly for Actions that aren't loaded by default into Interface Builder. To load this extra palette, add the /Developer/Extras/Palettes/AMPalette.palette in the Interface Builder preferences. 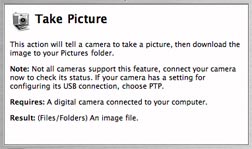
The Action DescriptionA very important part of the development of an Action is writing its description. The description is displayed by Automator in the lower-left corner and gives the user an idea of what the Action does. The description is defined by the AMDescription property which contains a set of subkeys that contains the various parts, including a summary, any notes, what the Action requires to run, and the result of the Action. For example, the description dictionary for a "Take Picture" Action would look as follows:
<key>AMDescription</key>
<dict>
    <key>AMDSummary</key>
    <string>
        This Action will tell a camera to take a picture,
        then download the image to your Pictures folder.
    </string>
    <key>AMNote</key>
    <string>
    	Not all cameras support this feature, connect your
    	camera now to check its status. If your camera has a
    	setting for configuring its USB connection, choose PTP.
    </string>
    <key>AMResult</key>
    <string>An image file.</string>
    <key>AMRequires</key>
    <string>A digital camera connected to your computer.</string>
    <key>AMIconName</key>
    <string>ImageCapture</string>
</dict>
Deploying ActionsThe Xcode Action project templates are set up so that when you run or debug your Action, Xcode launches Automator and adds your Action to the Action library. Once your Action has been debugged and tested, however, you'll want to be able to run it outside of Xcode or even share it with others. To do so, you'll want to place it (or set up an installer to place it) into one of the following folders:
The choice of which folder to use depends on whether the Action should be usable to every user on the system, or just a single user. Action Design GuidelinesSince many Actions are used with each other in Automator, they should have a consistent look and feel. Probably the most important piece of advice is to keep an Action as simple and as discrete as possible. An Action should not attempt to do too much. An Action that resembles a multi-tool will be too specialized to be useful and will limit the user. If the functionality that you want to provide is complicated, consider breaking it up into many small independent Actions. The user interface should also be kept as simple as possible. You should try to minimize the use of vertical space. In particular, use pop-up lists instead of radio buttons and avoid tab views. Probably the best strategy to adopt is to look at the other Actions in Automator. The more you can make yours look like the ones that are already there, the better off your users will be. ConclusionAs you have seen, Automator is a powerful tool. It will let users take control of tasks that they need to do every day. And it will also let developers allow users to extend the functionality of their applications in ways that they could never anticipate. How You Can Get StartedGetting started couldn't be easier. The first thing you should do, if you haven't already, is to become an Apple Developer Connection member. A free ADC Online membership provides access to the latest Xcode updates and other developer tools. An ADC Select Membership goes further by providing shipping versions of Mac OS X Tiger and Xcode 2 on disc, along with download access to Mac OS X Tiger Server. Select membership also includes direct, one-on-one consultation with Tiger support engineers, a discount on hardware through the ADC Hardware Purchase Program, and ongoing access to pre-release software. Next, you'll want to set yourself up with the Xcode 2.2 developer tools. It ships as part of each and every copy of Mac OS X Tiger on the Install DVD. Just double-click on the Xcode 2.2 package on the DVD and the developer tools—as well as a set of example code projects and comprehensive documentation in the ADC Reference Library—will be installed on your system. The documentation and sample code will help you learn more about the technologies covered in this article. For More InformationUpdated: 2006-03-06 |
|
Get information on Apple products. Copyright © 2010 Apple Inc. |