Running Applications
When you’re ready to run or debug your application, you build it using the Xcode build system. If there are no build errors, you can run it in iPhone Simulator or on a device.
Note: After testing your application in iPhone Simulator, you must test it on an iOS-based device to measure and tune its performance. To be able to run your application on a device, you must be a member of the iPhone Developer Program; see “Becoming a Member of the iPhone Developer Program” for details.
The iPhone SDK comprises two SDK families: The iPhone Simulator SDK and the iPhone Device SDK.
iPhone Simulator SDK: These SDKs build applications that run in iPhone Simulator.
iPhone Device SDK: These SDKs build applications that run in a device.
These are steps you follow to build and run applications:
Specify the buildtime environment.
Specify the runtime environment.
Set the Base SDK.
Specify where to run the application.
Build the application.
Run the application.
This chapter describes each of the steps required to run or debug your application. Start with “Running Sample Applications” if you’re interested in seeing applications that showcase iOS features.
Running Sample Applications
The iPhone Dev Center provides several resources that help you learn about the iOS application-development process. One of these resource types is sample code. You can download sample code to your computer and run it in iPhone Simulator. If you’re an iPhone Developer Program member, you can also run sample code on your device. See “Becoming a Member of the iPhone Developer Program” for details.
To run sample code:
Download the ZIP archive (the file with the
.zipsuffix) containing the sample code you want to use. The archive is named after the application name; for example,HelloWorld.zip.If you download the sample-code projects from the Xcode Documentation window, Xcode expands the archive and opens the project automatically. Otherwise, continue to the next step.
Expand the archive by double-clicking it.
Navigate to the sample-code project directory, also named after the example application; for example,
HelloWorld.Double-click the project package, a file with the
.xcodeprojsuffix. For example,HelloWorld.xcodeproj. This action opens the project in Xcode.Troubleshooting: Xcode doesn’t launch: If Xcode doesn’t launch, you need to download it and install it on your computer. To download Xcode, visit iPhone Dev Center.
With the sample-code project open in Xcode, follow the instructions in the following sections to build and run the application.
Specifying the Buildtime Environment
When you build your application, Xcode uses a build environment made up of frameworks, libraries, applications, command-line tools, and other resources. Each release of the iPhone SDK makes improvements to this environment to, for example, add user-interface features or improve compilers and resource-processing tools. In addition to these resources, you can specify whether you want to build your application to debug it or to distribute it to customers. This section describes how to set your buildtime environment.
Setting the Base SDK
One of the main factors that determine how Xcode builds your application is the SDK used to build it. As described earlier, iPhone SDKs come in two families: one to target devices and one to target iPhone Simulator. Applications built using an SDK from the iPhone Device SDK family can run only on iOS-based devices. Conversely, applications built using an SDK from the iPhone Simulator SDK family run only in iPhone Simulator.
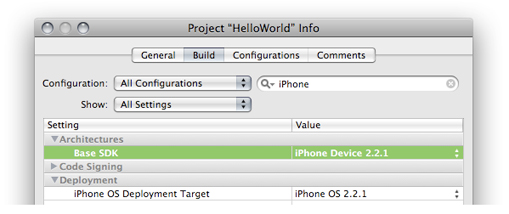
You specify the SDK Xcode uses to build your application in your project’s Base SDK build setting, which you can set in the General pane of the Project Info window or in the Build pane of the Project or Target Info window. Figure 3-1 shows the Base SDK for All Configurations pop-up menu in the General pane of the Project Info window.
Important: In addition, applications built using a particular version of an SDK–such as iPhone SDK 3.2, which targets iOS 3.2–may not run reliably on versions of the OS (on the iPhone Simulator or a device) that are earlier than its corresponding SDK. That is, if you want to run your application on iOS 3.1.3, for example, you must build it using iPhone SDK 3.1.3.
Setting Your Code Signing Identity
When you build your application to run it on a device, Xcode signs it with a development certificate (also known as a code signing identity) stored on your keychain. To learn how to obtain and install development certificates, see “Preparing Your Mac for iOS Development.”
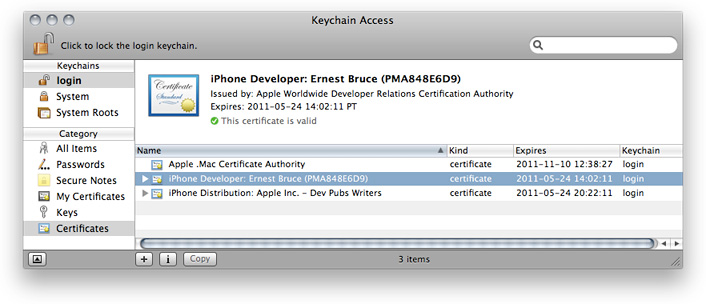
The Code Signing Identity build setting specifies the code signing identity Xcode uses to sign your binary. Xcode looks for code signing identities in your default keychain. Figure 3-2 shows an example set of options for the Code Signing Identity build setting obtained from the login (default) keychain shown in Figure 3-3 (the name of the default keychain appears bold in the Keychains list).
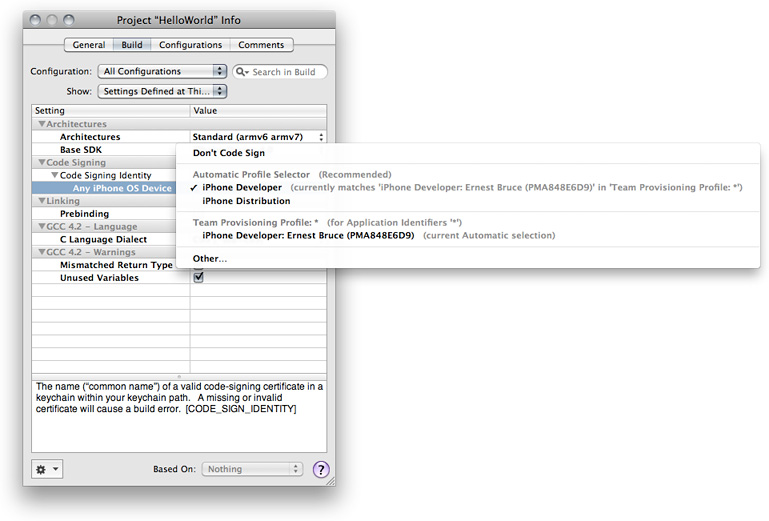
These are the possible values for the Code Signing Identity build setting:
Don’t Code Sign. Choose this option if you don’t want to sign your binary. Note that with this value, when you build your applications using the iPhone Device SDK the build fails.
Automatic Profile Selectors. These choices look for an identity whose name starts with “iPhone Developer” or “iPhone Distribution.”
A code signing identity. A specific code signing identity. The code signing identities in your default keychain are listed under the name of the provisioning profile under which you downloaded them from the iPhone Provisioning Portal. Expired or otherwise invalid identities are dimmed and cannot be chosen.
Xcode project templates are configured to use the iPhone Developer automatic selector.
Important: If need to use different code signing identities with the same name, you must use a separate Mac OS X user account for each identity.
Setting the Architecture
An iOS device uses one of a set of architectures, which include armv6 and armv7. The Architectures build setting identifies the architectures for which your application is built. You have two options for specifying the value of this setting:
Standard. Produces an application binary with a common architecture, compatible with all supported iOS devices. This option generates the smallest application, but it may not be optimized to run at the best possible speed for all devices.
Optimized. Produces an application binary optimized for each supported iOS device. However, the build time is longer than when using the Standard option, and the application is also larger because multiple instruction sets are bundled into it.
Choose the value for the Architecture build setting in the Build pane of the Target or Project Info window.
If you need to build your application so that it contains executable code for a different set of architectures than these predefined values offer, you can choose Other from the Architecture build-setting value list and enter the desired iOS-device architecture names.
Setting the Active Build Configuration
A build configuration tells Xcode the purpose of the built product. Xcode project templates are configured with Debug and Release configurations, which let you build your application for debugging or for release to customers, respectively. Debug builds include information and features that aid in debugging your application. Release builds produce smaller and faster binaries. During early and midlevel development, you should use the Debug configuration because it provides the best debugging experience. You should use the Release configuration in the last stages of development to measure and analyze your application’s performance.
When you start a build process, Xcode uses the active build configuration to build your application. There are two places you can set the active build configuration:
In the Set Active Build Configuration submenu in the Project menu
In the Overview pop-up menu in the toolbar
To learn more about the Release and Debug configurations, see “Building Products”.
Setting the Device Family
The device family identifies the type of devices you want the application to run on. There are two device families: iPhone, and iPad. The iPhone device family includes iPhone and iPod touch devices. The iPad device family includes iPad devices.
To specify the device families on which you want your application to be able to run:
Open the Project Info or Target Info window.
In the Build pane, locate the Targeted Device Family build setting and choose an appropriate value for it.
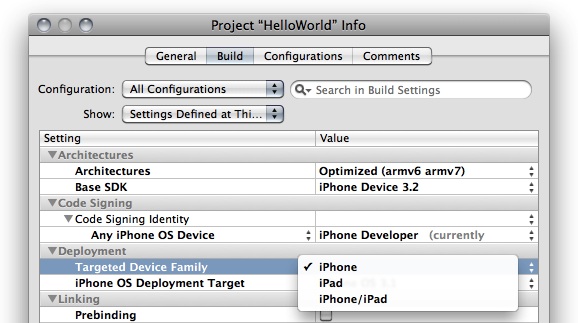
Table 3-1 lists the values you can specify for the Targeted Device Family build setting. It also indicates the device family the built application is optimized for.
Value | Application is optimized for |
|---|---|
iPhone | iPhone, and iPod touch |
iPad | iPad |
iPhone/iPad | iPhone, iPod touch, and iPad (universal application) |
Specifying the Runtime Environment
Each release of iOS (and its corresponding SDK) includes features and capabilities not present in earlier releases. As new releases of the OS are published, some users may upgrade immediately while other users may wait before moving to the latest release. You can take one of two strategies, depending on the needs of your application and your users:
Target the latest iOS release. Targeting the latest release allows you to take advantage of all the features available in the latest version of iOS. However, this approach may offer a smaller set of users capable of installing your application on their devices because your application cannot run on iOS releases that are earlier than the target release.
Target an earlier iOS release. Targeting an earlier release lets you publish your application to a larger set of users (because your application runs on the target OS release and later releases), but may limit the iOS features your application can use.
You specify the earliest iOS release on which you want your application to run with the iPhone OS Deployment Target build setting. By default, this build setting is set to the iOS release that corresponds to the Base SDK build-setting value. For example, when you set Base SDK to iPhone Device 2.2.1 or iPhone Simulator 2.2.1, the value of the iPhone Deployment Target build setting is iPhone OS 2.2.1, as shown in Figure 3-4.
To build your application using the iPhone Device 3.0 SDK and to allow it to run on iOS 2.2.1, set Base SDK to iPhone Device 3.0 and iPhone Deployment Target to iPhone OS 2.2.1.
When you build your application, your deployment target selection is reflected in the MinimumOSVersion entry in the application’s Info.plist file. When you publish your application to the App Store, the store indicates the iOS release on which your application can run based on the value of this property.
iPhone Device SDK: If the iPhone Device SDK release is earlier than the application’s target iOS release (for example, the active SDK is iPhone Device 2.2.1 and iPhone Deployment Target is iPhone OS 3.0), Xcode displays build warnings when it detects that your application is using a feature that’s not available in the target OS release. See “Specifying the Runtime Environment” for more information.
You must also ensure that the symbols you use are available in the application’s runtime environment using SDK-compatibility development techniques. These techniques are described in SDK Compatibility Guide.
iPhone Simulator SDK: When using the iPhone Simulator SDK to test your application, the iPhone Simulator software version must be set to the iOS release that corresponds to the iPhone Simulator SDK used to build the application. For example, if you build your application using iPhone Simulator SDK 2.2.1, you must set the iPhone Simulator software version to iOS 2.2.1. See “Specifying Where to Place Your Application” for details.
Specifying Where to Place Your Application
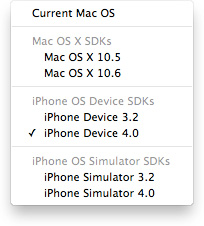
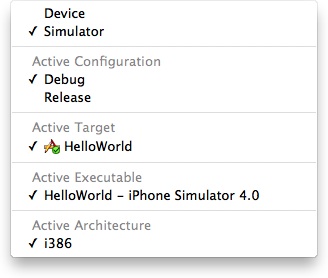
During development you may want to switch from running your application in iPhone Simulator to running it on a device to, for example, test the device performance of your application. To switch between running your application on a device on in the simulator use the Overview toolbar menu in the Project-window toolbar, shown in Figure 3-5, as described in these steps:
Choose whether you want to run your application on a device or in the simulation environment.
The first two options in the Overview toolbar menu let you choose between these alternatives.
Choose the device or the iPhone Simulator version on which you want to run the application.
The Active Executable section of the Overview toolbar menu lets you specify a device or iPhone Simulator version.
Building Your Application
To start the build process, choose Build > Build.
The status bar in the project window indicates that the build was successful or that there are build errors or warnings. You can view build errors and warnings in the text editor or the Project window.
Important: When building for iPhone Simulator, the generated binary runs only on the targeted iPhone Simulator release. It doesn’t run on earlier or later releases of the simulator.
iOS-based devices support two instruction sets, ARM and Thumb. Xcode uses Thumb instructions by default because using Thumb typically reduces code size by about 35 percent relative to ARM. Applications that have extensive floating-point code might perform better if they use ARM instructions rather than Thumb. You can turn off Thumb for your application by turning off the Compile for Thumb build setting.
If the build completes successfully, you can proceed to run your application as described in “Running Your Application.”
To learn more about the build process, see "Building Products".
Solving Build Errors
This section lists build errors you may experience while building your application and provides suggestions for solving them.
Provisioning Profile Errors
When building for a device, if Xcode has trouble installing your application onto your device due to a problem with your provisioning profile, ensure that your provisioning profile is properly configured in the iPhone Developer Program Portal (see “Becoming a Member of the iPhone Developer Program”). If necessary reinstall it on your computer and device, as described in “Preparing Your Mac for iOS Development.”
Code Signing Errors
When the code signing identity you’re using to sign your binary has expired or is otherwise invalid, you may get the following build-error message:
Code Signing Identity 'iPhone Developer' does not match any valid, non-expired, code-signing certificate in your keychain. |
To solve the error, choose a valid code signing identity, as described in “Setting Your Code Signing Identity.”
Application ID Errors
Application ID build errors may be produced due to a conflict between the application ID set in your provisioning profile (obtained through the Program Portal) and the application ID specified by the CFBundleIdentifier property of your application. To avoid such errors, ensure that the application ID in the profile is set to com.<organization_name>.* and your application’s CFBundleIdentifier property is set to com.<organization_name>.<application_name>. That is, if the application ID in your provisioning profile specifies a domain set, the application ID specified by the CFBundleIdentifier property of your application must not redefine the domain set, it may only reduce it. Table 3-2 and Table 3-3 identify valid and invalid pairing of these items.
Provisioning profile | App ID |
|
Application bundle |
|
|
Provisioning profile | App ID |
|
Application bundle |
|
|
To learn about the structure of iOS application binaries, including details about the CFBundleIdentifier property, see “The Application Bundle” in iOS Application Programming Guide.
To learn about solving other build errors, use the techniques described in “Viewing Errors and Warnings” in Xcode Project Management Guide to fix them.
Running Your Application
When you run your application, Xcode installs it on iPhone Simulator or a device and launches it.
Once running, you can test that your application performs as you intend using all the capabilities of your device. You should especially ensure that your application uses the device’s resources—CPU, memory, battery, and so on—as efficiently as possible. See “Tuning Applications” for more information.
To run your application, choose Run > Run or Run > Debug.
Troubleshooting: If you get the “Failed to start remote debug server” while trying to debug your application on your device, your device may not be running the iOS release that corresponds to your iPhone SDK. For more information, see “Installing iOS.”
Streamlining the Build-and-Run Workflow
In addition to the Build, Run, and Debug commands, Xcode provides convenience commands that perform these operations as a single task. These commands are Build and Run and Build and Debug.
Managing Application Data
As you develop your application, you might need to rely on user settings and application data to remain on iPhone Simulator or your development device between builds. Xcode doesn’t remove any user settings or application data as you build your application and install it on its host. But you may need to erase that information as part of testing your application the way users will use it. To do so, remove the application from the Home screen. See “Uninstalling Applications” for details.
As described in “File and Data Management” in iOS Application Programming Guide, iOS applications can access only files that reside in the application’s local file system. You can view your application’s local file system in your device and in iPhone Simulator.
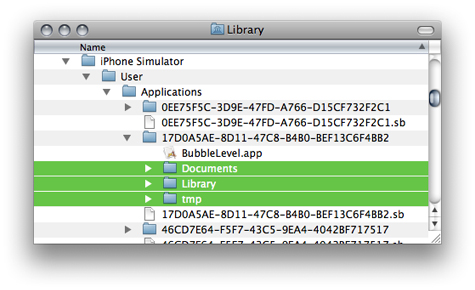
To view your application’s iPhone Simulator–based file system, navigate to the ~/Library/Application Support/iPhone Simulator/User/Applications directory in the Finder. Then open each directory in the Applications directory to find your application’s binary file. Alongside the binary file are the directories that make up your application’s local file system. Figure 3-6 shows the local file system for the BubbleLevel application in iPhone Simulator.
To make a copy of your application’s device–based file system to your Mac:
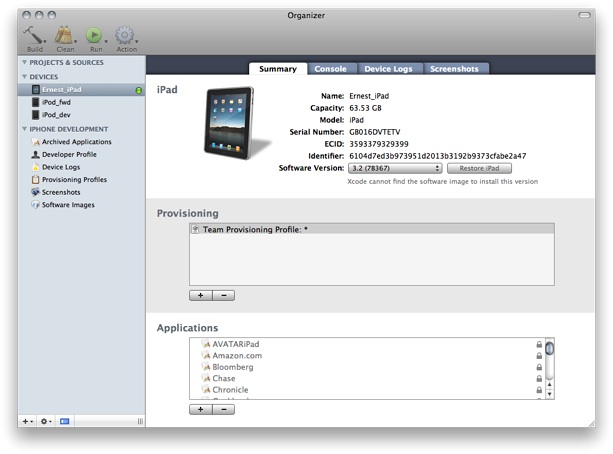
In Xcode, choose Window > Organizer.
In the Organizer, select your device in the Devices list.
In the Summary pane, click the disclosure triangle next to your application.
Click the download button (the down-pointing arrow to the left of the Application Data package), as shown in Figure 3-7.
In the dialog that appears, choose a location for the file-system copy.
To restore your application’s file system to a backup on your Mac:
In Xcode, open the Organizer.
In the Finder, locate the directory containing the backup.
Drag the backup to your application in the Summary pane of the Organizer.
Further Exploration
To learn more about using Xcode to build and run applications, see Xcode Project Management Guide.
Last updated: 2010-07-02