Build-Time Configuration Details
The configuration of your application is an important part of the development process. An iOS application uses a structured directory to manage its code and resource files. And although most of the files in this directory are custom files to support your application, some are resource files required by the system to run your application. Configuring these files correctly is therefore crucial to creating your application.
The Application Bundle
When you build your iOS application, Xcode packages it as a bundle. A bundle is a directory in the file system that groups related resources together in one place. An iOS application bundle contains the application executable and any resources used by the application (for instance, the application icon, other images, and localized content). Table 7-1 lists the contents of a typical iOS application bundle, which for demonstration purposes here is called MyApp. This example is for illustrative purposes only. Some of the files listed in this table may not appear in your own application bundles.
Files | Description |
|---|---|
| The executable file containing your application’s code. The name of this file is the same as your application name minus the This file is required. |
| Also known as the information property list file, a file defining key values for the application, such as bundle ID, version number, and display name. This file is required. For more information about this file, see “The Information Property List.” |
| The application’s main nib file, containing the default interface objects to load at application launch time. Typically, this nib file contains the application’s main window object and an instance of the application delegate object. Other interface objects are then either loaded from additional nib files or created programmatically by the application. (The name of the main nib file can be changed by assigning a different value to the |
Application icons | One or more image files containing the icons used to represent your application. Differently sized variants of the application icon may also be provided. An application icon is required. For information about these image files, see “Application Icons.” |
One or more launch images | A screen-sized image to display when your application is launched. The system uses this file as a temporary background until your application loads its window and user interface. At least one launch image is required. For information about specifying launch images, see “Application Launch Images.” |
| The 512 x 512 pixel icon for an application that is distributed using ad hoc distribution. This icon would normally be provided by the App Store; because applications distributed in an ad hoc manner do not go through the App Store, however, it must be present in the application bundle instead. iTunes uses this icon to represent your application. (The file you specify should be the same one you would have submitted to the App Store (typically a JPEG or PNG file), were you to distribute your application that way. The filename must be the one shown at left and must not include a filename extension.) |
| A file package that you use to add application preferences to the Settings application. This bundle contains property lists and other resource files to configure and display your preferences. For more information about specifying settings, see “Displaying Application Preferences.” |
| Nonlocalized resources are placed at the top level of the bundle directory ( |
other language-specific project directories | Localized resources are placed in subdirectories with an ISO 639-1 language abbreviation for a name plus an |
An iOS application should be internationalized and have a language.lproj directory for each language it supports. In addition to providing localized versions of your application’s custom resources, you can also localize your application icon, launch images, and Settings icon by placing files with the same name in your language-specific project directories. Even if you provide localized versions, however, you should always include a default version of these files at the top level of your application bundle. The default version is used in situations where a specific localization is not available.
At runtime, you can access your application’s resource files from your code using the following steps:
Obtain a reference to an appropriate bundle object (typically an
NSBundleobject).Use the methods of that object to obtain a file-system path to the desired resource file.
Open or access the file using the standard system techniques.
You can obtain a reference to your application’s main bundle using the mainBundle class method of NSBundle. The pathForResource:ofType: method is one of several methods that you can use to retrieve the location of resources in a bundle. The following example shows you how to locate a file called sun.png and create an image object using it. The first line gets the bundle object and the path to the file. The second line creates the UIImage object you would need in order to use the image in your application.
NSString* imagePath = [[NSBundle mainBundle] pathForResource:@"sun" ofType:@"png"]; |
UIImage* sunImage = [[UIImage alloc] initWithContentsOfFile:imagePath]; |
Note: If you prefer to use Core Foundation to access bundles, you can obtain a CFBundleRef opaque type using the CFBundleGetMainBundle function. You can then use that opaque type plus the Core Foundation functions to locate any bundle resources.
For information on how to access and use resources in your application, see Resource Programming Guide. For more information about the structure of an iOS application bundle, see Bundle Programming Guide.
The Information Property List
The information property list is a file named Info.plist that is included with every iOS application project created by Xcode. It is a property list whose key-value pairs specify essential runtime-configuration information for the application. The elements of the information property list are organized in a hierarchy in which each node is an entity such as an array, dictionary, string, or other scalar type.
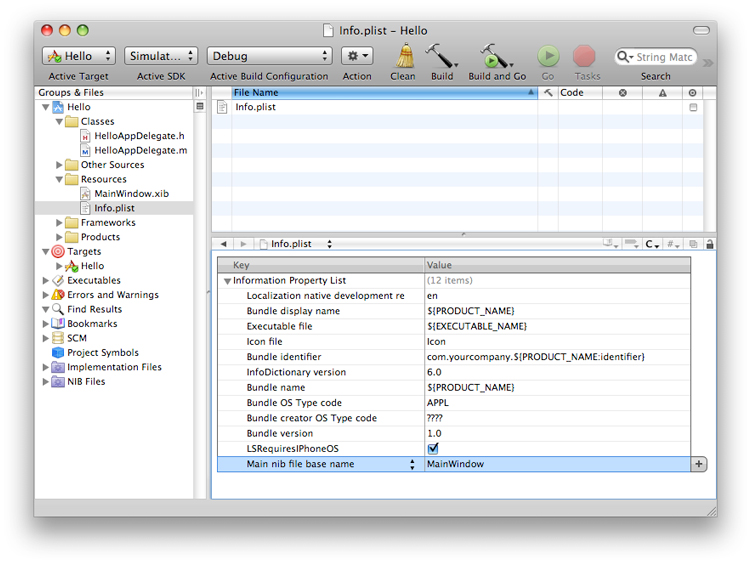
In Xcode, you can access the information property list by choosing Edit Active Target TargetName from the Project menu. Then, in the target’s Info window, click the Properties control. Xcode displays a pane of information similar to the example in Figure 7-1.
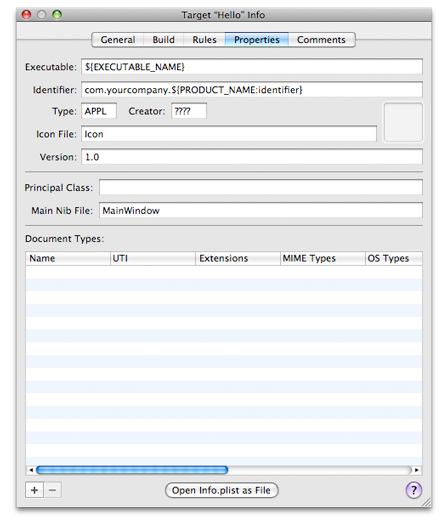
The Properties pane shows you some, but not all, of the properties of the application bundle. When you click the “Open Info.plist as File” button, or when you select the Info.plist file in your Xcode project, Xcode displays a property list editor window similar to the one in Figure 7-2. You can use this window to edit the property values and add new key-value pairs. To see the actual key names added to the Info.plist file, Control-click the Information Property List item in the editor and select Show Raw Keys/Values from the contextual menu that appears.
Xcode automatically adds some important keys to the Info.plist file of all new projects and sets the initial value. However, there are several keys that iOS applications use commonly to configure their launch environment and runtime behavior. Here are some of the important keys that you might want to add to your application’s Info.plist file specifically for iOS:
CFBundleIconFilesUIStatusBarStyleUIInterfaceOrientationUIRequiredDeviceCapabilitiesUIRequiresPersistentWiFi
For detailed information about these and other properties that you can include in your application’s Info.plist file, see Information Property List Key Reference.
iTunes Requirements
The App Store requires that you provide metadata about your application before submitting it. Most of this metadata is specified using the program portal web page, but some of it must be embedded directly in your application bundle.
Declaring the Required Device Capabilities
If your application requires device-related features in order to run, you must add a list of required capabilities to your application. At runtime, iOS will not launch your application unless those capabilities are present on the device. Further, the App Store requires this information so that it can generate a list of requirements for user devices and prevent users from downloading applications that they cannot run.
You add the list of required capabilities by adding the UIRequiredDeviceCapabilities key to your application’s Info.plist file. This key is supported in iOS 3.0 and later. The value of this key is either an array or a dictionary. If you use an array, the presence of a given key indicates that the corresponding feature is required. If you use a dictionary, you must specify a Boolean value for each key. If the value of this key is true, the feature is required. If the value of the key is false, the feature must not be present on the device. In both cases, omitting a key indicates that the feature is not required but that the application is able to run if the feature is present.
Table 7-2 lists the keys that you can include in the array or dictionary associated with the UIRequiredDeviceCapabilities key. You should include keys only for the features that your application absolutely requires. If your application can accommodate missing features by not executing the appropriate code paths, you do not need to include the corresponding key.
Key | Description |
|---|---|
Include this key if your application requires (or specifically prohibits) the presence of the Phone application. You might require this feature if your application opens URLs with the | |
Include this key if your application requires (or specifically prohibits) access to the networking features of the device. | |
Include this key if your application requires (or specifically prohibits) the presence of the Messages application. You might require this feature if your application opens URLs with the | |
Include this key if your application requires (or specifically prohibits) the presence of a camera on the device. Applications use the | |
Include this key if your application requires (or specifically prohibits) auto-focus capabilities in the device’s still camera. Although most developers should not need to include this key, you might include it if your application supports macro photography or requires sharper images in order to do some sort of image processing. | |
Include this key if your application requires (or specifically prohibits) the presence of a forward-facing camera. Applications use the | |
Include this key if your application requires (or specifically prohibits) the presence of a camera flash for taking pictures or shooting video. Applications use the | |
Include this key if your application requires (or specifically prohibits) the presence of a camera with video capabilities on the device. Applications use the | |
Include this key if your application requires (or specifically prohibits) the presence of accelerometers on the device. Applications use the classes of the Core Motion framework to receive accelerometer events. You do not need to include this key if your application detects only device orientation changes. | |
Include this key if your application requires (or specifically prohibits) the presence of a gyroscope on the device. Applications use the Core Motion framework to retrieve information from gyroscope hardware. | |
Include this key if your application requires (or specifically prohibits) the ability to retrieve the device’s current location using the Core Location framework. (This key refers to the general location services feature. If you specifically need GPS-level accuracy, you should also include the | |
Include this key if your application requires (or specifically prohibits) the presence of GPS (or AGPS) hardware when tracking locations. (You should include this key only if you need the higher accuracy offered by GPS hardware.) If you include this key, you should also include the | |
Include this key if your application requires (or specifically prohibits) the presence of magnetometer hardware. Applications use this hardware to receive heading-related events through the Core Location framework. | |
Include this key if your application uses the built-in microphone or supports accessories that provide a microphone. | |
Include this key if your application requires (or specifically prohibits) the presence of the OpenGL ES 1.1 interfaces. | |
Include this key if your application requires (or specifically prohibits) the presence of the OpenGL ES 2.0 interfaces. | |
Include this key if your application is compiled only for the armv6 instruction set. (iOS 3.1 and later.) | |
Include this key if your application is compiled only for the armv7 instruction set. (iOS 3.1 and later.) | |
Include this key if your application requires (or specifically prohibits) peer-to-peer connectivity over Bluetooth. (iOS 3.1 and later.) |
For detailed information on how to create and edit property lists, see Information Property List Key Reference.
Application Icons
Every application must specify an icon to be displayed on the device’s Home screen and in the App Store. And an application may specify several different icons for use in different situations. For example, applications can provide a small version of the application icon to use when displaying search results.
To specify the icons for your application, add the CFBundleIconFiles key to your application’s Info.plist file and list the icon image filenames in the associated array. The filenames can be anything you want but all image files must be in the PNG format and reside in the top-level of your application bundle. When the system needs an appropriately sized icon, it looks at the files in the CFBundleIconFiles array and picks the one whose size most closely matches the intended usage. (If your application also runs in iOS 3.1.3 or earlier, you must use specific names for your icon image files; these filenames are described later in this section.)
Table 7-3 lists the dimensions of the image files you can associate with the CFBundleIconFiles key, along with basic information about the intended usage for each icon. For devices that support high-resolution versions of an icon, two icons should be provided with the second one being a high-resolution version of the original. The names of the two icons should be the same except for the inclusion of the string @2x in the filename of the high-resolution image as described in “Updating Your Image Resource Files.” For detailed information about the usage and preparation of your icons, see iPhone Human Interface Guidelines or iPad Human Interface Guidelines.
Icon | Idiom | Size | Usage |
|---|---|---|---|
Application icon (required) | iPhone | 57 x 57 pixels 114 x 114 pixels ( | This is the main icon for applications running on iPhone and iPod touch. The |
Application icon (required) | iPad | 72 x 72 pixels | This is the main icon for applications running on iPad. |
Settings/Search results icon | iPhone/iPad | 29 x 29 pixels 58 x 58 pixels ( | Displayed in conjunction with search results on iPhone and iPod touch. Also used by the Settings application on all device types. (The |
Search results icon | iPad | 50 x 50 pixels | Displayed in conjunction with search results on iPad. |
When specifying icon files using the CFBundleIconFiles key, it is best to omit the filename extensions of your image files. If you include a filename extension, you must explicitly add all of your image files (including any high-resolution variants) to the array. When you omit the filename extension, the system automatically detects high-resolution variants of your file using the base filename you provide.
Note: Do not confuse the CFBundleIconFiles key with the CFBundleIconFile key. The keys provide similar behaviors but the plural version is preferred because it allows you to specify an array of image filenames instead of a single filename. The plural version of the key is available only in iOS 3.2 and later.
If your iPhone application supports running in iOS 3.1.3 or earlier, you must use specific naming conventions when creating your icon image files. Because the CFBundleIconFiles key was introduced in iOS 3.2, it is not recognized by earlier versions of the system. Instead, earlier versions of the system look for application icons by name. The sizes of the icons are the same as those listed in Table 7-3, but each icon must be named as follows:
Icon.png- The name for the application icon on iPhone or iPod touch.Icon-72.png- The name for the application icon on iPad.Icon-Small.png- The name for the search results icon on iPhone and iPod touch. This file is also used for the Settings icon on all devices.Icon-Small-50.png- The name of the search results icon on iPad.
Important: The use of fixed filenames for your application icons is for compatibility with earlier versions of iOS only. Even if you use these fixed icon filenames, your application should continue to include the CFBundleIconFiles key in its Info.plist if it is able to run in iOS 3.2 and later. In iOS 3.2 and earlier, the system looks for icons with the fixed filenames first. In iOS 4 and later, the system looks for icons in the CFBundleIconFiles key first.
In addition to the other icon files, developers who distribute their applications using ad hoc distribution must include a 512 x 512 version of their icon and give it the name iTunesArtwork (no filename extension). This icon is displayed by iTunes when presenting your application for distribution. Like all other icon files, the iTunesArtwork image file must reside at the top-level of your application bundle. The file should be the same one you would have submitted to the App Store (typically a JPEG or PNG file), were you to distribute your application that way.
For more information about the CFBundleIconFiles key, see Information Property List Key Reference. For information about creating your application icons, see iPhone Human Interface Guidelines and iPad Human Interface Guidelines.
Application Launch Images
When it launches an application, the system temporarily displays a static launch image on the screen. The launch image is an image file that you provide and is usually a prerendered version of your application’s default user interface. Presenting this image gives the user immediate feedback that the application launched and also gives your application time to initialize itself and prepare its initial set of views for display. Once your application is ready to run, the image is removed and the corresponding windows and views are shown.
Every application must provide at least one launch image. This is typically a file named Default.png that displays your application’s initial screen in a portrait orientation. However, you can also provide other launch images to be used under different launch conditions. Launch images must be PNG files and must reside in the top level of your application’s bundle directory. The name of each launch image indicates when it is to be used, and the basic format for launch image filenames is as follows:
<basename><usage_specific_modifiers><scale_modifier><device_modifier>.png
The <basename> portion of the filename is either the string Default or the custom string associated with the UILaunchImageFile key in your application’s Info.plist file. The <scale_modifier> portion is the optional string @2x and should be included only on images intended for use on high-resolution screens. Other optional modifiers may also be included in the name, and several standard modifiers are discussed in the sections that follow.
Table 7-4 lists the typical dimensions for launch images in iOS applications. For all dimensions, the image width is listed first, followed by the image height. For precise information about which size launch image to use, and how to prepare your launch images, see iPhone Human Interface Guidelines or iPad Human Interface Guidelines.
Device | Portrait | Landscape |
|---|---|---|
iPhone and iPod touch | 320 x 480 pixels 640 x 960 pixels (high resolution) | Not supported |
iPad | 768 x 1004 pixels | 1024 x 748 pixels |
To demonstrate the naming conventions, suppose your iOS application’s Info.plist file included the UILaunchImageFile key with the value MyLaunchImage. The standard resolution version of the launch image would be named MyLaunchImage.png and would be in a portrait orientation (480 x 320). The high-resolution version of the same launch image would be named MyLaunchImage@2x.png. If you did not specify a custom launch image name these files would need to be named Default.png and Default@2x.png respectively.
Providing Launch Images for Different Orientations
In iOS 3.2 and later, an iPad application can provide different launch images depending on whether the device is in a portrait or landscape configuration. To specify a launch image for a different orientation, you must add a special modifier string to the base file name of your standard launch image. Thus, the format of each file name becomes the following:
<basename><orientation_modifier><scale_modifier><device_modifier>.png
Table 7-5 lists the possible modifiers you can specify for the <orientation_modifier> value in your image filenames. As with any launch image, the file must be in the PNG format. These modifiers are supported for launch images used in iPad applications only; they are not supported for applications running on iPhone or iPod touch devices.
Modifier | Description |
|---|---|
| Specifies an upside-down portrait version of the launch image. A file with this modifier takes precedence over a file with the |
| Specifies a left-oriented landscape version of the launch image. A file with this modifier takes precedence over a file with the |
| Specifies a right-oriented landscape version of the launch image. A file with this modifier takes precedence over a file with the |
| Specifies the generic portrait version of the launch image. This image is used for right side-up portrait orientations and takes precedence over the |
| Specifies the generic landscape version of the launch image. If a file with the |
None | If you provide a launch image file with no orientation modifier, that file is used when no other orientation-specific launch image is available. In iOS 3.1.x and earlier, this is the only supported launch image file type and must be named |
For example, if you specify the value MyLaunchImage in the UILaunchImageFile key, the custom landscape and portrait launch images for your application would be named MyLaunchImage-Landscape.png and MyLaunchImage-Portrait.png. (The high-resolution variants of your images would be MyLaunchImage-Landscape@2x.png and MyLaunchImage-Portrait@2x.png.) If you did not specify a custom launch image filename, you would use the names Default-Landscape.png and Default-Portrait.png.
No matter which launch image is selected by the system, your application always launches in a portrait orientation initially and then rotates as needed to the correct orientation. Therefore, your application:didFinishLaunchingWithOptions: method should always assume a portrait orientation when setting up your window and views. Shortly after your application:didFinishLaunchingWithOptions: method returns, the system sends any necessary orientation-change notifications to your application’s window, giving it and your application’s view controllers a chance to reorient any views using the standard process. For more information about how your view controllers manage the rotation process, see “Custom View Controllers” in View Controller Programming Guide for iOS.
Providing Device-Specific Launch Images
It is possible to mark specific image files as usable only on a specific type of device. This capability simplifies the code you have to write for Universal applications. Rather than creating separate code paths to load one version of a resource file for iPhone and a different version of the file for iPad, you can let the bundle-loading routines choose the correct file at load time. All you have to do is specify one of the following values for the <device_modifier> portion of your image’s filename:
~ipad- The resource should be loaded on iPad devices only.~iphone- The resource should be loaded on iPhone or iPod touch devices only.
For example, if the name of your application’s launch image on iPhone and iPod touch is MyLaunchImage.png, the iPad specific version would be MyLaunchImage~ipad.png. Although you could include a MyLaunchImage~iphone.png image for the iPhone specific version (and a MyLaunchImage@2x~iphone.png for the high-resolution variant), it is better to use device modifiers only when necessary to distinguish the image from the default version. If no device-specific version of an image is present, the system loads the default version automatically.
Note: Another way to specify device-specific launch images is using device-specific keys in your Info.plist file. Adding a device-specific modifier to the UILaunchImageFile key lets you specify a custom basename for launch images used on different devices. For more information on how to apply device modifiers to keys in the Info.plist file, see Information Property List Key Reference.
Providing Launch Images for Custom URL Schemes
If your application supports a custom URL scheme, the system can display a custom launch image whenever it launches your application in response to a URL request. Prior to opening your application, the system looks for a launch image whose filename matches the following format:
<basename>-<url_scheme><scale_modifier><device_modifier>.png
The <url_scheme> modifier is a string representing the name of your URL scheme name. For example, if your application supports a URL scheme with the name myscheme, then the system would look for an image with the name Default-myscheme.png (or Default-myscheme@2x.png in the high-resolution case) in the application’s bundle. If the application’s Info.plist file includes the UILaunchImageFile key, then the base name portion changes from Default to the custom string you provide in that key.
Note: You can combine a URL scheme modifier with orientation modifiers. If you do this, the format for the file name is <basename>-<scheme>-<orientation_modifier><scale_modifier><device_modifier>.png. For more information about the launch orientation modifiers, see “Providing Launch Images for Different Orientations.”
In addition to including the launch images at the top level of your bundle, you can also include localized versions of that images in your application’s language-specific project subdirectories. For more information on localizing resources in your application, see “Internationalizing Your Application.”
Internationalizing Your Application
Ideally, the text, images, and other content that iOS applications display to users should be localized for multiple languages. The text that an alert dialog displays, for example, should be in the preferred language of the user. The process of preparing a project for content localized for particular languages is called internationalization. Project components that are candidates for localization include:
Code-generated text, including locale-specific aspects of date, time, and number formatting
Static text—for example, an HTML file loaded into a web view for displaying application help
Icons (including your application icon) and other images when those images either contain text or have some culture-specific meaning
Sound files containing spoken language
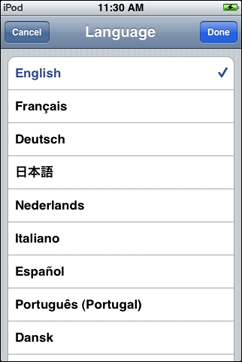
Using the Settings application, users select the language they want to see in their applications’ user interfaces from the Language preferences view (see Figure 7-3). They get to this view from the International group of settings, accessed from General settings.
The chosen language is associated with a subdirectory of the bundle. The subdirectory name has two components: an ISO 639-1 language code and a .lproj suffix. For example, to designate resources localized to English, the bundle would be named en.lproj. By convention, these language-localized subdirectories are called lproj directories.
Note: You may use ISO 639-2 language codes instead of those defined by ISO 639-1. However, you should should not include region codes (as defined by the ISO 3166-1 conventions) when naming your lproj directories. Although region information is used for formatting dates, numbers, and other types of information, it is not taken into consideration when choosing which language directory to use. For more information about language and region codes, see “Language and Locale Designations” in Internationalization Programming Topics.
An lproj directory contains all the localized content for a given language. You use the facilities of the NSBundle class or the CFBundleRef opaque type to locate (in one of the application’s lproj directories) resources localized for the currently selected language. Listing 7-1 gives an example of such a directory containing content localized for English (en).
Listing 7-1 The contents of a language-localized subdirectory
en.lproj/ |
InfoPlist.strings |
Localizable.strings |
sign.png |
This subdirectory example has the following items:
The
InfoPlist.stringsfile contains strings assigned as localized values of certain properties in the project’sInfo.plistfile (such asCFBundleDisplayName). For example, theCFBundleDisplayNamekey for an application named Battleship in the English version would have this entry inInfoPlist.stringsin thefr.lprojsubdirectory:CFBundleDisplayName = "Cuirassé";
The
Localizable.stringsfile contains localized versions of strings generated by application code.The
sign.pngfile in this example is a file containing a localized image.
To internationalize strings in your code for localization, use the NSLocalizedString macro in place of the string. This macro has the following declaration:
NSString *NSLocalizedString(NSString *key, NSString *comment); |
The first parameter is a unique key to a localized string in a Localizable.strings file in a given lproj directory. The second parameter is a comment that indicates how the string is used and therefore provides additional context to the translator. For example, suppose you are setting the content of a label (UILabel object) in your user interface. The following code would internationalize the label’s text:
label.text = NSLocalizedString(@"City", @"Label for City text field"); |
You can then create a Localizable.strings file for a given language and add it to the proper lproj directory. For the above key, this file would have an entry similar to the following:
"City" = "Ville"; |
Note: Alternatively, you can insert NSLocalizedString calls in your code where appropriate and then run the genstrings command-line tool. This tool generates a Localizable.strings template that includes the key and comment for each string requiring translation. For further information about genstrings, see the genstrings(1) man page.
For more information about internationalization and how you support it in your iOS applications, see Internationalization Programming Topics.
Last updated: 2010-06-30