Managing Devices and Digital Identities
With iPhone Simulator you can start developing iOS applications without using iOS-based devices. This way you can familiarize yourself with the API and development workflows used to develop applications. However, you must always test your applications on actual devices before publishing them to ensure that they run as intended and to tune them for performance on actual hardware.
As a registered Apple developer you can log in to the iPhone Dev Center, which provides access to iOS developer documentation and lets you build iOS applications that run in iPhone Simulator. (To become a registered Apple developer, visit http://developer.apple.com/programs/register/.) Being a registered Apple developer, however, doesn’t allow you to run applications on iOS-based devices. To do so you must be a member of the iPhone Developer Program. See “Becoming a Member of the iPhone Developer Program” for more information.
This chapter shows how to configure your computer and devices for iOS development. It also shows how to view your application’s console logs or crash information, or to take screenshots of your application as it runs. The chapter also describes how to safeguard the digital identifications required to install applications in development in devices.
Becoming a Member of the iPhone Developer Program
The iPhone Developer Program provides the tools and resources you need to run applications on development devices and distribute them to iOS users. To become a member of the iPhone Developer Program, visit http://developer.apple.com/iphone/program.
After becoming an iPhone Developer Program member, you have access to the iPhone Provisioning Portal in the iPhone Dev Center. The iPhone Provisioning Portal (or Portal) is a restricted-access area of the iPhone Dev Center that stores information about your development devices. It also manages other resources, including development certificates and provisioning profiles, used in the development and distribution of iOS applications.
Important: If you are not a member of the iPhone Developer Program, you do not have access to the iPhone Provisioning Portal.
Preparing Your Mac for iOS Development
To run applications on a device, you must configure your computer and device for iOS development. This section presents an overview of the process, which the Xcode Organizer can manage for you.
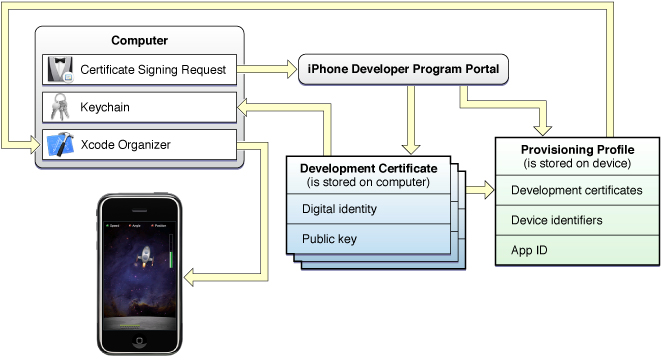
In preparing your device for development, you create or obtain the following digital assets:
Certificate signing request. A certificate signing request (CSR) contains personal information used to generate your development certificate. You submit this request to the iPhone Provisioning Portal.
Development certificate. A development certificate identifies an iOS application developer. After the CSR is approved, you download your developer certificate from the portal and add it to your keychain.
When you build your iOS application with Xcode, it looks for your development certificate in your keychain; if it finds the certificate, Xcode signs your application, otherwise, it reports a build error.
Provisioning profile. A provisioning profile associates one or more development certificates, devices, and an app ID (iOS application ID).
To be able to install iOS applications signed with your development certificate on a device, you must install at least one provisioning profile on the device. This provisioning profile must identify you (through your development certificate) and your device (by listing its unique device identifier). If you’re part of an iOS developer team, other members of your team, with appropriately defined provisioning profiles, may run applications you build on their devices.
Figure 5-1 illustrates the relationship between these digital assets.
Provisioning a Device for Development
To run applications on a device, you must set up the device for development. This process involves two main tasks:
Creating a provisioning profile that identifies your device on the iPhone Provisioning Portal.
Installing that provisioning profile in your device.
You can have Xcode perform these tasks automatically when you designate new devices for development, as described in “Provisioning a Device for Generic Development.” However, if your application requires a specialized provisioning profile (if it uses push notifications or in-app purchases), you need to follow the steps in “Provisioning a Device for Specialized Development.”
Provisioning a Device for Generic Development
To provision a new device for generic development:
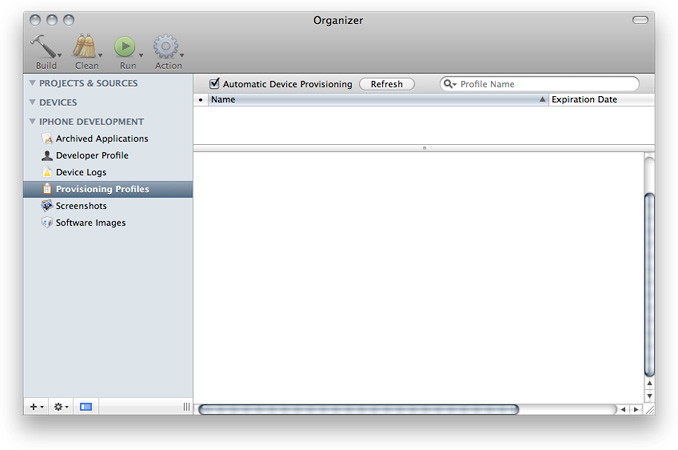
Open the Xcode Organizer.
In the IPHONE DEVELOPMENT group, select Provisioning Profiles.
Select the Automatic Device Provisioning option.
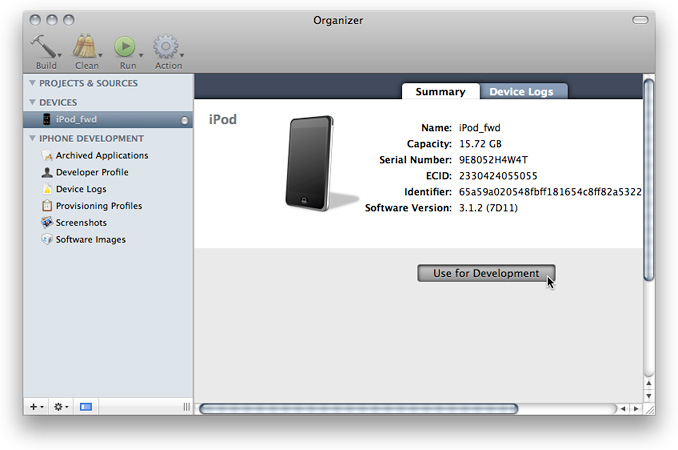
Plug in your device.
In the DEVICES group, select your device and click Use for Development.
In the dialog that appears, enter your iPhone Developer Program credentials.
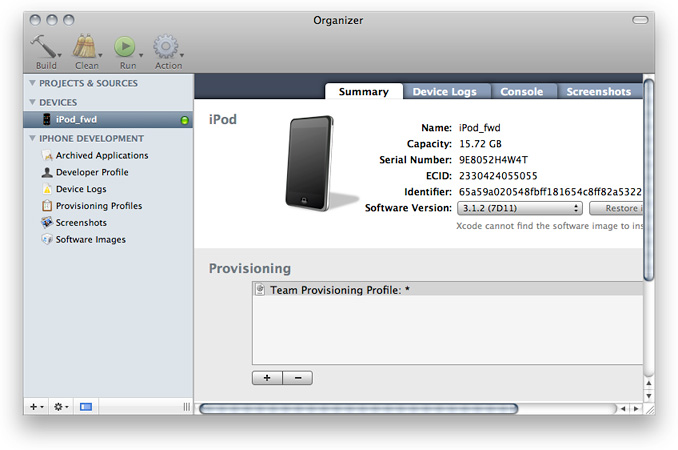
Xcode logs in to the Portal and adds the new device to it. Xcode also adds a provisioning profile called “Team Provisioning Profile: *” to your device. This provisioning profile is shared among the members of your team who provision their devices automatically.
If Xcode offers to request a development certificate in your behalf, click Submit Request.
To ensure that your device is provisioned correctly, you can download a sample project, build it using a device SDK, and run the application it produces on your device. See, “Running Sample Applications” for details.
Provisioning a Device for Specialized Development
When you use specialized provisioning profiles (required to run applications that use push notifications or in-app purchases, for example), you must create those provisioning profiles in the Portal and install them on your development device.
First, follow the steps in “Provisioning a Device for Generic Development” to add your device to the Portal.
To add a specialized provisioning profile to your device:
In the Portal, add your device to the specialized provisioning profile.
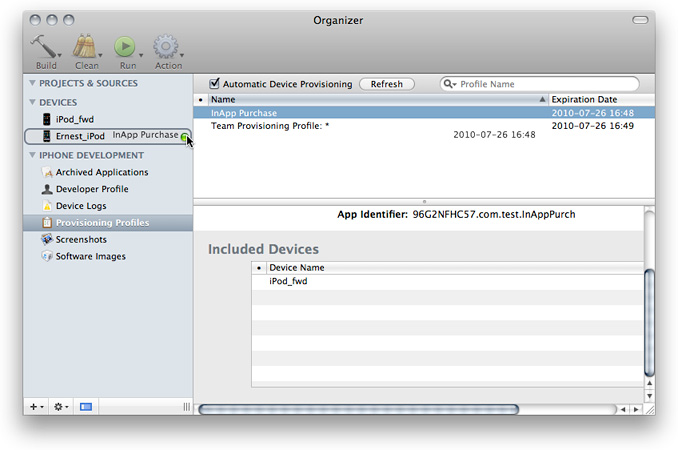
In the Xcode Organizer, select Provisioning Profiles in the IPHONE DEVELOPMENT group.
If you don’t see the provisioning profile you want to add to your device in the provisioning profile list, click Refresh.
Drag the specialized provisioning profile to your device in the DEVICES group.
Installing iOS
When you develop applications using the iPhone SDK, you should test those applications on devices running the iOS version the SDK targets. You can download the latest release of the iPhone SDK from the iPhone Dev Center. Use iTunes to install the latest iOS release onto your device.
Note: During seed periods, you can download seed releases of the iPhone SDK and iOS from the iPhone Dev Center.
To restore a device:
Launch Xcode and open the Organizer window.
Plug the device into your computer.
Select the device in the Devices list.
From the Software Version pop-up menu, choose the version of iOS you want to place on the device.
If you’re using a seed release of the iPhone SDK and the version of iOS you want to install is not listed in the Software Version pop-up menu:
Download the iOS seed that corresponds to your iPhone SDK seed from http://developer.apple.com.
From the Software Version pop-up menu, choose Other Version.
Navigate to the disk image containing the iOS developer software and click Open.
Xcode extracts the iOS software from the disk image. You can dispose of the disk image you downloaded.
From the Software Version pop-up menu, choose the newly downloaded iOS version.
During nonseed periods, you must install iOS using iTunes.
Click Restore iPhone or Restore iPod, depending on your device’s type.
Use iTunes to name your device.
Running Applications on a Device
After following the instructions in “Preparing Your Mac for iOS Development” and “Installing iOS” (if necessary) you can run your application on your development device.
You tell Xcode that you want to build your application for a device and that you want to run it on a connected device by setting the active SDK to an iPhone Device SDK. See “Building Your Application” for details.
Capturing Screen Shots
Screen shots help to document your application. This is also how you create your application’s default image, which iOS displays when the user taps your application’s icon. You can capture screen shots of your device’s screen from the Organizer or directly on your device.
To capture a screen shot from the Organizer:
Configure your application’s screen for the screen shot.
Depending on your application’s workflow, you may need to place breakpoint in your code and run your application until it reaches that point.
Open the Organizer window, select your device, and click Screenshots.
Click Capture.
To make that screen shot your application’s default image, click Save As Default Image.
To get a PNG file of the screenshot, drag it to the desktop.
If you have iPhoto installed on your computer, you may capture screen shots directly on your device and import them into your iPhoto library.
To capture a screen shot on your device, press the the Lock and Home buttons simultaneously. Your screen shot is saved in the Saved Photos album in the Photos application.
Note: Although the default image includes the status bar as it looked when the screen shot was captured, iOS replaces it with the current status bar when your application launches.
Managing Your Digital Identities
When you request a certificate from the iPhone Provisioning Portal, a public/private key pair is generated. The public key is included in your certificate. The private key is stored in your keychain. With these items, Xcode code-signs the applications you build with it. If you need to use another computer to develop iOS applications, you must transfer these digital-identification items to the other computer. You can do this in the Xcode Organizer.
To export your digital-identification items to a secure file, follow these steps:
Open the Xcode Organizer.
In the IPHONE DEVELOPMENT group, select Developer Profile.
Click Export Developer Profile.
Name the file, select a location for it, enter a password to secure the file, and click Save.
Now, when you need to develop iOS applications on another computer, import your digital-identification items into it by performing these steps:
Copy the developer-profile archive to the second computer.
On the second computer, launch Xcode.
Open the Organizer.
In the IPHONE DEVELOPMENT group, select Developer Profile.
Click Import Developer Profile.
Locate the archive, enter the password used to secure it, and click Open.
Last updated: 2010-07-02