IBM ThinkPad 760E, 760ED, 760EL, 760XD, or 760XL User's Guide
[ Bottom of Page | Previous Page | Next Page | Table of Contents | Index ]
(Ref #93.)
If the telephone connector on the left side of your computer is
one with a square receptacle,
the computer can be used for telephony or modem/fax functions
without any changes.
However, if a blank port cover are attached
you need to install the DAA/Telephony Kit option
to use the Mwave telephony functions.
Note:
In some countries, the Mwave telephony functions are only available
when the DAA/Telephony Kit option is installed.
|
The DAA/Telephony Kit
may only be used in the countries in which it has been approved
by the country's telephone authorities.
Attempting to use the kit in other countries may be contrary
to the laws of those countries.
If you are traveling to another country
where the DAA/Telephony Kit is not approved by the local
telecommunications authorities, you may contact IBM
or an IBM distributor in that country
to check if you can purchase a modem of the
ThinkPad DAA/Telephony Kit that is approved for that country.
Caution:
Your computer can use only
a public-switched telephone network (PSTN).
Do not use a PBX (private branch exchange) or
other digital telephone extension lines.
Use of phone lines other than PSTN can damage your modem.
If you are not sure which kind of
phone line you are using, contact your
telephone company.
Many hotels or office buildings use digital telephone extension
lines, so check before connecting the telephone cable in
such places.
If the modem is damaged by your incorrect use,
an additional charge will be required for repair.
To attach the DAA/Telephony Kit:
- Turn off the computer and disconnect the power cable.
- Open the keyboard and remove the battery pack.
|
Attention:
Make sure the security latch at the right side of the
computer is unlocked. (See step 2.)
|
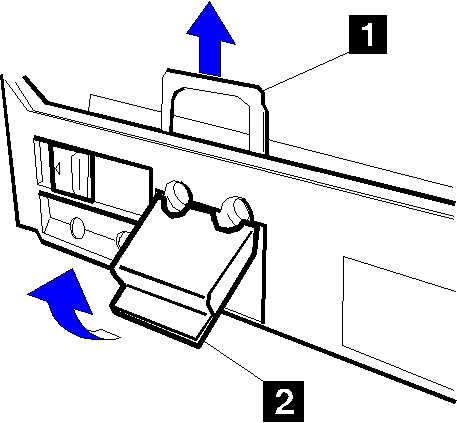
- Remove the metal port cover lock
 ,
and remove the blank port cover
  from the lower portion.
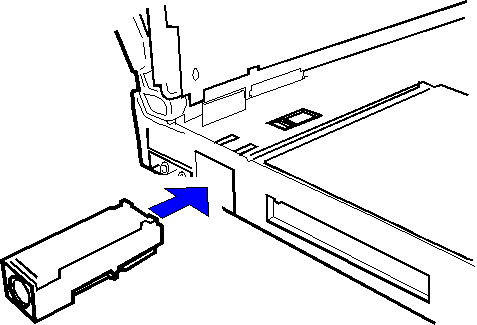
- Install the plug with the round receptacle
that came with your option kit.
Firmly press it into the connector.
|
Attention:
Make sure that any locking device
is unlocked.
|
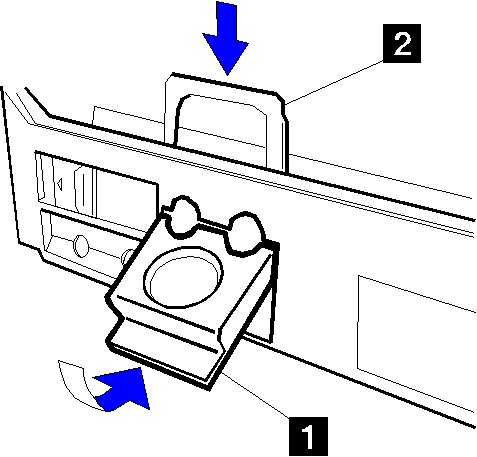
- On the left side of the computer,
install the port cover
 with the round opening that came
with your option kit, and insert the metal port cover lock
 .
.
- Close the keyboard.
(Ref #94.)
- Connect the cables:

DANGER!
To avoid shock hazard, do not connect
the telephone cable to or disconnect it from the computer
during electrical storms.
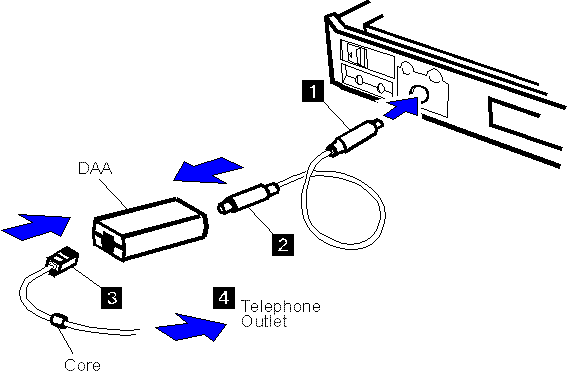
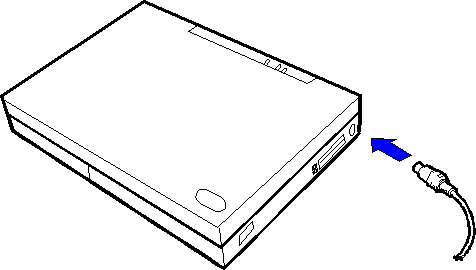
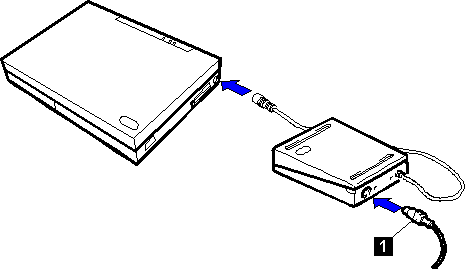
- Connect one end of the DAA interface cable
 to the
connector plug with the round receptacle.
Note:
Both ends of the DAA interface cable are identical.
|
- Connect the other end of the DAA interface cable
 to
the round receptacle on the DAA.
- Connect the ferrite-core end connector
 of the
telephone cable to the square receptacle on the DAA.
- Connect the other end of the telephone cable to
the telephone outlet
 on the wall.
(Ref #95.)
After you have finished attaching the modem/fax port,
install the necessary software by referring to
the manual that came with the option kit.
Refer to
"Using the Telephony Function" for information about how to use
the Mwave telephony features.
(Ref #96.)
An external numeric keypad or a mouse can be attached directly to
the external-input-device connector.
You can use both the IBM PS/2 Miniature Mouse
and TrackPoint III at the same time.
|
Attention:
When you connect a mouse other than
an IBM PS/2 Miniature Mouse, turn off the computer.
|
If you want to use the external numeric keypad and mouse
at the same time, first connect the
keypad cable to the computer; then connect
the mouse cable  to the connector at the rear of the keypad.
(Ref #97.)
(Ref #98.)
If you use
a serial mouse connected to the serial port or
a pointing device that is not compatible with the PS/2 Mouse,
you might need to disable the TrackPoint III before you can use it.
|
Note:
The appropriate software must have already been installed.
|


To disable the TrackPoint III:
- Start the ThinkPad Features program.
- Click on the Keyboard/Pointing-Device
(
 ) icon.
- Click on Disable for the TrackPoint.
These changes become effective when computer power is
turned off and then on again.
(Ref #99.)
To attach the external keyboard to the computer:
- Turn off the computer.
- Attach the keyboard/mouse connector
 (available as an option)
to your computer (
 ).
).
- Attach the external keyboard to
the connector (
 ).
).
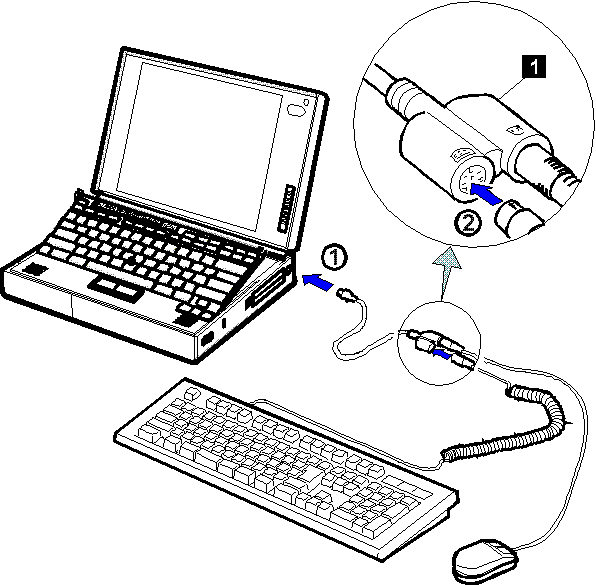
When the external keyboard is attached, the following
keys are not available:
To expand your computer resources,
you can use a docking station such as the
SelectaDock Docking System/SelectaDock II Docking System (PCI or ISA bus) or
the Dock I/Dock II (ISA bus).
(Ref #100.)
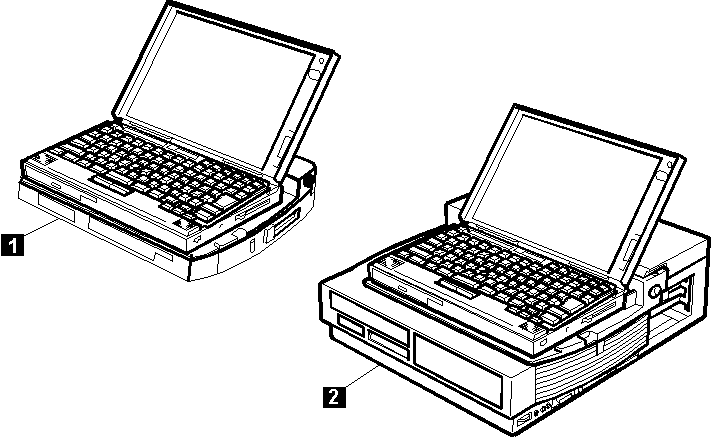
The following shows how the computer is docked.
To dock the computer to the SelectaDock Docking System  or SelectaDock II Docking System
  ,
see the User's Guide, which came with the SelectaDock Docking System
or SelectaDock II Docking System.
|
Attention:
When setting up your docking station,
avoid any hardware conflicts.
|
When you dock the computer to the SelectaDock Docking System or SelectaDock II Docking System with a new
hardware or software setting, do the following:
- Install all the new devices in the SelectaDock Docking System or SelectaDock II Docking System
|
Note:
For example, "device" means:
- PC Card or CardBus PC Card
- PCI or ISA adapter card
- Device in the UltraBay such as
CD-ROM drive, IDE hard disk drive, or diskette drive
- SCSI device
- Others
|
- Do the following according to your device newly installed:
- Dock your computer to the SelectaDock Docking System or SelectaDock II Docking System;
then turn on the computer.
The computer automatically starts Easy-Setup and
runs an autoconfiguration program to create a new configuration.
After that, the computer restarts, and the new devices in
the SelectaDock Docking System or SelectaDock II Docking System are available.
Once a configuration is created and
if hot or warm docking or warm undocking
is enabled by the ThinkPad Features program,
the computer can be docked to the SelectaDock Docking System or SelectaDock II Docking System even during
operation mode or suspend mode.
To use the computer with a new setting
including the SelectaDock Docking System or SelectaDock II Docking System,
you should create a new configuration by
starting the computer with the SelectaDock Docking System or SelectaDock II Docking System docked.
|
Note:
A device's functional capability in its hot or warm docking
depends on operating system and the device driver.
For more information, refer to manuals that came with
your operating system and the devices.
|
If some devices in the SelectaDock Docking System or SelectaDock II Docking System cannot be enabled
due to resource shortage or conflict,
see Appendix A. "System Resources"
and check the system resources
that are already occupied by other built-in devices.
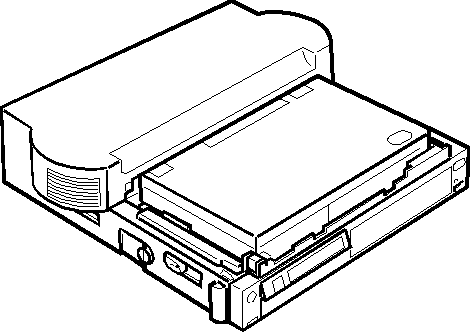
The following illustration shows the computer docked to the
Dock II:
|
Attention:
When setting up your docking station,
avoid any hardware conflicts.
|
|
Attention:
Do not use the Utility Diskettes that came
with the IBM Dock II.
|
To dock the computer to the Dock I or Dock II,
see the User's Guide, which came with
the Dock I or Dock II.
| Hints |
|---|
When an IBM Dock I is docked to the computer,
you can adjust the sound volume
by using the following key combinations:
- When you press and hold Fn and then press
PgUp (
 ),
the sound volume increases. ),
the sound volume increases.
- When you press and hold Fn and then press
PgDn
(
 ),
the sound volume decreases. ),
the sound volume decreases.
|
When you dock the computer to the
Dock I or Dock II with a new
hardware or software setting, do the following:


When you dock the computer to the Dock I
with the SCSI device installed,
and use DOS or Windows, do the following:
- Check the interrupt level (IRQ) for
the SCSI controller in the Dock I by using
the Dock I DIP switches.
|
Note:
Refer to the Dock I User's Guide
for information on the DIP switches.
|
- Start the ThinkPad Features program.
- Click on the Docking Station
(
 ) icon and click on
Advanced.
- Click on ISA device setup.
- Assign the same interrupt level as the one you checked
in the step 1 for the ISA resource.
For example, if the interrupt level for the Dock I SCSI is
11, assign 11 for the ISA resource.
- Click on OK.
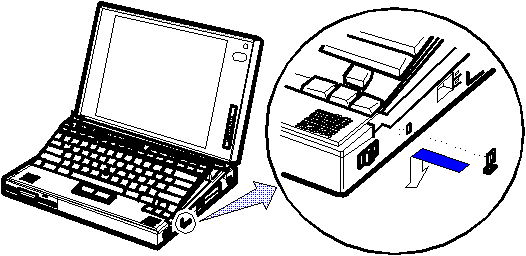
When you dock the computer to the docking station,
you can use the security plate to protect your computer from being removed.
To use the security plate:
- Attach the security plate to the security keyhole at the right side
of the computer.
- Dock the computer to your docking station.
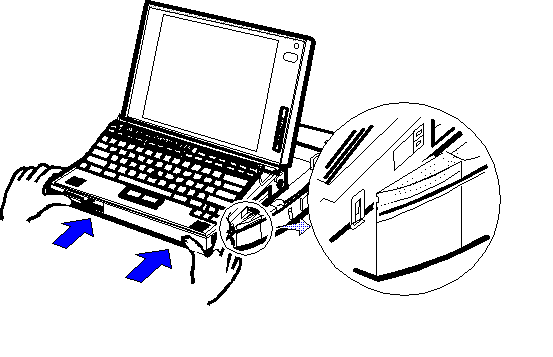
|
Note:
The figure shows an example when you are using the SelectaDock Docking System.
|
- Lock the security lock of the docking station.
When you leave the computer, remove the key.
The security plate protects
your computer from being removed from the docking station.
[ Top of Page | Previous Page | Next Page | Table of Contents | Index ]
�
to the connector plug with the round receptacle.
to the round receptacle on the DAA.
of the telephone cable to the square receptacle on the DAA.
on the wall.