


 4.2.4 Migrating the
Primary Domain Controller
This section shows how to perform the migration using OS/2 Warp Server for
e-business. You may have noticed that no boot diskettes are shipped with the
server. This is because the Server Pak Installation CD-ROM is a bootable
CD-ROM. If the new machine where OS/2 Warp Server for e-business is being
installed does not support booting from a CD-ROM, you can create the set of
three boot diskettes with the CDINST program on
the Server Pak CD-ROM.
Before starting the installation, make sure you have run CHKINST to
see if there are any warning conditions that may cause the installation to
fail. See 2.2.2.1 Run CHKINST for more
information.
The first migration task deals with migrating the previous base operating
system to the level of OS/2 Warp Server for e-business. Perform the following
steps:
- Insert the OS/2 Warp Server for e-business Server Pak Installation CD-ROM
in the machine's CD-ROM drive and reboot the system.
Note: Machines that do not support booting from CD-ROM need to boot from boot
diskettes created by the CDINST command mentioned above.
- When the system reboots, you will see the white OS/2 Warp Server for
e-business logo appear. At the bottom, you see the internal revision level,
14.039F. You will also see the word UNI or SMP depending on the type of system
detected.
During this boot sequence, you may see a message from the Volume Conversion
Utility (VCU) appear. VCU has marked any existing partitions as compatibility
volumes as required by the new Logical Volume Manager within OS/2 Warp Server
for e-business. Now, reboot your system.
| Note |
|---|
|
|
OS/2 Warp Server for e-business uses a new disk managing technique based on
logical volumes. As long as you do not use the new Journal File System (and up
to now, you don't), the main difference you'll notice is that the disks are now
managed by the Logical Volume Manager, LVM, not FDISK anymore. FDISK, as a
command and utility, is no longer available.
| Note |
|---|
|
Since FDISK is no longer shipped with OS/2 Warp Server for e-business, you
might need to modify your self-written utility programs that rely on FDISK. For
example, if you used the FDISK /QUERY command to determine the CD-ROM
drive letter, you would need to rework this procedure using the LVM
/QUERY command. Note that the output text has changed.
Also worth mentioning is that logical volumes can be assigned any drive
letter, and the CD-ROM drive letter can have a fixed one.
If you need to rely on the output of FDISK, to avoid overriding, you can
rename FDISK.COM (located in the \OS2 directory of your current installation)
to another name, such as OFDISK.COM. However, only use the /QUERY
parameter since the old FDISK cannot cope with logical volumes. Not doing so
might result in very serious problems.
If you rename the old FDISK.COM file to be able to use its output, modify
your self-written programs to accommodate the new name and double check that
only the /QUERY parameter is used.
|
- Once the system is rebooted, you will be prompted
to switch to the Server Pak CD-ROM. Insert it and press Enter.
- The installation program continues by displaying a Welcome screen that
lists the components and services offered by the product and introduces the
panel-driven installation. Press Enter to continue.
- After some files are copied, the installation program lists the three
phases of the installation process. Press Enter to continue. The
Installation Volume Selection panel is displayed.
- Choose the option that says Specify a different volume,
even if the Accept the volume option is highlighted. Press Enter to
continue. After reading the Warning screen, press Enter again.
- You may see a message that says A volume of the following minimum
size must be set installable: 120 megabytes. Press Enter to
continue.
- The LVM text mode screen is presented to you. Using
the arrow keys, highlight the volume you want to migrate (usually the one whose
status is Startable) and press Enter.
A menu similar to the old FDISK screen is displayed. Select Set the
volume installable. If you wish, press Enter again and select
Change the volume name to something that makes more sense, such as OS2
Boot Volume.
To see the Physical view of the Logical Volume Manager, press the F5
key. Now, you will see the physical partitions for the selected hard disk and
the logical volume that each partition is associated with.
- Press F3 and select Save the changes and exit to complete
the LVM configuration and continue with the installation process.
- The Installation Volume Selection panel now reappears. This time, select
the Accept the volume option.
- When you accept the installation volume, the next step consists of
specifying what to do with the selected installation volume. The associated
screen displays three choices:
- Do not format the volume (needed for a migration and the one you should
choose).
- Performing a long format (the best choice for a new
installation).
- Performing a quick format (very fast but may leave some unmarked bad
blocks on your disk and possibly cause problems later). This option was the
default choice for the previous OS/2 Warp Server version. The more experienced
user exited to a command line to execute the FORMAT /L long format
command instead.
Select Do not format the volume and press Enter.
- If your machine uses the 386 HPFS file system, an information window is
displayed providing you the last chance to remove the ACLs. You can use the
F3 key here to get a command prompt or press Enter to continue
with the installation.
- You may also see additional warning screens if the installation program
finds other components not supported by OS/2 Warp Server for e-business, such
as the OS/2 Tutorial and TME10 Netfinity. Press Enter each time to
acknowledge these and continue.
- After disk configuration (which can take several minutes) and files are
copied, the installation program reboots the system automatically.
- Define your specific system configuration as shown in the example
screens in Figure 23 and Figure 24.
Note that these windows have not changed from the OS/2 Warp 4 install.
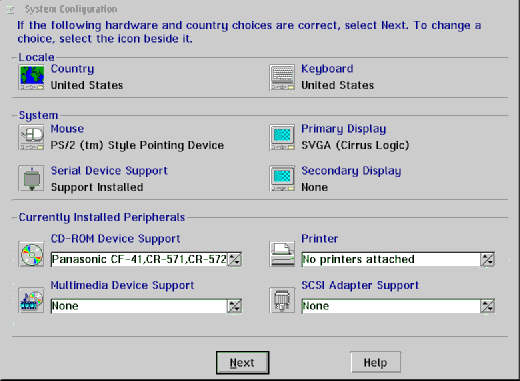
Figure 23: System Configuration Panel (1 of 2)
Pay attention to the video display that has been detected by the
installation program. Previously installed video drivers are not detected and
will not be used. If the one presented doesn't exactly match your display
adapter, select Video Graphics Array (VGA) from the
list. This will guarantee the system starts properly. After the migration has
completed, you may install your display driver in a separate step using, for
example, the DSPINSTL utility or the display installation
program that came with the display adapter.
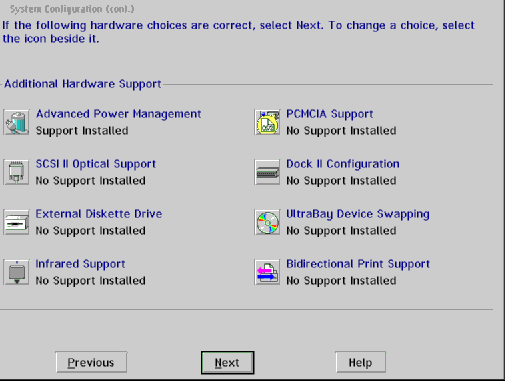
Figure 24: System Configuration Panel (2 of 2)
- Even if the country was selected in the first configuration panel, you will
be presented with the following window where you can select the default and
secondary code pages that will be used by your system (437,850 for the US, or
850,437, which covers the broadest set of national characters available for
Western Europe and English speaking countries, and is certainly the best choice
for these areas).
If you select an European country, you'll even be able to select the use of
the European locale. This ensures the Year 2000 compliance
of your server in these locations.
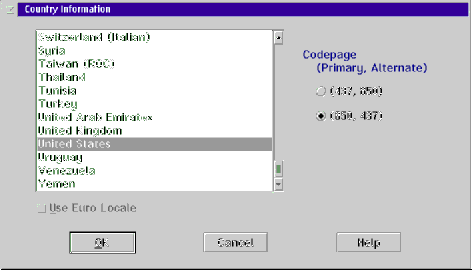
Figure 25: Country Information Panel
- The usual printer selection panel is then displayed, and you can, if
needed, indicate the primary printer associated with the server. If you don't
have any preferences, you may install the IBMNULL printer
driver. This ensures ASCII text printing from a printer that can be attached to
the server.
When all these elements have been collected, the installation program enters
its last phase.
You must specify the elements you want to have added to the base operating
system. Unless you have good reasons, we advise you to install as few elements
as possible: An OS/2-based server generally runs unattended and is mostly
controlled by remote REXX programs and is definitely not a Java development
platform.
Also, note that this phase, just as the preceding one, can be easily
restarted after the migration by executing INSTALL from the command
line or by clicking on the Selective Installation icon.

Figure 26: Selecting the Optional System Components
- As shown in Figure 26, we have only selected
Fonts (to have a system that will be able to take advantage of the
Unicode support), System Utilities, and System Components.
We have suppressed any DOS Support, Multimedia, Development, and the Tools
and Games. (On the CD-ROM that will come with this book, you'll find plenty of
OS/2 and Server-oriented tools.) However, if you plan to run OS/2 Warp Server
for e-business as a Java Server, we recommend selecting Java Development.
The following three figures show the windows selected in the previous step
when pressing the corresponding More... button.
Figure 27 shows that only Unicode Fonts,
which is the default, is selected.

Figure 27: Fonts Selection Window
Figure 28 displays the System Utilities selection
window. All system components but Sort Filter (which, for European countries,
doesn't sort at all) are selected.
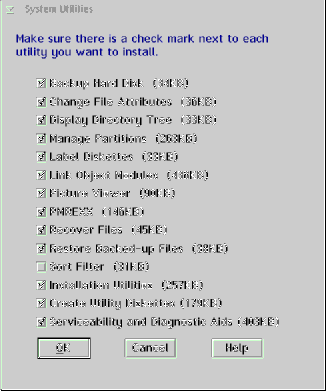
Figure 28: System Utilities Selection Window
Figure 29 displays the System Components selection
window. The JFS file system will be installed.
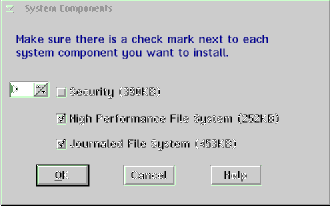
Figure 29: Systems Components Selection Window
| Note |
|---|
|
|
- As shown in Figure 30, the last OS/2-related pop-up
window appears prompting you how to cope with your previous configuration. Both
check boxes are already selected for you. Since it is desirable to migrate
previous configuration files and to have the opportunity to make changes to the
new CONFIG.SYS file (some previous settings, such as SET PROMPT, are
not transferred), press OK to continue.
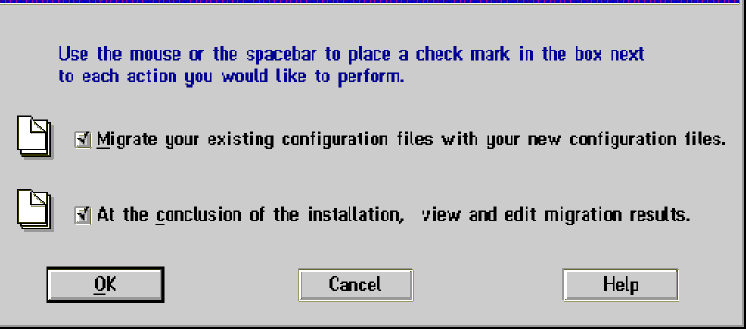
Figure 30: Previous Configuration Handling through Advanced Options
Window
The second migration task deals with migrating the previous LAN Server
component to the level of OS/2 Warp Server for e-business. After the OS/2 base
operating system migration has completed, the installation of the server
component will be started, as shown in Figure 31. Click
Next to continue.
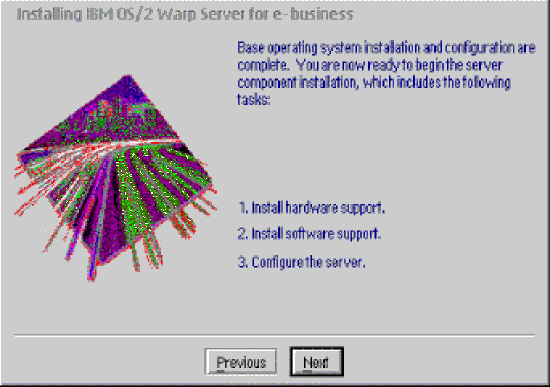
Figure 31: Server Component Installation
When you see the Information panel, click Next to bypass it. We will
not enter any information here.
As shown in Figure 32, you are prompted to select the
services you want to install. For each component you select, the installation
program will prompt you to provide configuration information. In case the
selected component was previously installed, configuration information will be
migrated. However, you still will have a chance to make changes to it.
Note that some components are checked by default, for example, TCP/IP
Services, and others are mandatory to install, such as Netscape Communicator.
The Current Status list informs you whether or not available components were
installed before and what level they are, for example, current version or
backlevel version.
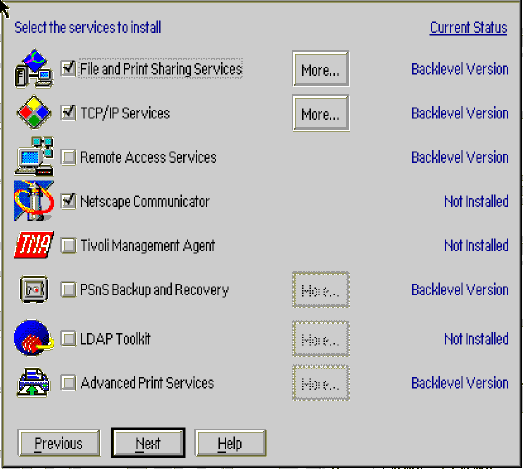
Figure 32: Server Components Selection
- Click Next to continue the installation process. As shown in
Figure 33, the OS/2 Warp Server for e-business
Configuration panel will be presented to you.
Because all configuration information has been retrieved from a previous
installation, most items are marked with a blue dash, which means that
acceptable default settings can be used. Please be aware that the options you
see on this panel differ based on the software that you are migrating from. For
example, our original server had Remote IPL installed.
| Note |
|---|
|
When migrating a Primary Domain Controller, an additional and
to-be-configured item is added to the list. You will be required to provide an
administrator ID along with a password.
|
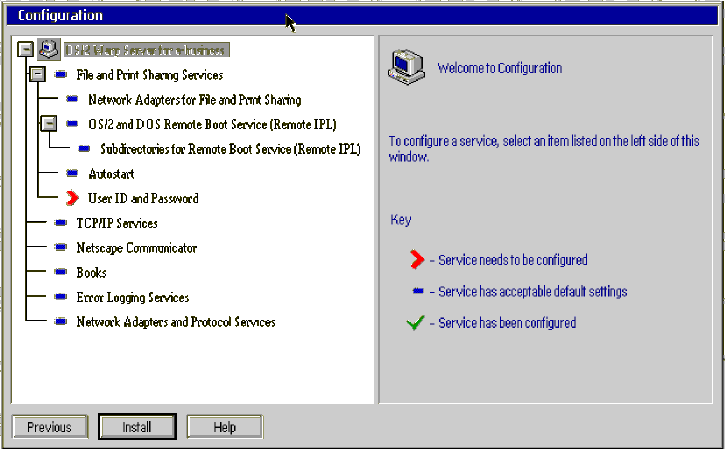
Figure 33: OS/2 Warp Server for e-business Configuration
Window
- When you click on the Install button, you will be prompted to
confirm your selection by clicking on OK to complete the installation
(see Figure 35).

Figure 35: Starting the Installation
In general, the NetBIOS parameters that were set previously are not
considered as appropriate by the Tuning Assistant, which
will tune them again. An information window will be presented to you as shown
in Figure 36.

Figure 36: Information from the Warp Server Tuning Assistant
You may, however, have good reasons to use the previous NetBIOS parameters.
As indicated in the shown message, the previous PROTOCOL.INI file is
copied in the \OS2\INSTALL\ directory with the file name of
WARPSRV.BAK.
- Click OK to continue.
All selected components will be installed now, and many files are copied. A
progress indicator informs you about the installation progress.
- You are now presented with the Migrate CONFIG.SYS/AUTOEXEC.BAT window,
as shown in Figure 37, showing you the modifications that
will be performed to the two configuration files.

Figure 37: CONFIG.SYS before and after Migration
Figure 37 shows you that our server was previously
using 386 HPFS (first line in the left list) and that the new CONFIG.SYS (the
right part) does not reflect the 386 HPFS installable file system anymore. This
is normal since the OS/2 Warp Server for e-business installation does not
include 386 HPFS anymore. We will install this from a different CD-ROM after
the installation is complete (described in 4.3.3 Installing
386 HPFS).
If you scroll down the window on the right, you can also notice that we have
manually removed the BASEDEV=AIC78U2.ADD line because our machine does
not have Adaptec adapters. Don't forget to press the Save button before
pressing the Quit button in order to save your modifications. The
modifications you perform are not validated before you save them. Make
modifications only if you're absolutely sure they will not
induce an error during the next reboot. Good candidates
for modifications are listed below:
-
SET PROMPT=($r)[$p]
- Modify the prompt in order to display the return code of the previous
command between parenthesis before the current path.
-
SET TZ=CST6CDT
- Set the time zone to reflect Central USA. (If you need some more elements
to set the time zone of your machine correctly, you can get an excellent
freeware program, TIME868, which offers a very nice time zone calculator.)
-
SET AUTOSTART=TASKLIST,FOLDERS,WARPCENTER
-
- Remove Programs and Connections from the
AUTOSTART line. That prevents the automatic restart of any unwanted
program, such as the Reconnect window at start-up of your server.
-
SET RESTARTOBJECTS=STARTUPFOLDERSONLY
-
-
Restrict the automated restart to the objects that will be put in any folder
having the startup attribute set (there is one by default in OS/2 Warp, but you
may define others).
-
SET SCUSEPRETTYCLOCK=YES
-
-
Modify the aspect of the OS/2 Warp Center (formerly called
Smart Center, hence, the SC prefix) to have it display a nicer clock than the
default one.
-
SET SCKILLFEATUREENABLED=YES
- Enables killing a running process by obtaining the
list of the running process using a Ctrl-Click on the Windows list button.
-
SET SCFINDUTILITY=C:\OS2\APPS\PMSEEK.EXE
-
-
Replaces the object find program by the more usable PMSeek
application.
Depending on your machine type, you may want to remove unnecessary device
drivers, such as either IBM1FLPY.ADD or IBM2FLPY.ADD.
- Once you verify the CONFIG.SYS and AUTOEXEC.BAT files, the installation
program copies the server components to the hard disk. This takes several
minutes, depending on the speed of your system. The system will reboot
automatically as required.
- After the system reboots, the installation process continues. Additional
components are installed and configured as you specified on the installation
panels. The system will reboot automatically when complete.
After this reboot, the system is installed and OS/2 Warp Server for
e-business is ready for work. Don't forget to remove your CD-ROM.
There is one more task that we will discuss, that is, the installation of
386 HPFS.
As you already know, 386 HPFS is licensed and purchased
separately from the rest of OS/2 Warp Server for e-business. Once you have the
386 HPFS Upgrade CD-ROM, you can reinstall 386 HPFS as described in the steps
that follow. We assume you have already installed OS/2 Warp Server for
e-business.
- Insert the 386 HPFS Upgrade CD-ROM into the server to be upgraded from
HPFS.
- This CD-ROM contains the 386 HPFS code in all supported languages. We
must to go the directory for the language we want (in our case, the
\en directory). There is a README.TXT file you should read before
continuing.
- Go to the \en\install directory and type install. This will
begin the 386 HPFS installation program. The following screen will appear, as
shown in Figure 38 below.
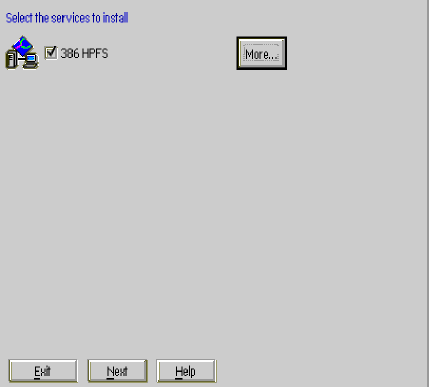
Figure 38: 386 HPFS Installation Program
- If you are also installing Fault Tolerance, you can click on
More... and select the Fault Tolerance option as shown in
Figure 39
.
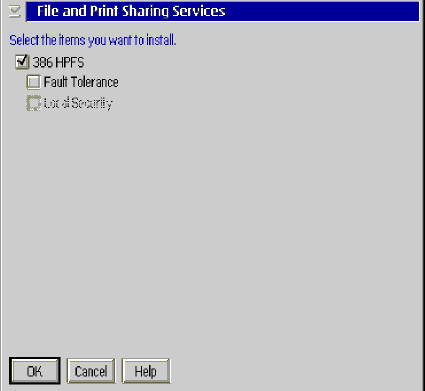
Figure 39: 386 HPFS Installation Program - Fault Tolerance
Option
- Next, a 386 HPFS configuration panel appears. You have the option of
overriding the defaults provided for 386 HPFS options as shown in
Figure 40. In general, the defaults provide good file and
print performance for clients
.
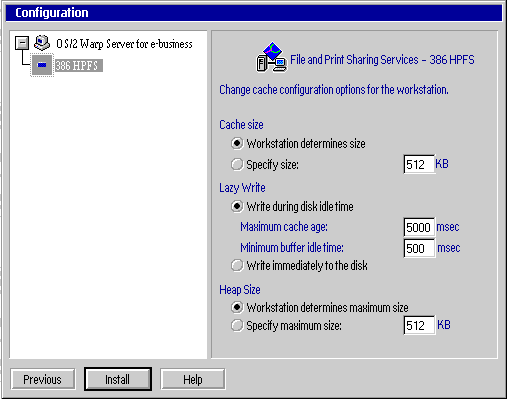
Figure 40: 386 HPFS Configuration Options
- Click OK to confirm the configuration options you selected. The
system copies files and then informs you that the system will be shut down.
Click OK to continue, and press Ctrl+Alt+Del to reboot the system
when the shutdown is complete.
- After the reboot, the OS/2 Warp Server for e-business Installation panel
appears, and the 386 HPFS component is installed to the system. This takes a
few minutes. When the installation completes, the system will reboot
automatically.
The system should now be running 386 HPFS and ready for network requests.
You can verify this by typing cache386 /o (to see cache size and other
parameters) or cache386 /s (to see cache read and write hit rates).
You will also see the following line near the top of the CONFIG.SYS file:
IFS=C:\IBM386FS\HPFS386.IFS /A:*


 4.4 Behind the
Scenes


 4.2.4 Migrating the
Primary Domain Controller


 4.2.4 Migrating the
Primary Domain Controller


