


 2.1 Before You Start a
Migration Project
2.1 Before You Start a
Migration Project
2.1 Before You Start a
Migration Project
The decision roadmap shown in Figure 2 will guide you through the decisions you need to make for your migration project.
When using the roadmap, please write the relevant references down and continue going through the roadmap. That way you'll have a list of chapters and sections that are most useful for your environment.
Together with the other contents of this chapter, the roadmap is intended as a central information hub that will point you to the right places for the actual information. Going through the whole set of questions will help you to make the right assessments.
In addition, Section 2.3 Special
Considerations highlights some points to consider during your migration.
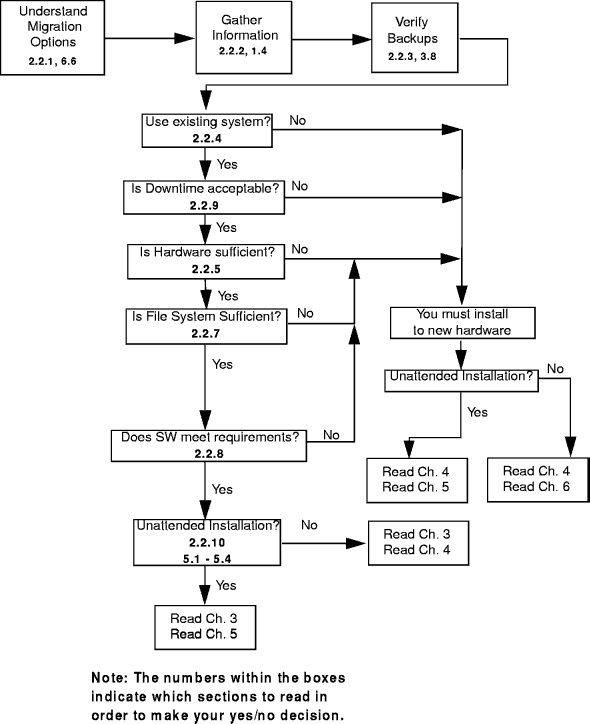
Figure 2: Migration Road Map
We have identified three basic migration situations. The first one we call panel driven, which means that the migration process is just a normal installation over your current server configuration. Chapter 4. Panel-Driven Installation covers this.
The second scenario is intended as a model for those who use CID and/or software distribution. Chapter 5. Unattended CID Migration tells you how to do this.
We have also considered a situation where only the configuration is saved, and the server is basically installed from scratch (see Chapter 6. Migrating Hardware).
All the preparatory steps that apply to all of these situations are covered in Chapter 3. Preparing the Migration Process.
This is the installation situation that will preserve almost all configuration information. There are a few exceptions (for example, LAN Distance) that must be removed prior to installation. Chapter 3. Preparing the Migration Process has the information on the general preparatory steps. Section 2.2.2.1 Run CHKINST will help you identify the necessary steps.
The advantage of this approach is that, after migration has finished, everything will be configured and up and running. In an environment that has only a few servers, this might be the fastest approach to migration (see Chapter 4. Panel-Driven Installation). However, in the event of a catastrophic failure, such as all hard disks lost, or no valid or current backup of the operating environment, you would have to re-implement your whole setup. That's why you might still want to consider a automated setup that can restore your system from scratch. (See Chapter 6. Migrating Hardware).
Under certain circumstances, it might be necessary to start with a new installation and re-apply the previous configuration. We will show you how to do this and what tools are available for this purpose in Chapter 6. Migrating Hardware.
Some customers deliberately forgo backing up the system software and application programs. Instead, they backup all applications, the user data, and save the configuration information. In case of a major failure, they just reinstall everything using software distribution and re-apply the configuration information. In this case, migration means to apply the old saved configuration to a new installation. This is also covered in Chapter 6. Migrating Hardware.
In some instances, you might want to change so many things from your current implementation (perhaps including the hardware) that the best way to do it is do a new installation and only restore the data. Starting with a clean, new installation might be advantageous for systems that have been up and running for a long time. Such servers tend to accumulate all sorts of electronic rubble that can be hard to sort from the relevant information.
Naturally, this approach means you have to re-do all the configuration and tuning for all the software you are going to install.
It also gives you the opportunity to implement more of the new OS/2 Warp Server for e-business features in one step, such as implementing JFS. This is probably the biggest advantage.
One of the most important things for a successful migration project is to collect or verify some basic information about the setup currently in use. It will help you select the right migration path for your setup and help you find the chapters in this book that are interesting to you.
Gather Information in the following areas:
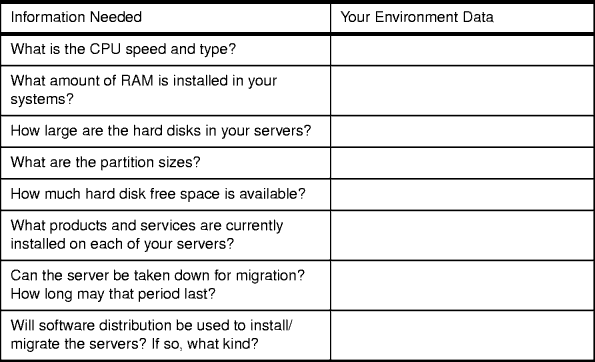
Table 3: Basic System Information
CHKINST is a utility supplied with OS/2 Warp Server for e-business and can be used to check your installation and generate a report of preparatory steps you have to perform before you do the actual setup. We recommend that you run CHKINST at the servers you intend to migrate and review the log file generated.
| PREPMNT Utility |
|---|
|
You should also be familiar with the PREPMNT utility, which is used to update your disk drivers before you migrate an existing system. See 5.10.2.2 PREPMNT Utility for SEMAINT for more information. |
The CHKINST utility searches for components on the checked system that must be removed from the existing system prior to migration. Such components include Remote Access Services (LAN Distance), IBM Peer Services, or Local Security.
When CHKINST finds unsupported components, such as OpenDoc or AskPSP, it issues a warning that the installation program will remove these components. Other components, such as OS/2 Tutorial, IBM Works, and IBM VoiceType are not likely to cause any failures if they remain on the system. If these components are found by CHKINST, a warning message will be generated showing a list of files that have a more current release level. The installation process does not migrate configuration file information for these components.
CHKINST.EXE can be found on the on the root directory of the OS/2 Warp Server for e-business Server Pak CD-ROM. It is completely self-contained and can be run from any OS/2 version.
The syntax for CHKINST is
CHKINST /T:<target drive>
/L1:<drive letter and path>\<log file>
where:
CHKINST accepts input parameters in any order and in either upper or lower case. Both parameters are required. CHKINST logs each item that was successfully found. If 386 HPFS was detected, an informational message will be logged advising you to remove access controls prior to the migration process.
Prior to a migration, a backup of all servers selected for migration should be made in the rare case of an unsuccessful migration. Make sure the backup was verified to work correctly. Without a backup, you will not be able to restore your system to a working state if the migration should fail.
More suggestions on this topic can be found in Section 3.8 Back Up Your System.
If your server needs have increased or your current hardware does not have sufficient disk space or memory, it is a good idea to migrate your current servers to new machines to accomplish your needs. In addition, you might consider moving to a machine that can exploit the extended SMP support in OS/2 Warp Server for e-business or the new I2O support.
Since OS/2 Warp Server for e-business comes with both a kernel for machines with one processor and a kernel for SMP machines, you can easily upgrade from one-processor machines to SMP machines. For example, if your current machines support multiple processors, but currently only one processor is installed, you can later selective-install SMP support whenever your requirements exceed a uniprocessor environment. A prerequisite, however, is that your target system comply either with Intel Multiprocessor Specification 1.4 or 1.1, or it must be one of the following server machines:
If this is not applicable to your system, your hardware manufacturer might have written its own *.PSD driver file to support OS/2 Warp Server for e-business SMP on their hardware. Please check in advance whether such support is available.
If you have decided to move to a new machine, then you will find a description how to do this in Chapter 6. Migrating Hardware.
As mentioned in Section 1.3.6 I2O Support, OS/2 Warp Server for e-business now can exploit I2O-capable hardware. This offloads much of the I/O processing to the I2O subsystem freeing the main processor from such mundane tasks as servicing I/O interrupts.
I2O-capable hardware comes in several flavors. One implementation integrates the I/O processor on the server's motherboard, and another implements I2O support as a PCI Adapter card.
Depending on your choice of hardware, the migration will either mean moving to a new hardware (described in Chapter 6. Migrating Hardware) or doing a migration on the same hardware and adding I2O Adapters later. Depending on your choice later in the roadmap (Section 2.2.10 Panel-Driven Installation or CID-Based?), you'll find your installation method described either in Chapter 4. Panel-Driven Installation or in Chapter 5. Unattended CID Migration.
Table 4 lists the minimum hard
disk requirements that need to be met prior to the migration process.
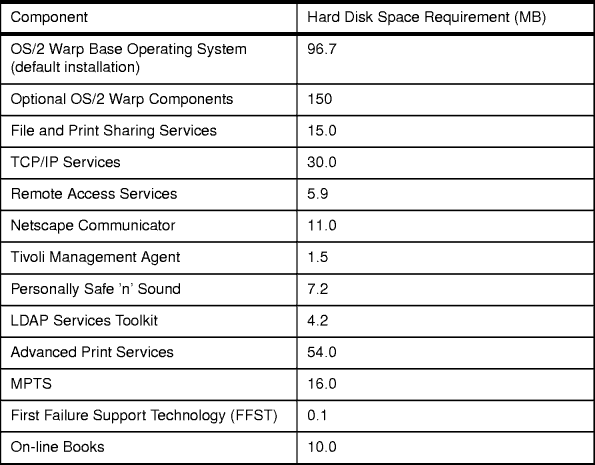
Table 4: Hard Disk Requirements
If your system does not have enough free space to install the components you want, you have several options.
This approach can also be combined with the one above if there is free space on other partitions to meet your needs. You would leave some components out of the initial setup and install them later on to a different drive. Using this approach can give you the opportunity to install OS/2 Warp Server for e-business components to a JFS-formatted drive.
As described in Section 1.3.2 File Systems, the disk I/O subsystem has changed a lot from previous versions. For example, drive letters can now be assigned to volumes permanently, which makes adding more disks to an already defined volume as easy as possible. You just add hard disks to a volume whenever necessary without being confronted with new drive letters.
| Drive letter Sequence |
|---|
|
Hard disk partitions can now be assigned any letter you choose. If you have tools or scripts that rely on a sequential assignment of drive letters, be aware that they might have to be reworked if you exploit this. The CD-ROM is now assigned the first free drive letter, which might not be after the last hard drive. This also may impact your tools. You can use the RESERVEDRIVELETTER= statement in the CONFIG.SYS file to move the CD-ROM to a convenient drive letter. |
A volume, in turn, can consist of one or more partitions (both logical and primary). However, OS/2 requires the drive letter of the bootable volumes to remain the same always. Changing the assigned drive letter of a bootable volume will subsequently cause the boot process to fail.
Grouping multiple partitions into one larger volume is called disk spanning. Different partitions in a volume do not have to reside on the same physical disk.
| Caution |
|---|
|
If one partition of a linked volume is lost, usually ALL data in the entire file system will be lost. |
The space in a volume is then formatted to be accessible using one of the supported file systems.
OS/2 now supports four hard disk file systems:
The basic differences were explained in Section 1.3.2 File Systems.
If you are planning to use the 386 HPFS file system after your migration, you will need to install this separately from the main OS/2 Warp Server for e-business installation since 386 HPFS is licensed and purchased separately. For the panel-driven installation, see 4.3.3 Installing 386 HPFS.
In our tests, we did not find any special prerequisite fixpak requirements to install OS/2 Warp Server for e-business over OS/2 Warp Server, Version 4.
The following tables list the FixPaks we used in our migration tests. They might not reflect the only working combination. Entries marked with a superscript were applied to make our REXX procedures work properly.
Table 5 lists the OS/2 LAN Server
3 FixPak levels used in our migration tests.
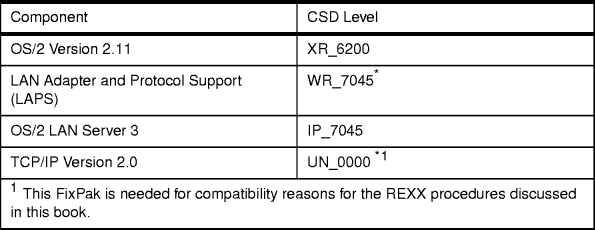
Table 5: OS/2 LAN Server 3 Syslevel Prior to the Migration
Process
Table 6 lists OS/2 LAN Server 4
FixPak levels used in our migration tests.
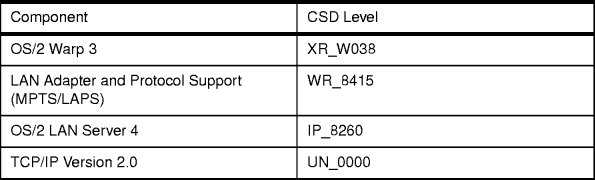
Table 6: OS/2 LAN Server 4 Syslevel Prior to the Migration
Process
Table 7 lists OS/2 Warp Server 4 FixPak levels used in
our migration tests.
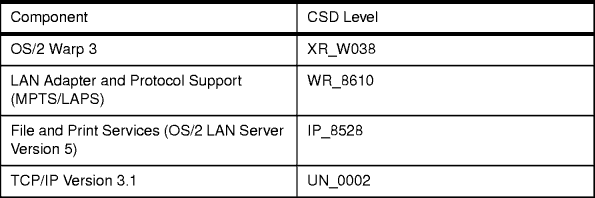
Table 7: OS/2 Warp Server 4 Syslevel Prior to the Migration
Process
If your servers need to be available without interruption, it will be necessary to install the new server while the existing one is still running. After the migration process has finished, you can switch to the new server. Chapter 6. Migrating Hardware deals with this situation.
If you continue to use 386 HPFS and DASD limits, please include the time necessary for directory limit priming in your estimate of server downtime.
| DASD Limit Priming |
|---|
|
DASD limit priming is performed by 386 HPFS at initialization each time after running CHKDSK. With large servers, it can take a considerable amount of time to apply DASD limits. Since it is part of the file system initialization, it is part of the total time for server startup. For example, on a Netfinity 7000 Server with one 50GB 386 HPFS RAID5 array and 1000 home directories with DASD limits applied, priming can take up to three hours. Your actual time may vary. |
If your server does not have DASD limits enabled or does not use 386 HPFS partitions in that size range, then this concern does not apply to your scenario.
For attended migrations, you can use the normal setup procedures and install over your existing OS/2 Warp Server or OS/2 LAN Server. Chapter 4. Panel-Driven Installation illustrates this in more detail. The normal installation process is also driven by response files that can be reused in a CID-based migration. Chapter 5. Unattended CID Migration shows how to set up a sample CID scenario and how to use the response files generated by a panel driven installation.

 2.3 Special
Considerations
2.3 Special
Considerations