


 4.3.3 Installing 386
HPFS
4.3.3 Installing 386
HPFSThis section is intended for those who want to know how the installation process is really handled behind the panels and for those who plan to use Configuration, Installation, and Distribution (CID) techniques in their organization. Understanding how the manual installation works is a good prerequisite for setting up a working CID scenario.
For a more extensive description of the CID process, please refer to the redbook titled The OS/2 Warp 4 CID Software Distribution Guide, SG24-2010.
The installation program, whose installation screens you saw in previous sections of this chapter, stores all the choices you made while filling in fields or pushing buttons. These choices are saved in data files that are called response files. These response files are used to perform the actual installation. These files are the same type as those used in the unattended installation.
Some products allow you to create response files through a Graphical User Interface(GUI). The LAN Server component of the installation program allows you to do so. If you click on the Create an Installation Response File radio button, your following choices will not be executed but translated into a Response file that will allow you to perform a remote installation of the product on any machine (that is not necessarily on the one with which you created it). Other products, like Communication Manager/2, can produce a response file from a current configuration, which can prove very helpful.
Obviously, in an unattended installation, you have to handle some parts by yourself (force a reboot, access the code over the network, and so on), but installing the actual software is the same in both cases.
The installation process is composed of three phases, each separated by a reboot of the system being installed. The following sections provide more detail about each phase.
This phase uses the text-based interface. During this phase, the files needed to restart the operating system from the hard disk are copied. Specifically, the CDBOOT.EXE program is started, and under its control, CONINST.EXE (CD-ROM and Network adapter card detection) and SYSINST2.EXE (Installation type query, FDISK-type Call, actual file copies) are run.
| Note |
|---|
|
If your machine needs some unique device drivers (such as a specific type of SCSI Adapter), you may need to put them on Diskette 1 of your boot diskettes and add the lines SET COPYFROMFLOPPY=1 and SET SAVECONNECT=1 along with the associated DEVICE= or BASEDEV= statement in the CONFIG.SYS file on this diskette. This will ensure that the drivers loaded will also be copied from the diskette on your hard disk. (The SET SAVECONNECT=1 line will prevent deletion of the unknown file at the end of the installation). |
During this phase, the rest of the operating system and the selected components are installed including MPTS.
| CID Installers |
|---|
|
As the reboot after Phase 1 is just needed to provide a Graphical Interface to the user, in an unattended installation, this intermediate reboot may be skipped. |
The last phase is used to install TCP/IP and the LAN Server components. The last objects are created and placed in their respective folders. It is followed by the last reboot that will load the default desktop.
| CID Installers |
|---|
|
It is just after the last reboot that you may move some icons and generally perform the desktop cleanup if you wish. As you may see in our examples, we reorganize the objects associated with one component just after the installation of this component (through the steps named CHKxxxxx). We also collect some server information after the entire system has been set up. |
Even if the administrator installs OS/2 Warp Server for e-business through
the installation panels, selections are stored in response
files. They are listed here with the full path and the
process that generated them. CID installers will then be able to quickly locate
them and adapt them to their needs for future unattended installations.
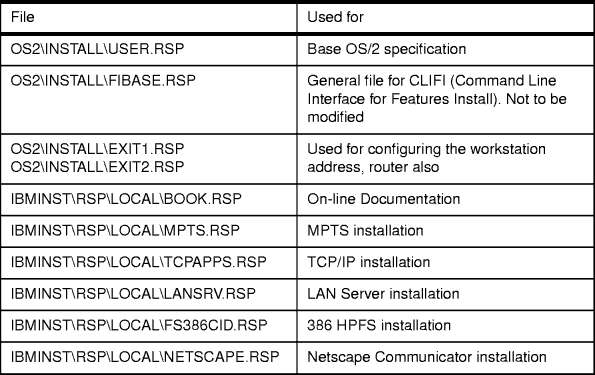
Table 17: Location and Function of Some Response Files

 4.5 Finishing the
Migration
4.5 Finishing the
Migration