


MACINTOSH C CARBON: A Hobbyist's Guide To Programming the Macintosh in C
| ||||||||||||||||||||||||||||||||||||||||||||||||||||||||||||||||||||||||||||||||||||||||||||||||||||||||||||||||||||||||||||||||||||||||||||||||||||||||||||||||||||||||||||||||||||||||||||||||||||||||||||||||||||||||||||


Function |
Description |
|---|---|
| GetRegionBounds | Get the region's bounding rectangle. |
For a region which is a rectangle, the rectangle returned by GetRegionBounds defines the entire region. The data for more complex regions is stored in the region object in a proprietary format. The function IsRegionRectangular may be used to determine whether a specific region is rectangular.
![]()
The Graphics Pen, Foreground and Background Colours, Pixel Patterns and Bit Patterns, and Transfer Modes
The Graphics Pen
The metaphorical graphics pen used for drawing lines and shapes in a graphics port is rectangular in shape and its size (that is, its height and width) is measured in pixels. Whenever you draw into a graphics port, the characteristics of the graphics pen determine how the drawing looks. Those characteristics are as follows:
- Pen location, which is specified in local coordinates stored in the graphics port. The functions Move and MoveTo are used to move the pen to a specified location, and the function GetPen gets the pen's current location.
- Pen size, which is specified by the a width and a height (in pixels) stored in the graphics port. The pen's default size is one-by-one pixel; however, PenSize can be used to change the size and shape up to a 32,767-by-32767 pixel square. Note that, if either the width or height is set to 0, the pen does not draw.
- Pen colour, that is, the graphics port's foreground colour.
- Pen pattern, which defines the pattern that the pen draws with.
- Pen transfer mode, a Boolean or arithmetic operation which determines how QuickDraw transfers the pen pattern to the pixel map during drawing operations.
- Pen visibility, which is specified by an integer stored in the graphics port, indicating whether drawing operations will actually appear. For example, for 0 or negative values, the pen draws with "invisible ink". The functions ShowPen and HidePen are used to change pen visibility.
Getting and Setting the Pen State
The following functions are used to get and set the current pen state:
Function |
Description |
|---|---|
| GetPenState | Returns, in a PenState structure, the graphics pen's current location, size, transfer mode, and pattern. |
| SetPenState | Using information supplied by a PenState structure, sets the graphics pen's location, size, transfer mode, and pattern. |
| PenNormal | Resets the pen size, transfer mode, and pattern to the state initialised when the graphics port was opened. |
Foreground and Background Colour
Foreground Colour
The function RGBForecolor is used to set the foreground colour in the graphics port. You may also use the Palette Manager function PmForeColor to set the foreground colour.
The foreground colour is used by the graphics pen for drawing lines, framed shapes, and text. The foreground colour is also used by QuickDraw shape painting functions.
Background Colour
The function RGBBackColor is used to set the background colour in the graphics port. You may also use the Palette Manager function PmBackColor to set the background colour.
The background colour is used by QuickDraw erasing functions, and is also used by the ScrollRect function to replace the scrolled pixels.
Pixel Patterns and Bit Patterns
Pixel Patterns
If you wish to draw or paint with a colour pattern rather than the colour set by RGBForecolor, you can set the pen pixel pattern in the graphics port using SetPortPenPixPat or PenPixPat. (Initially, the pen pixel pattern in the graphics port is all-"black". When you set a non-all-"black" pattern, the pen pattern in the graphics port overrides the foreground colour.)
You define a pixel pattern in a 'ppat' resource. To retrieve the pixel pattern stored in the 'ppat' resource, you use the GetPixPat function. The handle to a pixPat data structure returned by GetPixPat may then be used in a call to SetPortPenPixPat or PenPixPat to set the pixel pattern.
Similarly, if you wish to erase with a pixel pattern rather than the background colour, or replace the pixels scrolled by ScrollRect with a pixel pattern rather than the background colour, you can set the background pixel pattern in the graphics port using SetPortBackPixPat or BackPixPat. (Initially, the background pixel pattern in the graphics port is all-"white". When you assign a non-all-"white" pattern, the background pattern in the graphics port overrides the background colour)
In addition to drawing, painting and erasing functions, QuickDraw includes shape filling functions, which may be used to fill a specified shape using a specified pixel pattern. A handle to a pixPat data structure is passed in the thePPat parameter of these functions.
Bit Patterns
After drawing or painting with a pixel pattern, you can return to drawing or painting with the foreground colour by simply restoring the default all-"black" pattern by calling PenPat and passing in the bit pattern contained in the QuickDraw global variable black as follows:
Pattern blackPattern;
PenPat(GetQDGlobalsBlack(&blackPattern));
After erasing with a pixel pattern, you can return to erasing with the background colour by simply restoring the default all-"white" pattern by calling BackPat and passing in the bit pattern contained in the QuickDraw global variable white as follows:
Pattern whitePattern;
BackPat(GetQDGlobalsWhite(&whitePattern));
When you use the PenPat and BackPat functions, QuickDraw constructs a pixel pattern equivalent to the bit pattern, The graphics port's current foreground colour is used for the "black" bits in the bit pattern, and the background colour is used for the "white" bits.
The PenPat and BackPat functions may also be used to set other bit patterns in the graphics port.
Transfer Modes
The term transfer mode may be considered as a generic term encompassing three different transfer mode types. Each has to do with the way source pixels interact with destination pixels during drawing, painting, erasing, filling, and copying operations. The three types of transfer mode are as follows:
- Boolean Pattern Mode. Boolean pattern modes apply to line drawing, framing, painting, erasing, and filling operations.
- Boolean Source Mode. Boolean source modes apply to text drawing and copying operations.
- Arithmetic Source Mode. Arithmetic source modes apply to drawing (including text drawing), painting, and copying operations.
Boolean Pattern Modes
Pattern modes may be set as pen transfer modes in the graphics port using the PenMode function. The modes are represented by eight constants, each of which relates to a specific Boolean operation (COPY, OR, XOR, and BIC (for bit clear)) and their inverse variants.
The effects of these modes are best explained assuming a 1-bit (black-and-white) environment in which the foreground colour is black and the background colour is white. The following lists the pattern modes and describes the effect of source pixels on destination pixels in such an environment.
Pattern Mode |
Action On Destination Pixel | |
|---|---|---|
If source pixel is black |
If source pixel is white | |
| patCopy | Apply foreground colour. |
Apply background colour. |
| patOr | Apply foreground colour. |
Leave alone. |
| patXor | Invert. |
Leave alone. |
| patBic | Apply background colour. |
Leave alone. |
| notPatCopy | Apply background colour. |
Apply foreground colour. |
| notPatOr | Leave alone. |
Force black. |
| notPatXor | Leave alone. |
Invert. |
| notPatBic | Leave alone. |
Apply background colour. |
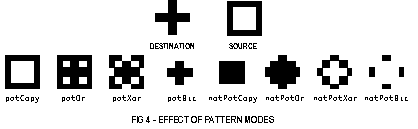
These effects are illustrated at Fig 4. Note particularly that patCopy causes the destination pixels to be completely over-written. patCopy is the transfer mode initially set in the graphics port.
Boolean Source Modes
Boolean source modes may be set as text in the graphics port using the function TextMode, and may be passed as parameters in QuickDraw functions for copying pixel images. The Boolean source modes are the equivalent in text drawing and copying to the Boolean pattern mode used for non-text drawing, painting, filling, and erasing operations.
The relevant constants are srcCopy, srcOr, srcXor, srcBic, notSrcCopy, notSrcOr, notSrcXor, and notSrcBic. The additional non-standard mode grayishTextOr is useful for drawing text in deactivated or disabled user interface objects. (This mode is considered non-standard because it is not stored in pictures and printing with it is undefined.)
Arithmetic Source Modes
Arithmetic source modes may be set in the graphics port, and may be passed as parameters in QuickDraw functions for copying pixel images.
Arithmetic source modes perform arithmetic operations on the values of the red, green and blue components of the source and destination pixels. Because they work with RGB colours rather than colour table indexes, arithmetic transfer modes produce predictable results on indexed devices. The arithmetic source modes and their effects in a colour environment are as follows:
Constant |
Value |
Description |
|---|---|---|
| blend | 32 | Destination pixel is replaced with a blend of the source and destination pixel colours. Revert to srcCopy mode if the destination is a bitmap or 1-bit pixel image. |
| addPin | 33 | Destination pixel is replaced with the sum of the source and destination pixel colours up to a maximum allowable value. Revert to srcBic mode if the destination is a bitmap or 1-bit pixel image. |
| addOver | 34 | Destination pixel is replaced with the sum of the source and destination pixel colours, but if the value of the red, green or blue component exceeds 65,536, then subtract 65,536 from that value. Revert to srcXor mode if the destination is a bitmap or 1-bit pixel image. |
| subPin | 35 | Destination pixel is replaced with the difference of the source and destination pixel colours, but not less than a minimum allowable value. Revert to srcOr mode if the destination is a bitmap or 1-bit pixel image. |
| transparent | 36 | Source and destination pixel are replaced with the source pixel if the source pixel is not equal to the background colour. |
| addMax | 37 | Destination pixel is replaced with the colour containing the greater saturation of each of the RGB components of the source and destination pixels. Revert to srcBic mode if the destination is a bitmap or 1-bit pixel image. |
| subOver | 38 | Destination pixel is replaced with the difference of the source and destination pixel colours, but if the value of the red, green or blue is less than 0, add the negative result to 65,536. Revert to srcXor mode if the destination is a bitmap or 1-bit pixel image. |
| adMin | 39 | Destination pixel is replaced with the colour containing the lesser saturation of each of the RGB components of the source and destination pixels. Revert to srcOr mode if the destination is a bitmap or 1-bit pixel image. |
![]()
Drawing Lines and Framed Shapes
Functions for Drawing Lines
You can move the graphics pen to a specified location, and you can draw lines from that location. Lines are drawn using the current graphics pen size, foreground colour or pen pixel/bit pattern, and pen pattern mode.
Functions for moving the graphics pen and drawing lines are as follows:
Function |
Description |
|---|---|
| MoveTo | Moves the graphics pen location to the specified location, in local coordinates. |
| Move | Moves the graphics pen a specified distance from its current location. |
| LineTo | Draws a line from the current pen location to the specified location, in local coordinates. |
| Line | Draws a line a specified distance from the graphics pen's current location. |
Fig 5 shows a line drawn with a pen of size 20-by-40 pixels. Note that the pen "hangs" below and to the right of the defining points,

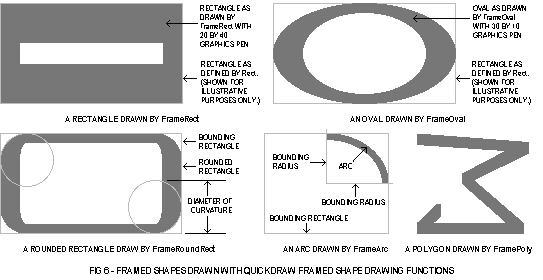
Functions for Drawing Framed Shapes
Framing a shape draws its outline only, using the current pen size, foreground colour or pen pixel/bit pattern, and pen pattern mode. The pixels in the interior of the shape are unaffected. Framed shapes are drawn using the current graphics pen size, foreground colour or pen pixel/bit pattern, and pen pattern mode.
Functions for drawing framed shapes are as follows:
Function |
Description |
|---|---|
| FrameRect | Draws a rectangle, the position and size of which are defined by a Rect structure. |
| FrameOval | Draws an oval, the position and size of which are determined by a bounding rectangle defined by a Rect structure. |
| FrameRoundRect | Draws a rounded rectangle, the position and size of which are determined by a bounding rectangle defined by a Rect structure. Curvature of the corners is defined by ovalWidth and ovalHeight parameters. |
| FrameArc | Draws an arc, the position and size of which are determined by a bounding rectangle defined by a Rect structure. Starting point and arc extent are determined by startAngle and arcAngle parameters. |
| FramePoly | Draws a polygon by "playing back" all the line drawing calls that define it. |
| FrameRgn | Draws an outline around a specified region. The line is drawn just inside the region. |
Fig 6 shows various framed shapes drawn with various graphics pen sizes and bit patterns. Note that the bounding rectangles completely enclose the shapes they bound, that is, no pixels extend outside the infinitely thin lines of the bounding rectangle. Note also that the arc is a portion of the circumference of an oval bounded by a pair or radii joining at the oval's centre.
Framed Polygons and Regions
Framed polygons and regions require that you call several functions to create and draw them. You begin by calling a function that collects drawing commands into a definition for the object. You then use drawing functions to define the object before calling a function which signals the end of the object definition. Finally, you use a function which draws the newly-defined object.
Framed Polygons
To define a polygon you must first call OpenPoly. You then call LineTo a number of times to create lines from the first vertex to the second, from the second vertex to the third, etc. You then call ClosePoly, which completes the definition process. After defining a polygon in this way, you can draw the polygon, as a framed polygon, using FramePoly.
Note that, in the framed polygon at Fig 5, the final defining line from the last vertex back to the first vertex was not drawn during the definition process. Note also that, as in all line drawing, FramePoly hangs the pen down and to the right of the infinitely thin lines that define the polygon.
Framed Regions
To define a region, you can use any set of lines or shapes, including other regions, so long as the region's outline consists of one or more closed loops. First, however, you must call NewRgn and OpenRgn. You then use line, shape, or region drawing commands to define the region. When you have finished collecting commands to define the outline of the region, you call CloseRgn. You can then draw the framed region using FrameRegion.
![]()
Drawing Painted and Filled Shapes
Painting a shape fills both its outline and its interior with the current foreground colour or graphics pen pixel/bit pattern. Filling a shape fills both its outline and its interior with a pixel pattern or bit pattern passed in a parameter of the QuickDraw shape filling functions.
Transfer Mode. Painting operations utilise the current graphics pen pattern mode. In filling operations, the transfer mode is invariably the pattern mode patCopy, meaning that the destination pixels are always completely overwritten.
Functions for Painting and Filling Shapes
The following lists the available functions for painting and filling shapes:
Function |
Description |
|---|---|
| PaintRect | Fills a rectangle with the current foreground colour or graphics pen pixel/ bit pattern. |
| PaintOval | Fills an oval with the current foreground colour or graphics pen pixel/ bit pattern. |
| PaintRoundRect | Fills a round rectangle with the current foreground colour or graphics pen pixel/ bit pattern. |
| PaintArc | Fills a wedge with the current foreground colour or graphics pen pixel/ bit pattern. |
| PaintPoly | Fills a polygon with the current foreground colour or graphics pen pixel/ bit pattern. |
| PaintRgn | Fills a region with the current foreground colour or graphics pen pixel/ bit pattern. |
| FillRect | Fills a rectangle with a specified bit pattern. |
| FillCRect | Fills a rectangle with a specified pixel pattern. |
| FillOval | Fills an oval with a specified bit pattern. |
| FillCOval | Fills an oval with a specified pixel pattern. |
| FillRoundRect | Fills a round rectangle with a specified bit pattern. |
| FillCRoundRect | Fills a round rectangle with a specified pixel pattern. |
| FillArc | Fills a wedge of an oval with a specified bit pattern. |
| FillCArc | Fills a wedge of an oval with a specified pixel pattern. |
| FillPoly | Fills a polygon with a specified bit pattern. |
| FillCPoly | Fills a polygon with a specified pixel pattern. |
| FillRgn | Fills a region with a specified bit pattern. |
| FillCRgn | Fills a region with a specified pixel pattern. |
Wedges
The wedges drawn by PaintArc, FillArc, and FillCArc are pie-shaped segments of an oval bounded by a pair of radii joining at the oval's centre. A wedge includes part of the oval's interior. Like the framed arc, wedges are defined by the bounding rectangle that encloses the oval, along with a pair of angles marking the positions of the bounding radii. Fig 7 shows a wedge.
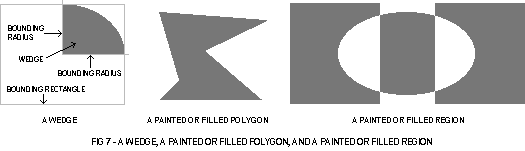
Painted and Filled Polygons and Regions
The general procedure for drawing painted and filled polygons and regions is the same as described for their framed counterparts, above.
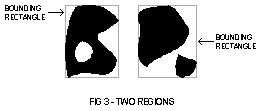
Fig 7 shows the polygon as defined for the framed polygon at Fig 6, but this time drawn with one of the polygon painting or filling functions. Note that, although the final defining line from the last vertex back to the first vertex was not drawn, the painting and filling functions complete the polygon (whereas FramePoly did not).
Fig 7 also shows a region comprising two rectangles and an overlapping oval, drawn using PaintRgn. Note that, where two regions overlap, the additional area is added to the region and the overlap is removed from the region.
![]()
Erasing and Inverting Shapes
Erasing a shape fills both its outline and its interior with the background colour or background pixel/bit pattern. Inverting a shape simply inverts all the pixels in the shape; for example, all black pixels become white, and vice versa.
Transfer Mode. In erasing operations, the transfer mode is invariably the pattern mode patCopy, meaning that the destination pixels are always completely overwritten.
Functions for Erasing and Inverting Shapes
The following list the available functions for painting and filling shapes:
Function |
Description |
|---|---|
| EraseRect | Fills a rectangle with the current background colour or pixel/ bit pattern. |
| EraseOval | Fills an oval with the current background colour or pixel/ bit pattern. |
| EraseRoundRect | Fills a round rectangle with the current background colour or pixel/ bit pattern. |
| EraseArc | Fills a wedge with the current background colour or pixel/ bit pattern. |
| ErasePoly | Fills a polygon with the current background colour or pixel/ bit pattern. |
| EraseRgn | Fills a region with the current background colour or pixel/ bit pattern. |
| InvertRect | Inverts all the pixels in a rectangle. |
| InvertOval | Inverts all the pixels in an oval. |
| InvertRoundRect | Inverts all the pixels in a round rectangle. |
| InvertArc | Inverts all the pixels in a wedge. |
| InvertPoly | Inverts all the pixels in a polygon. |
| InvertRgn | Inverts all the pixels in a region. |
![]()
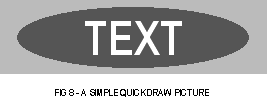
Drawing Pictures
Your application can record a sequence of QuickDraw drawing operations in a picture and play its image back later. Fig 8 shows an example of a simple picture containing a filled rectangle, a filled oval, and some text.
The subject of pictures is addressed in more detail at Chapter 13.
![]()
Drawing Text
Setting the Font
The font used to draw text in a graphics port may be set using the function TextFont. TextFont takes a single parameter, of type SInt16, which may be either a predefined constant or a font family ID number. Although predefined constants remain in the header file Fonts.h, their use is now discouraged by Apple.
You can get the font family ID using GetFNum. For example, the following sets the current font to Palatino:
short fontNum;
GetFNum("\pPalatino",&fontNum);
TextFont(fontNum);
 |
If you know the font family ID, you can get its name by calling the Font Manager's GetFontName function. If you do not know either the font family ID or the font name, you can use the Resource Manager's GetIndResource function followed by the GetResInfo function to determine the names and IDs of all available fonts. |
Setting and Modifying the Text Style
You use the function TextFace to change the text style, using any combination of the constants bold, italic, underline, outline, shadow, condense, and extend. Some examples of are as follows:
TextFace(bold); // Set to bold.
TextFace(bold | italic); // Set to bold and italic.)
TextFace(GetPortTextFace(thePort) | bold); // Add bold to existing.
TextFace(GetPortTextFace(thePort) &~ bold); // Remove bold.
TextFace(normal); // Set to plain.
Setting the Font Size
You use the function TextSize to change the font size in typographical points. A point is approximately 1/72 inch.
Changing the Width of Characters
Widening and narrowing space and non-space characters lets you meet special formatting requirements. You use SpaceExtra to specify the extra pixels to be added to or subtracted from the standard width of the space character. SpaceExtra is ordinarily used in text-justification functions.
Transfer Mode
The transfer mode initially set in the graphics port is the Boolean source mode srcOr. This mode causes the colour of the glyph to be determined by the foreground colour and the drawn glyph to completely overwrite the existing pixels. (In this mode only those bits which make up the actual glyph are drawn.)
|
A glyph is the visual representation of a character. |
You should generally use either srcOr or srcBic when drawing text, because all other transfer modes draw the character's background as well as the glyph itself. This can result in the clipping of characters by adjacent characters.
![]()
Copying Pixel Images Between Graphics Ports
QuickDraw provides the following three primary image-processing functions:
- CopyBits, which copies a pixel image to another graphics port, optionally allowing you to:
- Resize the image.
- Modify the image with transfer modes.
- Clip the image to a region.
- CopyMask, which copies a pixel image to another graphics port, allowing you to:
- Resize the image.
- Modify the image by passing it through a mask.
- CopyDeepMask, which combines the effects of CopyBits and CopyMask, , optionally allowing you to:
- Resize the image.
- Clip the image to a region.
- Specify a transfer mode.
- Modify the image by passing it through a mask.
The mask used by CopyMask and CopyDeepMask may be another pixel map whose pixels indicate proportionate weights of the colours for the source and destination pixels.
The CopyBits, CopyMask, and CopyDeepMask functions date from the era of black-and-white Macintoshes, which is why they expect a pointer to a bitmap in their source and destination parameters. Thus, when you are copying pixel maps using these functions, you must cast the address of the handle to the pixel map to a pointer to a bitmap. By looking at certain information in the graphics port object, CopyBits, CopyMask, and CopyDeepMask can establish that you have passed the functions a handle to a pixel map rather than the base address of a bitmap.
Using Masks
With CopyMask and CopyDeepMask, you supply a pixel map to act as the copying mask. The mask's pixels proportionally select between source and destination pixel values.
In the case of masks that are 1 bit deep, black bits in the mask cause the destination pixel to take the colour of the source pixel and white bits cause the destination pixel to retain its current colour. In the case of masks with pixel depths greater than 1, Colour QuickDraw takes a weighted average between source and destination colours. For example, a blue mask (that is, one with high values for the blue components of all pixels) filters out blue values coming from the source.
Transfer Modes
CopyBits and CopyDeepMask both allow you to specify the transfer mode, which can be either a Boolean source mode or an arithmetic source mode.
The Importance of Foreground and Background Colour
Applying a foreground colour other than black or a background colour other than white to the pixel can produce an unexpected result. For consistent results, you should set the foreground colour to black and the background colour to white before using CopyBits, CopyMask, or CopyDeepMask. (That said, setting foreground and background colours to something other than black or white can achieve some interesting colouration effects.)
Dithering
You can use dithering with CopyBits and CopyDeepMask. Dithering is a technique used by these functions to mix existing colours together to create the illusion of a third colour that may be unavailable on an indexed device, and to improve images that you shrink when copying them from a direct device to an indexed device.
You can add dithering to any transfer mode by adding the following constant to the transfer mode:
ditherCopy = 64 // Add to source mode for dithering.
Copying From Offscreen Graphics Ports
To gracefully display complex images, your application should construct the image in an offscreen graphics world and then use CopyBits to transfer the image to the onscreen graphics port. (Offscreen graphics worlds are addressed at Chapter 13.)
![]()
Scrolling Pixels in the Port Rectangle
You can use ScrollRect to scroll the pixels in the port rectangle. ScrollRect takes four parameters: the rectangle to scroll, a horizontal distance to scroll, a vertical distance to scroll, and a region reference. ScrollRect is a special form of CopyBits which copies bits enclosed by a rectangle and stores them within that same rectangle. The vacated area is filled with the current background colour or pixel/bit pattern.
![]()
Manipulating Rectangles and Regions
QuickDraw provides many functions for manipulating rectangles and regions. You can use the functions which manipulate rectangles to manipulate any shape based on a rectangle, that is, rounded rectangles, ovals , arcs, and wedges.
For example, you could define a rectangle to bound an oval and then frame the oval. You could then use OffsetRect to move the oval's bounding rectangle downwards. Using the offset bounding rectangle, you could frame a second, connected oval to form a figure eight with the first oval. You could then use that shape to help define a region. You could create a second region, and then use UnionRgn to create a region from the union of the two.
Manipulating Rectangles
The following summarises the functions for manipulating, and performing calculations on, rectangles:
Function |
Description |
|---|---|
| EmptyRect | Determine whether a rectangle is an empty rectangle. |
| EqualRect | Determine whether two rectangles are equal. |
| InsetRect | Shrinks or expands a rectangle. |
| OffsetRect | Moves a rectangle. |
| PtInRect | Determines whether a pixel is enclosed in a rectangle. |
| PtToAngle | Calculates the angle from the middle of a rectangle to a point. |
| Pt2Rect | Determines the smallest rectangle that encloses two points. |
| SectRect | Determines whether two rectangles intersect. |
| UnionRect | Calculates the smallest rectangle that encloses two rectangles. |
Manipulating Regions
The following summarises the functions for manipulating, and performing calculations on, regions:
Function |
Description |
|---|---|
| CopyRgn | Makes a copy of a region. |
| DiffRgn | Subtracts one region from another. |
| EmptyRgn | Determines whether a region is empty. |
| EqualRgn | Determines whether two regions have identical sizes, shapes, and locations. |
| InsetRgn | Shrinks or expands a region. |
| OffsetRgn | Moves a region. |
| PtInRgn | Determines whether a pixel is within a region. |
| RectInRgn | Determines whether a rectangle intersects a region. |
| RectRgn | Changes the structure of an existing region to that of a rectangle (using a Rect). |
| SectRgn | Calculates the intersection of two regions. |
| SetEmptyRgn | Sets a region to empty. |
| SetRectRgn | Changes the structure of an existing region to that of a rectangle (using coordinates). |
| UnionRgn | Calculates the union of two regions. |
| XorRgn | Calculates the difference between the union and the intersection of two regions. |
Manipulating Polygons
You can use OffSetPoly to move a polygon; however, QuickDraw provides no other functions for manipulating polygons.
Scaling Shapes and Regions Within the Same Graphics Port
To scale shapes and regions within the same graphics port, you can use the functions ScalePt, MapPt, MapRect, MapRgn, and MapPoly.
![]()
Highlighting
Highlighting is used when selecting and deselecting objects such as text or graphics. TextEdit, for example, uses highlighting to indicate selected text. If the current highlight colour is, for example, blue, TextEdit draws the selected text, then uses InvertRgn to produce a blue background for the text.
The system highlight colour, which can be changed by the user at the Highlight Color item in the Appearance pane of the Appearance control panel, is stored in a low memory global represented by the symbolic name HiliteRGB. It can be retrieved using LMGetHiliteRGB. You can override the default colour using the function HiliteColor. The current colour is copied the graphics port object, and may be retrieved from there using the function GetPortHiliteColor.
Color QuickDraw implements highlighting by replacing the background colour with the highlight colour. Another low memory global, represented by the symbolic name HiliteMode, contains a byte which represents the current highlight mode. One bit in that byte, represented by the constant pHiliteBit, is used to toggle the background and highlight colours.
Because Color QuickDraw resets the highlight bit after performing each drawing operation, your application must always clear the highlight bit immediately before calling InvertRgn (or, indeed, any of the other drawing or image-copying function that uses the patXor or srcXor transfer modes.)
The highlight mode can be retrieved and set using LMGetHiliteMode and LMSetHiliteMode, and BitClr may be used to clear the highlight bit:
UInt8 hiliteMode;
...
hiliteMode = LMGetHiliteMode();
BitClr(&hiliteMode,pHiliteBit);
LMSetHiliteMode(hiliteMode);
Another way to use highlighting is to add this constant to the transfer mode you pass in calls to the functions PenMode, CopyBits, CopyDeepMask and TextMode:
hilite = 50 // Add to source or pattern mode for highlighting.
![]()
Drawing Other Graphics Entities
In addition to drawing lines, rectangles, rounded rectangles, ovals, arcs, wedges, polygons and regions, and text, you can also use QuickDraw to draw the following:
- Cursors.
- Icons.
Cursors and Icons are addressed at Chapter 13.
![]()
Saving and Restoring the Graphics Port Drawing State
As stated above, the functions GetPenState and SetPenState are used to save and restore the graphics pen's location, size, transfer mode, and pattern, and PenNormal is used to initialise the pen's size, transfer mode, and pattern.
Typically, an application calls GetPenState at the beginning of a function that changes the pen's location, size, transfer mode, and/or pattern and restores the saved state to the pen on exit from that function. Depending on its requirements, an application might also save and restore the graphics port's foreground and background colours, and the text transfer mode, in the same way.
Since the introduction of the Appearance Manager, it has also become necessary to save and restore the pen pixel/bit pattern and background pixel/bit pattern in functions that call the Appearance Manager functions SetThemeBackground, SetThemePen, and/or SetThemeWindowBackground. Recall from Chapter 6 that constants of type ThemeBrush are passed in the inBrush parameter of these Appearance Manager functions and that the value in the inBrush parameter can represent either a colour or a pattern depending on the current appearance.
Accordingly, in the era of the Appearance Manager, applications which call SetThemeBackground and/or SetThemePen will need to take measures to save and restore the complete graphics port drawing state and, if required, normalise that state.
The following functions are used for saving, restoring, and normalising the graphics port drawing state:
Function |
Description |
|---|---|
| GetThemeDrawingState | Obtains the drawing state of the current graphics port. |
| SetThemeDrawingState | Sets the drawing state of the current graphics port. |
| NormalizeThemeDrawingState | Sets the current graphics port to the default drawing state. |
| DisposeThemeDrawingState | Releases the memory associated with a reference to a graphics port's drawing state. (Note that this memory may also be released by passing true in the inDisposeNow parameter of SetThemeDrawingState.) |
Information about the current state of the graphics port is stored in a structure of type ThemeDrawingState. This is a private data structure.
![]()
Main QuickDraw Constants, Data Types and Functions
Constants
Boolean Pattern Modes
patCopy = 8 patOr = 9 patXor = 10 patBic = 11 notPatCopy = 12 notPatOr = 13 notPatXor = 14 notPatBic = 15
Boolean Source Modes
srcCopy = 0 srcOr = 1 srcXor = 2 srcBic = 3 notSrcCopy = 4 notSrcOr = 5 notSrcXor = 6 notSrcBic = 7 ditherCopy = 64
Arithmetic Transfer Modes
blend = 32 addPin = 33 addOver = 34 subPin = 35 transparent = 36 addMax = 37 subOver = 38 adMin = 39
Add Dithering to Transfer Modes
ditherCopy = 64
Highlighting
hilite = 50 hiliteBit = 7 pHiliteBit = 0
Pattern List Resource ID for Pattern Resources in the System File
sysPatListID = 0
Data Types
Point
struct Point
{
short v;
short h;
};
typedef struct Point Point;
typedef Point *PointPtr;
Rect
     struct Rect
     {
       short top;
       short left;
       short bottom;
       short right;
     };
     typedef struct Rect Rect;
     typedef Rect *RectPtr;
Region
typedef struct OpaqueRgnHandle *RgnHandle;
Polygon
struct Polygon
{
  short  polySize;
  Rect   polyBBox;
  Point  polyPoints[1];
};

typedef struct Polygon Polygon;
typedef Polygon *PolyPtr, **PolyHandle;
PenState
struct PenState
{
  Point    pnLoc;
  Point    pnSize;
  short    pnMode;
  Pattern  pnPat;
};

typedef struct PenState PenState;
Functions
Managing the Graphics Pen
void  HidePen(void);
void  ShowPen(void);
void  GetPen(Point *pt);
void  GetPenState(PenState *pnState);
void  SetPenState(const PenState *pnState);
void  PenSize(short width,short height);
void  PenMode(short mode);
void  PenNormal(void);
Getting and Setting Foreground, Background , and Pixel Colour
void  RGBForeColor(const RGBColor *color);
void  RGBBackColor(const RGBColor *color);
void  GetForeColor(RGBColor *color);
void  GetBackColor(RGBColor *color);
void  GetCPixel(short h,short v,RGBColor *cPix);
void  SetCPixel(short h,short v,const RGBColor *cPix);
Creating and Disposing of Pixel Patterns
PixPatHandle  GetPixPat(short patID);
PixPatHandle  NewPixPat(void);
void          CopyPixPat(PixPatHandle srcPP,PixPatHandle dstPP);
void          MakeRGBPat(PixPatHandle pp,const RGBColor *myColor);
void          DisposePixPat(PixPatHandle pp);
Getting Pattern Resources
PatHandle  GetPattern(short patternID);
void       GetIndPattern(Pattern *thePat,short patternListID,short index);
Changing the Pen and BackGround Pixel Pattern and Bit Pattern
void  BackPixPat(PixPatHandle pp);
void  PenPixPat(PixPatHandle pp);
void  BackPat(const Pattern *pat);
void  PenPat(const Pattern *pat);
Drawing Lines
void  MoveTo(short h,short v);
void  Move(short dh,short dv);
void  LineTo(short h,short v);
void  Line(short dh,short dv);
Drawing Rectangles
void  FrameRect(const Rect *r);
void  PaintRect(const Rect *r);
void  FillRect(const Rect *r,ConstPatternParam pat);
void  FillCRect(const Rect *r,PixPatHandle pp);
void  InvertRect(const Rect *r);
void  EraseRect(const Rect *r);
Drawing Rounded Rectangles
void  FrameRoundRect(const Rect *r,short ovalWidth,short ovalHeight);
void  PaintRoundRect(const Rect *r,short ovalWidth,short ovalHeight);
void  FillRoundRect(const Rect *r,short ovalWidth,short ovalHeight,const Pattern *pat);
void  FillCRoundRect(const Rect *r,short ovalWidth,short ovalHeight,PixPatHandle pp);
void  InvertRoundRect(const Rect *r,short ovalWidth,short ovalHeight);
void  EraseRoundRect(const Rect *r,short ovalWidth,short ovalHeight);
Drawing Ovals
void  FrameOval(const Rect *r);
void  PaintOval(const Rect *r);
void  FillOval(const Rect *r,const Pattern *pat);
void  FillCOval(const Rect *r,PixPatHandle pp);
void  InvertOval(const Rect *r);
void  EraseOval(const Rect *r);
Drawing Arcs and Wedges
void  FrameArc(const Rect *r,short startAngle,short arcAngle);
void  PaintArc(const Rect *r,short startAngle,short arcAngle);
void  FillArc(const Rect *r,short startAngle,short arcAngle,const Pattern *pat);
void  FillCArc(const Rect *r,short startAngle,short arcAngle,PixPatHandle pp);
void  InvertArc(const Rect *r,short startAngle,short arcAngle);
void  EraseArc(const Rect *r,short startAngle,short arcAngle);
Drawing and Painting Polygons
void  FramePoly(PolyHandle poly);
void  PaintPoly(PolyHandle poly);
void  FillPoly(PolyHandle poly,const Pattern *pat);
void  FillCPoly(PolyHandle poly,PixPatHandle pp);
void  InvertPoly(PolyHandle poly);
void  ErasePoly(PolyHandle poly);
Drawing Regions
void  FrameRgn(RgnHandle rgn);
void  PaintRgn(RgnHandle rgn);
void  FillCRgn(RgnHandle rgn,PixPatHandle pp);
void  EraseRgn(RgnHandle rgn);
void  InvertRgn(RgnHandle rgn);
void  FillRgn(RgnHandle rgn, const Pattern *pat);
Setting Text Characteristics
void  TextFont(short font);
void  TextFace(short face);
void  TextMode(short mode);
void  TextSize(short size);
void  SpaceExtra(Fixed extra);
void  GetFontInfo(FontInfo *info);
Drawing and Measuring Text
void   DrawChar(short ch);
void   DrawString(ConstStr255Param s);
void   DrawText(const void *textBuf,short firstByte,short byteCount);
short  CharWidth(short ch);
short  StringWidth(ConstStr255Param s);
Copying Images
void  CopyBits(const BitMap *srcBits,const BitMap *dstBits,const Rect *srcRect,
      const Rect *dstRect,short mode,RgnHandle maskRgn);
void  CopyMask(const BitMap *srcBits,const BitMap *maskBits,const BitMap *dstBits,
      const Rect *srcRect,const Rect *maskRect,const Rect *dstRect);
void  CopyDeepMask(const BitMap *srcBits,const BitMap *maskBits,const BitMap *dstBits,
      const Rect *srcRect,const Rect *maskRect,const Rect *dstRect,short mode,
      RgnHandle maskRgn);
Getting and Setting the Highlight Colour and HighLight Mode
void   HiliteColor(const RGBColor *color);
void   LMGetHiliteRGB(RGBColor *hiliteRGBValue);
void   LMSetHiliteRGB(const RGBColor *hiliteRGBValue);
UInt8  LMGetHiliteMode(void);
void   LMSetHiliteMode(UInt8 value);
Creating and Disposing of Colour Tables
CTabHandle  GetCTable(short ctID);
void        DisposeCTable(CTabHandle cTable);
Creating and Managing Polygons
PolyHandle  OpenPoly(void);
void        ClosePoly(void);
void        KillPoly(PolyHandle poly);
void        OffsetPoly(PolyHandle poly,short dh,short dv);
Creating and Managing Rectangles
void     SetRect(Rect *r,short left,short top,short right,short bottom);
void     OffsetRect(Rect *r,short dh,short dv);
void     InsetRect(Rect *r,short dh,short dv);
Boolean  SectRect(const Rect *src1,const Rect *src2,Rect *dstRect);
void     UnionRect(const Rect *src1,const Rect *src2,Rect *dstRect);
Boolean  PtInRect(Point pt,const Rect *r);
void     Pt2Rect(Point pt1,Point pt2,Rect *dstRect);
void     PtToAngle(const Rect *r,Point pt,short *angle);
Boolean  EqualRect(const Rect *rect1,const Rect *rect2);
Boolean  EmptyRect(const Rect *r);
Creating and Managing Regions
RgnHandle  NewRgn(void);
void       OpenRgn(void);
void       CloseRgn(RgnHandle dstRgn);
void       DisposeRgn(RgnHandle rgn);
void       CopyRgn(RgnHandle srcRgn,RgnHandle dstRgn);
void       SetEmptyRgn(RgnHandle rgn);
void       SetRectRgn(RgnHandle rgn,short left,short top,short right,short bottom);
void       RectRgn(RgnHandle rgn,const Rect *r);
void       OffsetRgn(RgnHandle rgn,short dh,short dv);
void       InsetRgn(RgnHandle rgn,short dh,short dv);
void       SectRgn(RgnHandle srcRgnA,RgnHandle srcRgnB,RgnHandle dstRgn);
void       UnionRgn(RgnHandle srcRgnA,RgnHandle srcRgnB,RgnHandle dstRgn);
void       DiffRgn(RgnHandle srcRgnA,RgnHandle srcRgnB,RgnHandle dstRgn);
void       XorRgn(RgnHandle srcRgnA,RgnHandle srcRgnB,RgnHandle dstRgn);
Boolean    PtInRgn(Point pt,RgnHandle rgn);
Boolean    RectInRgn(const Rect *r,RgnHandle rgn);
Boolean    EqualRgn(RgnHandle rgnA,RgnHandle rgnB);
Boolean    EmptyRgn(RgnHandle rgn);
OSErr      BitMapToRegion(RgnHandle region,const BitMap *bMap);
Scaling and Mapping Points, Rectangles, Polygons, and Regions
void  ScalePt(Point *pt,const Rect *srcRect,const Rect *dstRect);
void  MapPt(Point *pt,const Rect *srcRect,const Rect *dstRect);
void  MapRect(Rect *r,const Rect *srcRect,const Rect *dstRect);
void  MapRgn(RgnHandle rgn,const Rect *srcRect,const Rect *dstRect);
void  MapPoly(PolyHandle poly,const Rect *srcRect,const Rect *dstRect);
Determining Whether QuickDraw has Finished Drawing
Boolean QDDone(GrafPtr port);
Retrieving Color QuickDraw Result Codes
short QDError(void);
Managing Port Rectangles and Clipping Regions
void  ScrollRect(const Rect *r,short dh,short dv,RgnHandle updateRgn);
void  SetOrigin(short h,short v);
void  PortSize(short width,short height);
void  MovePortTo(short leftGlobal,short topGlobal);
void  GetClip(RgnHandle rgn);
void  SetClip(RgnHandle rgn);
void  ClipRect(const Rect *r);
Manipulating Points in Graphics Ports
void     GlobalToLocal(Point *pt);
void     LocalToGlobal(Point *pt);
void     AddPt(Point src,Point *dst);
void     SubPt(Point *src,Point *dst);
void     SetPt(Point *pt,short h,short v);
Boolean  EqualPt(Point pt1,Point pt2);
Boolean  GetPixel(short h,short v);
![]()
Relevant Appearance Manager Data Types and Functions
Data Types
typedef struct OpaqueThemeDrawingState *ThemeDrawingState;
Functions
OSStatus  NormalizeThemeDrawingState(void);
OSStatus  GetThemeDrawingState(ThemeDrawingState *outState);
OSStatus  SetThemeDrawingState(ThemeDrawingState inState,Boolean inDisposeNow);
OSStatus  DisposeThemeDrawingState(ThemeDrawingState inState);
![]()


- SPREAD THE WORD:

- Slashdot

- Digg

- Del.icio.us


- Newsvine
