Implementing Application Preferences
In traditional desktop applications, preferences are application-specific settings used to configure the behavior or appearance of an application. iOS also supports application preferences, although not as an integral part of your application. Instead of each application displaying a custom user interface for its preferences, all application-level preferences are displayed using the system-supplied Settings application.
In order to integrate your custom application preferences into the Settings application, you must include a specially formatted settings bundle in the top-level directory of your application bundle. This settings bundle provides information about your application preferences to the Settings application, which is then responsible for displaying those preferences and updating the preferences database with any user-supplied values. At runtime, your application retrieves these preferences using the standard retrieval APIs. The sections that follow describe both the format of the settings bundle and the APIs you use to retrieve your preferences values.
Guidelines for Preferences
Adding your application preferences to the Settings application is most appropriate for productivity-style applications and in situations where you have preference values that are typically configured once and then rarely changed. For example, the Mail application uses these preferences to store the user’s account information and message-checking settings. Because the Settings application has support for displaying preferences hierarchically, manipulating your preferences from the Settings application is also more appropriate when you have a large number of preferences. Providing the same set of preferences in your application might require too many screens and might cause confusion for the user.
When your application has only a few options or has options that the user might want to change regularly, you should think carefully about whether the Settings application is the right place for them. For instance, utility applications provide custom configuration options on the back of their main view. A special control on the view flips it over to display the options, and another control flips the view back. For simple applications, this type of behavior provides immediate access to the application’s options and is much more convenient for the user than going to Settings.
For games and other full-screen applications, you can use the Settings application or implement your own custom screens for preferences. Custom screens are often appropriate in games because those screens are treated as part of the game’s setup. You can also use the Settings application for your preferences if you think it is more appropriate for your game flow.
Note: You should never spread your preferences across the Settings application and custom application screens. For example, a utility application with preferences on the back side of its main view should not also have configurable preferences in the Settings application. If you have preferences, pick one solution and use it exclusively.
If you do incorporate settings into the Settings application, be sure you respond to the NSUserDefaultsDidChangeNotification notification as described in “Responding to Changes in Your Application’s Settings.”
The Preferences Interface
The Settings application implements a hierarchical set of pages for navigating application preferences. The main page of the Settings application displays the system and third-party applications whose preferences can be customized. Selecting a third-party application takes the user to the preferences for that application.
Each application has at least one page of preferences, referred to as the main page. If your application has only a few preferences, the main page may be the only one you need. If the number of preferences gets too large to fit on the main page, however, you can add more pages. These additional pages become child pages of the main page. The user accesses them by tapping on a special type of preference, which links to the new page.
Each preference you display must be of a specific type. The type of the preference defines how the Settings application displays that preference. Most preference types identify a particular type of control that is used to set the preference value. Some types provide a way to organize preferences, however. Table 6-1 lists the different element types supported by the Settings application and points out how you might use each type to implement your own preference pages.
Element Type | Description |
|---|---|
Text Field | The text field type displays an optional title and an editable text field. You can use this type for preferences that require the user to specify a custom string value. The key for this type is |
Title | The title type displays a read-only string value. You can use this type to display read-only preference values. (If the preference contains cryptic or nonintuitive values, this type lets you map the possible values to custom strings.) The key for this type is |
Toggle Switch | The toggle switch type displays an ON/OFF toggle button. You can use this type to configure a preference that can have only one of two values. Although you typically use this type to represent preferences containing Boolean values, you can also use it with preferences containing non-Boolean values. The key for this type is |
Slider | The slider type displays a slider control. You can use this type for a preference that represents a range of values. The value for this type is a real number whose minimum and maximum value you specify. The key for this type is |
Multi Value | The multi value type lets the user select one value from a list of values. You can use this type for a preference that supports a set of mutually exclusive values. The values can be of any type. The key for this type is |
Group | The group type is a way for you to organize groups of preferences on a single page. The group type does not represent a configurable preference. It simply contains a title string that is displayed immediately before one or more configurable preferences. The key for this type is |
Child Pane | The child pane type lets the user navigate to a new page of preferences. You use this type to implement hierarchical preferences. For more information on how you configure and use this preference type, see “Hierarchical Preferences.” The key for this type is |
For detailed information about the format of each preference type, see Settings Application Schema Reference. To learn how to create and edit Setting page files, see “Adding and Modifying the Settings Bundle.”
The Settings Bundle
In iOS, you specify your application’s preferences through a special settings bundle. This bundle has the name Settings.bundle and resides in the top-level directory of your application’s bundle. This bundle contains one or more Settings Page files that provide detailed information about your application’s preferences. It may also include other support files needed to display your preferences, such as images or localized strings. Table 6-2 lists the contents of a typical settings bundle.
Item name | Description |
|---|---|
| The Settings Page file containing the preferences for the root page. The contents of this file are described in more detail in “The Settings Page File Format.” |
Additional | If you build a set of hierarchical preferences using child panes, the contents for each child pane are stored in a separate Settings Page file. You are responsible for naming these files and associating them with the correct child pane. |
One or more | These directories store localized string resources for your Settings Page files. Each directory contains a single strings file, whose title is specified in your Settings Page. The strings files provide the localized content to display to the user for each of your preferences. |
Additional images | If you use the slider control, you can store the images for your slider in the top-level directory of the bundle. |
In addition to the settings bundle, your application bundle can contain a custom icon for your application settings. The Settings application displays the icon you provide next to the entry for your application preferences. For information about application icons and how you specify them, see “Application Icons.”
When the Settings application launches, it checks each custom application for the presence of a settings bundle. For each custom bundle it finds, it loads that bundle and displays the corresponding application’s name and icon in the Settings main page. When the user taps the row belonging to your application, Settings loads the Root.plist Settings Page file for your settings bundle and uses that file to display your application’s main page of preferences.
In addition to loading your bundle’s Root.plist Settings Page file, the Settings application also loads any language-specific resources for that file, as needed. Each Settings Page file can have an associated .strings file containing localized values for any user-visible strings. As it prepares your preferences for display, the Settings application looks for string resources in the user’s preferred language and substitutes them into your preferences page prior to display.
The Settings Page File Format
Each Settings Page file in your settings bundle is stored in the iPhone Settings property-list file format, which is a structured file format. The simplest way to edit Settings Page files is to use the built-in editor facilities of Xcode; see “Preparing the Settings Page for Editing.” You can also edit property-list files using the Property List Editor application that comes with the Xcode tools.
Note: Xcode automatically converts any XML-based property files in your project to binary format when building your application. This conversion saves space and is done for you automatically at build time.
The root element of each Settings Page file contains the keys listed in Table 6-3. Only one key is actually required, but it is recommended that you include both of them.
Key | Type | Value |
|---|---|---|
| Array | The value for this key is an array of dictionaries, with each dictionary containing the information for a single preference element. For a list of element types, see Table 6-1. For a description of the keys associated with each element type, see Settings Application Schema Reference. |
| String | The name of the strings file associated with this file. A copy of this file (with appropriate localized strings) should be located in each of your bundle’s language-specific project directories. If you do not include this key, the strings in this file are not localized. For information on how these strings are used, see “Localized Resources.” |
Hierarchical Preferences
If you plan to organize your preferences hierarchically, each page you define must have its own separate .plist file. Each .plist file contains the set of preferences displayed only on that page. Your application’s main preferences page is always stored in the Root.plist file. Additional pages can be given any name you like.
To specify a link between a parent page and a child page, you include a child pane element in the parent page. A child pane element creates a row that, when tapped, displays a new page of settings. The File key of the child pane element identifies the name of the .plist file that defines the contents of the child page. The Title key identifies the title of the child page; this title is also used as the text of the row that the user taps to display the child page. The Settings application automatically provides navigation controls on the child page to allow the user to navigate back to the parent page.
Figure 6-1 shows how this hierarchical set of pages works. The left side of the figure shows the .plist files, and the right side shows the relationships between the corresponding pages.

For more information about child pane elements and their associated keys, see Settings Application Schema Reference.
Localized Resources
Because preferences contain user-visible strings, you should provide localized versions of those strings with your settings bundle. Each page of preferences can have an associated .strings file for each localization supported by your bundle. When the Settings application encounters a key that supports localization, it checks the appropriately localized .strings file for a matching key. If it finds one, it displays the value associated with that key.
When looking for localized resources such as .strings files, the Settings application follows the same rules that Mac OS X applications do. It first tries to find a localized version of the resource that matches the user’s preferred language setting. If a resource does not exist for the user’s preferred language, an appropriate fallback language is selected.
For information about the format of strings files, language-specific project directories, and how language-specific resources are retrieved from bundles, see Internationalization Programming Topics.
Adding and Modifying the Settings Bundle
Xcode provides a template for adding a Settings bundle to your current project. The default settings bundle contains a Root.plist file and a default language directory for storing any localized resources. You can then expand this bundle to include additional property list files and resources needed by your settings bundle.
Adding the Settings Bundle
To add a settings bundle to your Xcode project:
Choose File > New File.
Choose the iPhone OS > Settings > Settings Bundle template.
Name the file
Settings.bundle.
In addition to adding a new settings bundle to your project, Xcode automatically adds that bundle to the Copy Bundle Resources build phase of your application target. Thus, all you have to do is modify the property list files of your settings bundle and add any needed resources.
The newly added Settings.bundle bundle has the following structure:
Settings.bundle/ |
Root.plist |
en.lproj/ |
Root.strings |
Preparing the Settings Page for Editing
After creating your settings bundle using the Settings Bundle template, you can format the contents of your schema files to make them easier to edit. The following steps show you how to do this for the Root.plist file of your settings bundle but the steps are the same for any other schema files you create.
Display the contents of the
Root.plistfile of your settings bundle.In the Groups & Files list, disclose
Settings.bundleto view its contents.Select the
Root.plistfile. Its contents appear in the Detail view.
In the Detail view, select the Root key of the
Root.plistfile.Choose View > Property List Type > iPhone Settings plist.
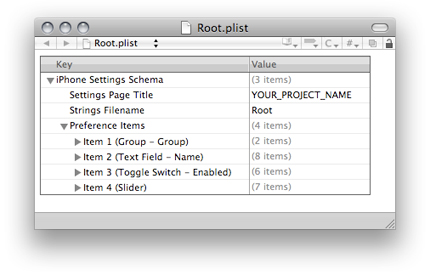
This command formats the contents of the property list inside the Detail view. Instead of showing the property list key names and values, Xcode substitutes human-readable strings (as shown in Figure 6-2) to make it easier for you to understand and edit the file’s contents.
Configuring a Settings Page: A Tutorial
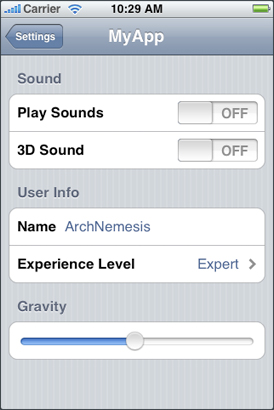
This section contains a tutorial that shows you how to configure a Settings page to display the controls you want. The goal of the tutorial is to create a page like the one in Figure 6-3. If you have not yet created a settings bundle for your project, you should do so as described in “Preparing the Settings Page for Editing” before proceeding with these steps.
Change the value of the Settings Page Title key to the name of your application.
Double-click the
YOUR_PROJECT_NAMEtext and change the text toMyApp.Disclose the Preference Items key to display the default items that come with the template.
Change the title of
Item 1toSound.Disclose
Item 1ofPreference Items.Change the value of the
Titlekey fromGrouptoSound.Leave the
Typekey set toGroup.
Create the first toggle switch for the newly renamed Sound group.
Select
Item 3ofPreference Itemsand choose Edit > Cut.Select
Item 1and choose Edit > Paste. (This moves the toggle switch item in front of the text field item.)Disclose the toggle switch item to reveal its configuration keys.
Change the value of the
Titlekey toPlay Sounds.Change the value of the
Identifierkey toplay_sounds_preference. The item should now be configured as shown in the following figure.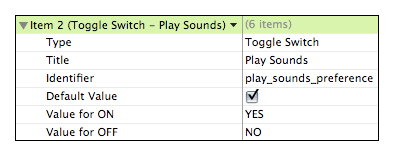
Create a second toggle switch for the Sound group.
Select
Item 2(the Play Sounds toggle switch).Select Edit > Copy.
Select Edit >Paste. This places a copy of the toggle switch right after the first one.
Disclose the new toggle switch item to reveal its configuration keys.
Change the value of its
Titlekey to3D Sound.Change the value of its
Identifierkey to3D_sound_preference.
At this point, you have finished the first group of settings and are ready to create the User Info group.
Change
Item 4into a Group element and name itUser Info.Click
Item 4in thePreferences Items. This displays a drop-down menu with a list of item types.From the drop-down menu, select
Groupto change the type of the element.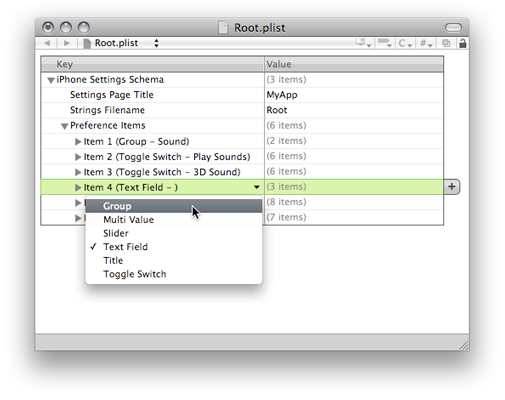
Disclose the contents of
Item 4.Set the value of the
Titlekey toUser Info.
Create the Name field.
Select
Item 5in the Preferences Item.Using the drop-down menu, change its type to
Text Field.Set the value of the
Titlekey toUser Info.Set value of the
Identifierkey touser_name.Toggle the disclosure button of the item to hide its contents.
Create the Experience Level settings.
Select
Item 5and click the plus (+) button (or press Return) to create a new item.Click the new item and set its type to
Multi Value.Disclose the items contents and set its title to
Experience Level, its identifier toexperience_preference, and its default value to0.With the Default Value key selected, click the plus button to add a
Titlesarray.Open the disclosure button for the
Titlesarray and click the items button along the right edge of the table. Clicking this button adds a new subitem toTitles.Select the new subitem and click the plus button 2 more times to create 3 total subitems.
Set the values of the subitems to
Beginner,Expert, andMaster.Select the
Titleskey again and click its disclosure button to hide its subitems.Click the plus button to create the
Valuesarray.Add 3 subitems to the
Valuesarray and set their values to0,1, and2.Click the disclosure button of
Item 6to hide its contents.
Add the final group to your settings page.
Create a new item and set its type to
Groupand its title toGravity.Create another new item and set its type to
Slider, its identifier togravity_preference, its default value to1, and its maximum value to2.
Creating Additional Settings Page Files
The Settings Bundle template includes the Root.plist file, which defines your application’s top Settings page. To define additional Settings pages, you must add additional property list files to your settings bundle. You can do this either from the Finder or from Xcode.
To add a property list file to your settings bundle in Xcode, do the following:
In the Groups and Files pane, open your settings bundle and select the
Root.plistfile.Choose File > New.
Choose Other > Property List.
Select the new file and choose View > Property List Type > iPhone Settings plist to configure it as a settings file.
After adding a new Settings page to your settings bundle, you can edit the page’s contents as described in “Configuring a Settings Page: A Tutorial.” To display the settings for your page, you must reference it from a Child Pane element as described in “Hierarchical Preferences.”
Accessing Your Preferences
iOS applications get and set preferences values using either the Foundation or Core Foundation frameworks. In the Foundation framework, you use the NSUserDefaults class to get and set preference values. In the Core Foundation framework, you use several preferences-related functions to get and set values.
Listing 6-1 shows a simple example of how to read a preference value from your application. This example uses the NSUserDefaults class to read a value from the preferences created in “Configuring a Settings Page: A Tutorial” and assign it to an application-specific instance variable.
Listing 6-1 Accessing preference values in an application
- (void)applicationDidFinishLaunching:(UIApplication *)application |
{ |
NSUserDefaults *defaults = [NSUserDefaults standardUserDefaults]; |
[self setShouldPlaySounds:[defaults boolForKey:@"play_sounds_preference"]]; |
// Finish app initialization... |
} |
For information about the NSUserDefaults methods used to read and write preferences, see NSUserDefaults Class Reference. For information about the Core Foundation functions used to read and write preferences, see Preferences Utilities Reference.
Debugging Preferences for Simulated Applications
When running your application, the iPhone Simulator stores any preferences values for your application in ~/Library/Application Support/iPhone Simulator/User/Applications/<APP_ID>/Library/Preferences, where <APP_ID> is a programmatically generated directory name that iOS uses to identify your application.
Each time you reinstall your application, iOS performs a clean install, which deletes any previous preferences. In other words, building or running your application from Xcode always installs a new version, replacing any old contents. To test preference changes between successive executions, you must run your application directly from the simulator interface and not from Xcode.
Last updated: 2010-06-30