Adding a View Controller
In this application you’ll need two classes. Xcode’s application template provided an application delegate class and an instance is created in the nib file. You need to implement a view controller class and create an instance of it.
Adding a View Controller Class
View controller objects play a central role in most iOS applications. As the name implies, they’re responsible for managing a view, but on iOS they also help with navigation and memory management. You’re not going to use the latter features here, but it’s important to be aware of them for future development. UIKit provides a special class—UIViewController—that encapsulates most of the default behavior you want from a view controller. You have to create a subclass to customize the behavior for your application.
>> In Xcode, in the project organizer select either the project (HelloWorld at the top of the Groups and Files list) or the Classes group folder—the new files will be added to the current selection.
>> Choose File > New File and in the New File window. Select the Cocoa Touch Classes group, then select UIViewController subclass. In the Options section, choose only With XIB for user interface.
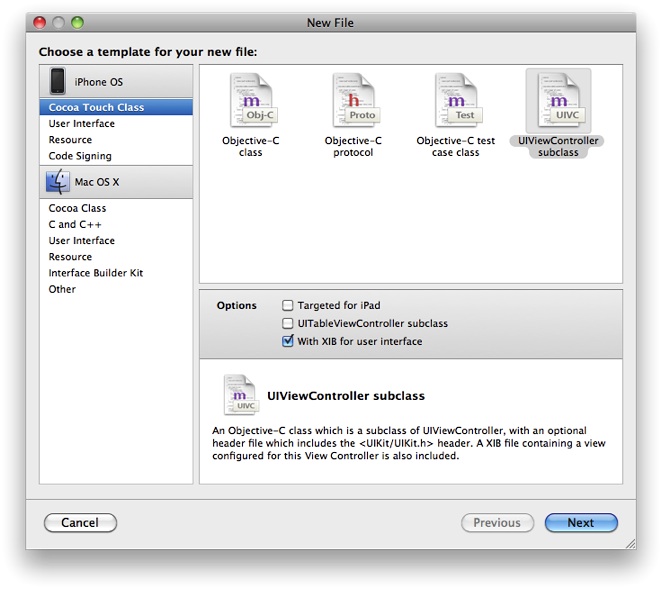
Note: If you don’t see the “With XIB for user interface” option, make sure you have installed version 3.2 of the iPhone OS SDK—Xcode should show version 3.2.2 or later.
Selecting “With XIB for user interface” means that Xcode creates a nib file to accompany the view controller, and adds it to the project. (Nib files are discussed in detail in the next chapter.)
>> Click Next, and in the following screen give the file a new name such as MyViewController (by convention, class names begin with a capital letter). Make sure that both the .m and .h files are created and that the files marked as being added to the project’s target, as shown here:
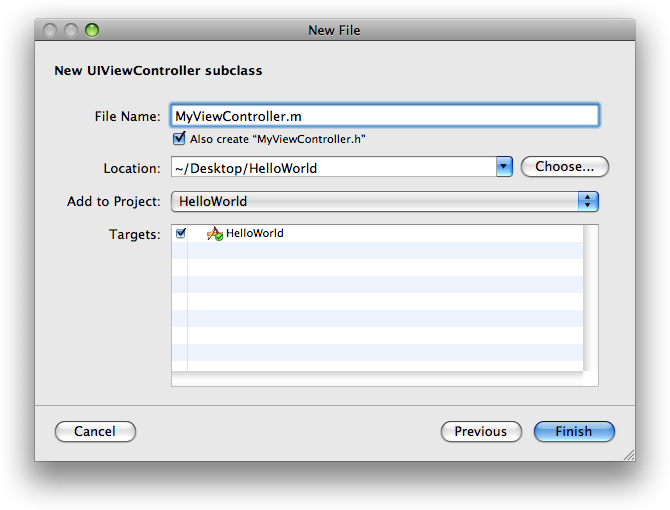
>> Press Finish and make sure that the files were added to your project.
If you look at the new source files, you’ll see that stub implementations of various methods are already given to you. These are all you need for the moment; the next task is to create an instance of the class.
Adding a View Controller Property
You want to make sure that the view controller lasts for the lifetime of the application, so it makes sense to add it as an instance variable of the application delegate (which will also last for the lifetime of the application). (To understand why, consult Memory Management Programming Guide.)
The instance variable will be an instance of the MyViewController class. The compiler will generate an error, though, if you declare the variable but you don’t tell it about the MyViewController class. You could import the header file, but typically in Cocoa you instead provide a forward declaration—a promise to the compiler that MyViewController will be defined somewhere else and that it needn’t waste time checking for it now. (Doing this also avoids circularities if two classes need to refer to each other and would otherwise include each other’s header files.) You then import the header file itself in the implementation file.
>> In the application delegate’s header file (HelloWorldAppDelegate.h), add this forward declaration before the interface declaration for HelloWorldAppDelegate:
@class MyViewController; |
>> Add the instance variable by adding the following line between the braces:
MyViewController *myViewController; |
>> Add a declaration for this property after the closing brace but before @end:
@property (nonatomic, retain) MyViewController *myViewController; |
Important: Like C, Objective-C is case-sensitive. MyViewController refers to a class; myViewController is a variable that here contains an instance of MyViewController. A common programming error in Cocoa is to misspell a symbol name, frequently by using a letter of an inappropriate case (for example, “tableview” instead of “tableView”). This tutorial deliberately uses MyViewController and myViewController to encourage you to look at the name carefully. When writing code, make sure you use the appropriate symbol.
Properties are described in the “Declared Properties” chapter in The Objective-C Programming Language. Basically, though, this declaration specifies that an instance of HelloWorldAppDelegate has a property that you can access using the getter and setter methods myViewController and setMyViewController: respectively, and that the instance retains the property (retaining is discussed in more detail later).
To make sure you’re on track, confirm that your HelloWorldAppDelegate class interface file (HelloWorldAppDelegate.h) looks like this (comments are not shown):
#import <UIKit/UIKit.h> |
@class MyViewController; |
@interface HelloWorldAppDelegate : NSObject <UIApplicationDelegate> { |
UIWindow *window; |
MyViewController *myViewController; |
} |
@property (nonatomic, retain) IBOutlet UIWindow *window; |
@property (nonatomic, retain) MyViewController *myViewController; |
@end |
You can now create an instance of the view controller.
Creating the View Controller Instance
Now that you’ve added the view controller property to the application delegate, you need to actually create an instance of the view controller and set it as the value for the property.
>> In the implementation file for the application delegate class (HelloWorldAppDelegate.m), create an instance of MyViewController by adding the following code as the first statements in the implementation of the application:didFinishLaunchingWithOptions: method:
MyViewController *aViewController = [[MyViewController alloc] |
initWithNibName:@"MyViewController" bundle:[NSBundle mainBundle]]; |
[self setMyViewController:aViewController]; |
[aViewController release]; |
There’s quite a lot in just these three lines. What they do is:
Create and initialize an instance of the view controller class.
Set the new view controller to be the
myViewControllerinstance variable using an accessor method.Remember that you didn’t separately declare
setMyViewController:, it was implied as part of the property declaration—see “Adding a View Controller Property.”Adhere to memory management rules by releasing the view controller.
You create the view controller object using alloc, then initialize it using initWithNibName:bundle:. The init method specifies first the name of the nib file the controller should load and second the bundle in which it should find it. A bundle is an abstraction of a location in the file system that groups code and resources that can be used in an application. The advantages of using bundles over locating resources yourself in the file-system are that bundles provide a convenient and simple API—the bundle object can locate a resource just by name—and they take account of localization for you. To learn more about bundles, see Resource Programming Guide.
By convention, you own any objects you create using an alloc method (amongst others, see “Memory Management Rules”). You should also:
Relinquish ownership of any objects you create.
Typically use accessor methods to set instance variables anywhere other than in an initializer method.
The second line in the implementation uses an accessor method to set the instance variable, and then the third line uses release to relinquish ownership.
There are other ways to implement the above. You could, for example, replace the three lines with just two:
MyViewController *aViewController = [[[MyViewController alloc] |
initWithNibName:@"MyViewController" bundle:[NSBundle mainBundle]] autorelease]; |
[self setMyViewController:aViewController]; |
In this version, you use autorelease as a way to relinquish ownership of the new view controller but at some point in the future. To understand this, read “Autorelease Pools” in the Memory Management Programming Guide. In general, however, you should try to avoid using autorelease wherever possible as it’s a more resource intensive operation than release.
You could also replace the last line with:
self.myViewController = aViewController; |
The dot notation invokes exactly the same accessor method (setMyViewController:) as in the original implementation. The dot notation simply provides a more compact syntax—especially when you use nested expressions. Which syntax you choose is largely personal preference, although using the dot syntax does have some additional benefits when used in conjunction with properties—see “Declared Properties” in The Objective-C Programming Language. For more about the dot syntax, see “Dot Syntax” in The Objective-C Programming Language in “Objects, Classes, and Messaging” in The Objective-C Programming Language.
Setting Up the View
The view controller is responsible for managing and configuring the view when asked. Rather than creating the window’s content view directly, therefore, you ask the view controller for its view and add that as the subview for the window.
>> After releasing the view controller, add the following lines:
UIView *controllersView = [myViewController view]; |
[window addSubview:controllersView]; |
You could do this in one line:
[window addSubview:[myViewController view]]; |
But breaking it into two serves to highlight the side of memory management that is the converse of that which you saw earlier. Because you didn’t create the controller view using any of the methods listed in “Memory Management Rules” in Memory Management Programming Guide, you don’t own the returned object. Consequently you can simply pass it to the window and forget about it (you don’t have to release it).
The final line from the template:
[window makeKeyAndVisible]; |
causes the window—now complete with your view—to be displayed on screen. You add your view before the window is displayed so that the user doesn’t briefly see a blank screen before the real content appears.
Housekeeping
There are a few unfinished tasks to complete: You need to import the view controller’s header file, synthesize the accessor methods, and—to conform to the rules of memory management—make sure the view controller is released in the dealloc method.
>> In the implementation file for the application delegate class (HelloWorldAppDelegate.m), do the following:
At the top of the file, import the header file for
MyViewController:#import "MyViewController.h"
In the
@implementationblock of the class, tell the compiler to synthesize the accessor methods for the view controller:@synthesize myViewController;
In the
deallocmethod, release the view controller in the first statement:[myViewController release];
Implementation Source Listing
To make sure you’re still on track, confirm that your HelloWorldAppDelegate class implementation (HelloWorldAppDelegate.m) looks like this:
#import "MyViewController.h" |
#import "HelloWorldAppDelegate.h" |
@implementation HelloWorldAppDelegate |
@synthesize window; |
@synthesize myViewController; |
- (BOOL)application:(UIApplication *)application |
didFinishLaunchingWithOptions:(NSDictionary *)launchOptions { |
MyViewController *aViewController = [[MyViewController alloc] |
initWithNibName:@"MyViewController" bundle:[NSBundle mainBundle]]; |
[self setMyViewController:aViewController]; |
[aViewController release]; |
UIView *controllersView = [myViewController view]; |
[window addSubview:controllersView]; |
[window makeKeyAndVisible]; |
} |
- (void)dealloc { |
[myViewController release]; |
[window release]; |
[super dealloc]; |
} |
@end |
Test the Application
You can now test your application.
>> Compile and run the project (choose Build > Build and Run, or click the Build and Run button in Xcode’s toolbar).
Your application should compile without errors and you should again see a white screen in Simulator.
Recap
In this section you added a new view controller class and its accompanying nib file. In the application delegate, you declared an instance variable and accessor methods for a view controller instance. You also synthesized the accessor methods and performed a few other housekeeping tasks. Most importantly, though, you created an instance of the view controller and passed its view to the window. In the next chapter you’ll use Interface Builder to configure the nib file the controller uses to load its view.
Last updated: 2010-07-01