Creating Your Project
In this chapter, you create the project using Xcode and find out how an application launches.
Xcode
The main tool you use to create applications for iOS is Xcode—Apple’s IDE (integrated development environment). You can also use it to create a variety of other project types, including Cocoa and command-line utilities.
Notes: As a convention, >> denotes the beginning of a paragraph (sometimes including the following bulleted list) that contains steps that you must perform in the tutorial.
In code listings, comments included in Xcode template files are not shown.
>> Launch Xcode (by default it’s in /Developer/Applications), then create a new project by choosing File > New Project. You should see a new window similar to this:
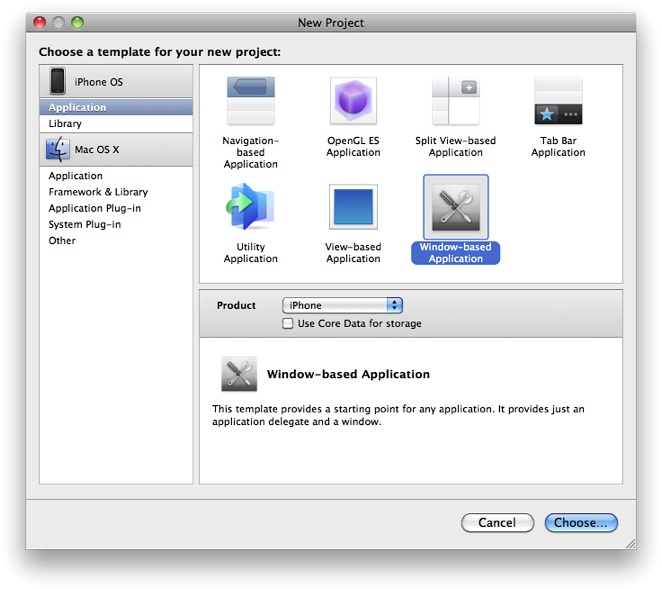
Note: If you don’t see the Product and “Use Core Data for storage” options, make sure you have installed version 4.0 of the iPhone OS SDK—you should have Xcode version 3.2.2 or later. You can still follow the tutorial even if you don’t have 4.0 installed, just make sure you start with the Window-based Application.
>> Select the Window-Based Application.
>> In the Product popup menu, make sure iPhone is selected. (Do not select the option to use Core Data for storage. You don’t use Core Data in this example.)
>> Click Choose.
A sheet appears to allow you to select where your project will be saved.
>> Select a suitable location for your project (such as the Desktop or a custom Projects directory), then give the project a name—HelloWorld—and click Save.
Note: The remainder of the tutorial assumes that you named the project HelloWorld, so the application delegate class is called HelloWorldAppDelegate. If you name your project something else, then the application delegate class will be called YourProjectNameAppDelegate.
You should see a new project window like this:
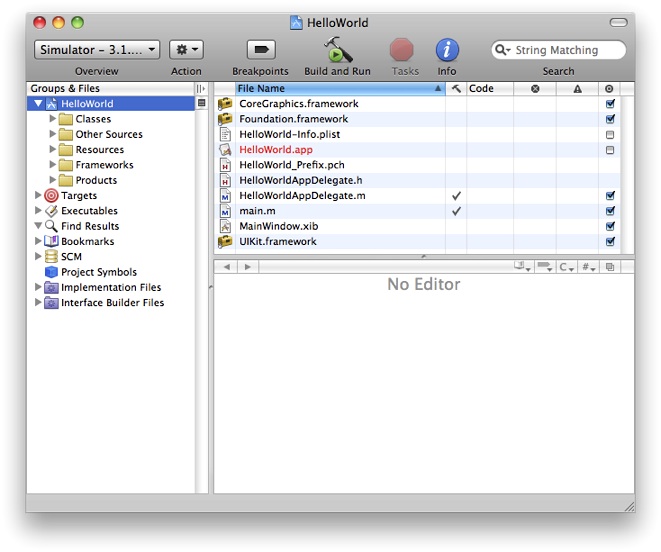
If you haven’t used Xcode before, take a moment to explore the application. You should read Xcode Workspace Guide to understand the organization of the project window and how to perform basic tasks like editing and saving files. You can now build and run the application to see what the Simulator looks like.
>> Choose Build > Build and Go (Run) or click the Build and Go button in the toolbar.
The iPhone Simulator application should launch automatically, and when your application starts up you should simply see a white screen. To understand where the white screen came from, you need to understand how the application starts up.
>> Quit the Simulator.
Application Bootstrapping
The template project you created already sets up the basic application environment. It creates an application object, connects to the window server, establishes the run loop, and so on. Most of the work is done by the UIApplicationMain function as illustrated in Figure 2-1.
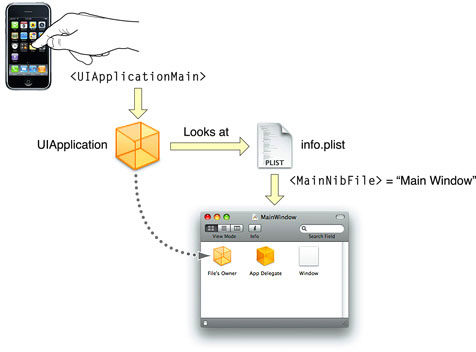
The main function in main.m calls the UIApplicationMain function:
int retVal = UIApplicationMain(argc, argv, nil, nil); |
This creates an instance of UIApplication. It also scans the application’s Info.plist property list file. The Info.plist file is a dictionary that contains information about the application such as its name and icon. It may contain the name of the nib file the application object should load, specified by the NSMainNibFile key. Nib files contain an archive of user interface elements and other objects—you’ll learn more about them later in the tutorial. In your project’s Info.plist file you should see:
<key>NSMainNibFile</key> |
<string>MainWindow</string> |
This means that when the application launches, the MainWindow nib file is loaded.
>> To look at the nib file, double-click MainWindow.xib in the Resources group in the project window (the file has the extension “xib” but by convention it is referred to as a “nib file”). Interface Builder launches and opens the file.
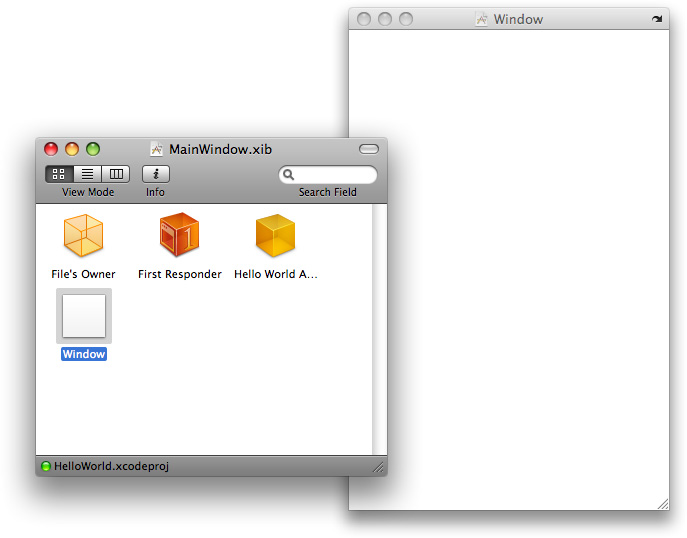
The Interface Builder document contains four items:
A File’s Owner proxy object. The File’s Owner object is actually the
UIApplicationinstance—File’s Owner is discussed later, in “File’s Owner.”A First Responder proxy object. The First Responder is not used in this tutorial but you can learn more about it by reading “Event Handling” in iOS Application Programming Guide.
An instance of
HelloWorldAppDelegateset to be the application's delegate. Delegates are discussed in the next section.A window. The window has its background set to white and is set to be visible at launch. It’s this window that you see when the application launches.
After the application has finished launching, you can perform additional customization. A common pattern—and the one you’ll follow in the next chapter—is illustrated in this diagram:
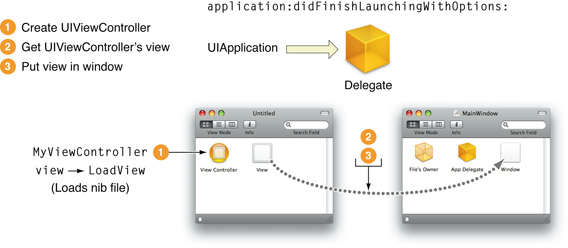
When the application object has completed its setup, it sends its delegate an application:didFinishLaunchingWithOptions: message. Rather than configuring the user interface itself, the delegate typically creates a view controller object (a special controller responsible for managing a view—this adheres to the model-view-controller design pattern as described in “Model-View-Controller”). The delegate asks the view controller for its view (which the view controller creates on demand) and adds that as a subview of the window.
Recap
In this chapter you created a new project and learned about how the application launch process works. In the next chapter, you’ll define and create an instance of a view controller.
Last updated: 2010-07-01