Distributing Applications
When you’re ready to distribute your application for testing or for general distribution through the App Store, you need to create an archive of the application using a distribution provisioning profile, and send it to application testers or submit it to iTunes Connect. This chapter shows how to perform these tasks.
Publishing Your Application for Testing
After testing and tuning your application yourself or with the assistance of your teammates, it’s always a good idea to perform wider testing with a representative sample of your application’s potential users. Such testing may reveal issues that surface only with particular usage patters. Incorporating a few nondeveloper users in your testing strategy lets you expose your application to a variety of usage styles, and, if such usage produces crashes in your application, allows you to collect the crash reports (also known as crash logs) from those users, to help you resolve those execution problems.
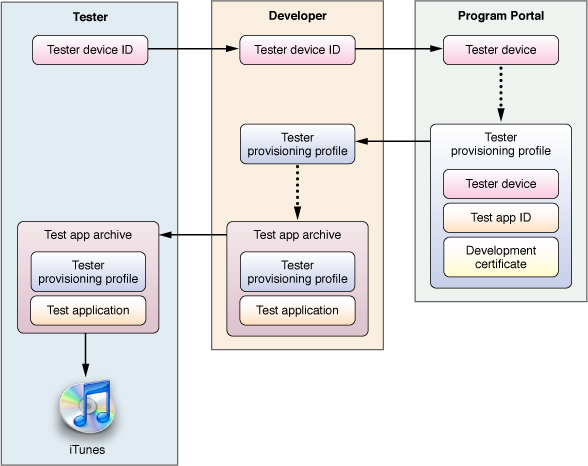
An iOS application in development can run only on devices with provisioning profiles generated by the application developer. As iPhone Developer Program members, you and your fellow team members install these files on your devices as part of your development process (as described in “Managing Devices and Digital Identities”). To include users that are not of your team (also known as testers) in your testing strategy, you must add them as part of your team in the iPhone Provisioning Portal and issue them test provisioning profiles (also known as ad-hoc provisioning profiles), which allow them to install on their devices applications that have not been published to the App Store.
“Publishing Your Application for Testing” illustrates the process of adding users as testers and delivering your test application to them.
Prerequisites:
Before sending your application to testers, review the information in “Running Applications.”
To add testers to your team you must have distribution certificate in the Portal.
To help testers obtain the information you need to add them to your testing program and to show them how to send you crash logs, you can send them the information in “Instructions for Application Testers.”
Important: To add testers to your team, you must be a member of the iPhone Developer Program. See “Managing Devices and Digital Identities” for details.
The remainder of this chapter describes the steps you need to perform to add testers to your team and shows how to import the crash logs they send you into the Organizer.
Adding Application Testers to Your Team
To add iOS users to your team as testers:
Obtain the testers’ device IDs.
The easiest way to obtain this information is through email. Have your tester follow the instructions for sending their device ID to you in “Sending Your Device ID to a Developer.”
Add the testers’ device IDs to the Portal.
If you already have a testing provisioning profile for your application in the Portal, add the testers’ device IDs to it. Otherwise, create the profile with these characteristics:
Distribution method
Ad Hoc
Profile name
<Application_Name> Testing Profile
App ID
Appropriate application ID for the application being tested
Devices
Testers’ device IDs
Download the testing profile and install it in the Xcode Organizer.
Drag the
<Profile_Name>.mobileprovisionfile to the Provisioning Profiles list under IPHONE DEVELOPMENT.
Adding the iTunes Artwork to Your Application
Test versions of your application should contain artwork iTunes uses to identify your application. Otherwise, when users add your application to their iTunes library, iTunes uses generic artwork for it, as shown in Figure 9-2.
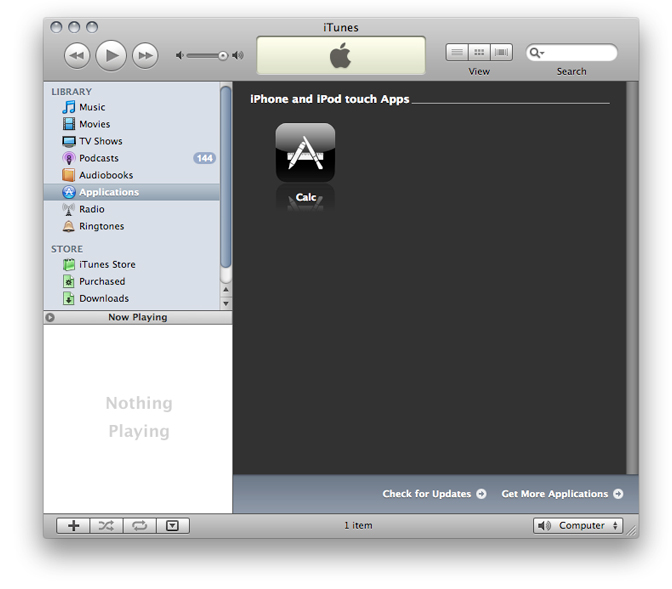
The iTunes artwork your testers see should be your application’s icon. This artwork must be a 512 x 512 JPEG or PNG file named iTunesArtwork. Note that the file must not have an extension.
After generating the file of your application’s icon, follow these steps to add it to your application:
Open your project in Xcode.
In the Groups & Files list, select the Resources group.
Choose Project > Add to Project, navigate to your
iTunesArtworkfile, and click Add.In the dialog that appears, select the ”Copy items” option and click Add.
Archiving Your Application for Testing
To archive your application for distribution to your testers:
Set the Code Signing Identity build setting to a test provisioning profile.
In the Project window Overview toolbar menu, set Active Executable to a device.
Choose Build > Build and Archive.
Note: To streamline this process, create a distribution configuration (by duplicating the Release configuration), and change the Code Signing Identity build setting in that configuration. That way, you can keep your development and distribution configurations separate. For more information about build configurations, see "Build Configurations".
Sending Your Application to Testers
To send your application to testers:
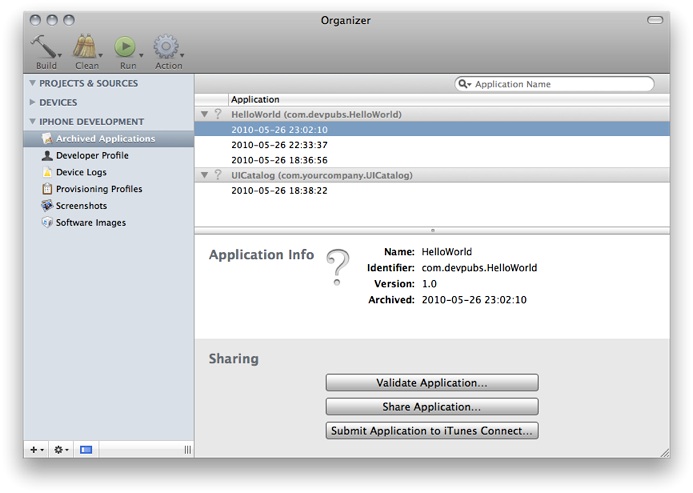
In the Archived Applications list in the Organizer, select the application archive you want to send to testers, and click Share Application.
Click E-Mail.
In the email message, provide your testers information they need to test your application.
Importing Crash Logs from Testers
To add tester crash logs to the Organizer to view their symbol information, drag the crash logs to the Crash Logs group under the iPhone Development section.
Important: For Xcode to symbolize crash logs (to add information about the API used to the crash log), Spotlight must be indexing the volume in which your archived applications and their corresponding dSYM files are stored.
Instructions for Application Testers
This section provides instructions to testers about the procedures to follow to test your iOS applications on their devices. An application tester is a potential user of your application who wants to test it before it’s released through the App Store.
You may send these instructions, along with any special tasks needed to test your application, to customers interested in testing your application.
Sending Your Device ID to a Developer
Before a developer can send you an application for testing, they must register your device with Apple under their application-testing program.
To send your device ID to a developer for test-program registration:
Launch iTunes.
Connect your device to your computer.
Select the device in the Devices list.
In the Summary pane, click the Serial Number label. It changes to Identifier.
Choose Edit > Copy.
Email your device identifier to the developer. Be sure to include your name and device name in the email.
Installing an Application for Testing
After being registered in a developer’s testing program, the developer sends you an archive of the test application. You need to install the archive into iTunes to run the application on your device.
To install the test application on your device:
In the Finder, double-click the application archive,
<Application_Name>.ipa.The application appears in the iTunes Applications list.
Sync your device.
If the version of iOS on your device is earlier than the test application can run on, you need to update your device with the current release of iOS.
Sending Crash Reports to a Developer
When the application you’re testing crashes, iOS creates a record of that event. The next time you connect your device to iTunes, iTunes downloads those records (known as crash logs) to your computer. To help get the problem fixed, you should send crash logs of the application you’re testing to its developer.
Sending Crash Reports from Macs
To send crash logs to developers:
In the Finder, open a new window.
Choose Go > Go to Folder.
Enter
~/Library/Logs/CrashReporter/MobileDevice.Open the folder named after your device’s name.
Select the crash logs named after the application you’re testing.
Choose Finder > Services > Mail > Send File.
In the New Message window, enter the developer’s email address in the To field and
<application_name> crash logs from <your_name>(for example,MyTestApp crash logs from Anna Haro) in the Subject field.Choose Message > Send.
In the Finder, you may delete the crash logs you sent to avoid sending duplicate reports later.
Sending Crash Reports from Windows
To send crash logs to developers, enter the crash log directory (Listing 9-1 and Listing 9-2) in the Windows search field, replacing <user_name> with your Windows user name.
Listing 9-1 Crash log storage on Windows Vista
C:\Users\<user_name>\AppData\Roaming\Apple computer\Logs\CrashReporter/MobileDevice |
Listing 9-2 Crash log storage on Windows XP
C:\Documents and Settings\<user_name>\Application Data\Apple computer\Logs\CrashReporter |
Open the folder named after your device’s name and send the crash logs for the application you’re testing in an email message using the subject-text format <application_name> crash logs from <your_name> (for example, MyTestApp crash logs from Anna Haro) to the application’s developer.
Publishing Your Application for App Store Distribution
When you’re ready to publish your application for general distribution through the App Store, you submit it to iTunes Connect. This section describes how to prepare your application for submission and how to submit it to iTunes Connect.
Creating a Distribution Profile for Your Application
To create a distribution profile for your application:
Create a distribution provisioning profile in the Portal with these characteristics:
Distribution method
App Store
Profile name
<Application_Name> Distribution Profile
App ID
The appropriate application ID for your application.
Download the distribution profile and install it in the Xcode Organizer.
Drag the
<Profile_Name>.mobileprovisionfile to the Provisioning Profiles list under IPHONE DEVELOPMENT in the Organizer.
Archiving Your Application for Submission to iTunes Connect
To create a distribution archive of your application:
Set the Code Signing Identity build setting to the distribution profile.
In the Overview toolbar menu in the Project window, set Active Executable to a device.
Choose Build > Build and Archive.
Your new application archive appears in the Archived Applications list in the Organizer. Each archive is identified with the date and time it was created.
Submitting Your Application to iTunes Connect
To submit your application to iTunes Connect:
In the Archived Applications list in the Organizer, select the application archive you want to submit, and click Submit Application to iTunes Connect.
In the dialog that appears, enter your iTunes Connect credentials, and click Submit.
Last updated: 2010-07-02