The Core Application Design
Because it runs iOS, an iPad application uses all of the same objects and interfaces found in existing iPhone applications. As a result, the core architecture of the two application types is identical. However, iOS 3.2 introduces some new features that you can take advantage of in your iPad applications that you cannot use in your iPhone applications. This chapter describes those features and shows you how and when to use them in your application.
iPad Application Architecture
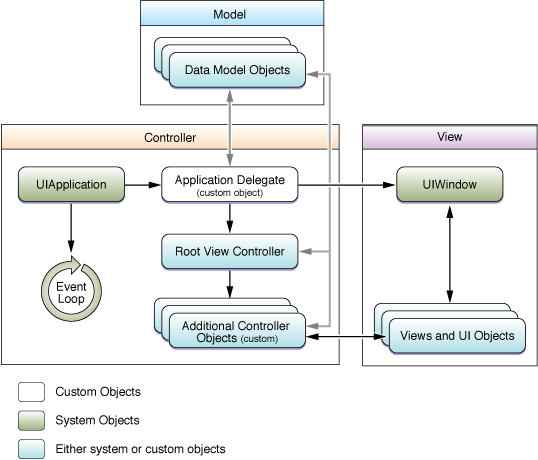
Although the architecture of iPhone and iPad applications is identical, there are places where you may need to adjust your code or resource files to support one device type or another. Figure 3-1 recaps the basic iPhone application architecture, showing the key objects that are most commonly found, and Table 3-1 describes the roles of each of these types of objects. (For a more in-depth introduction to the core architecture of iPhone (and thus iPad) applications, see iOS Application Programming Guide.)
Object | Description |
|---|---|
The | |
Application delegate object | The application delegate is a custom object that you provide at application launch, usually by embedding it in your application’s main nib file. The primary job of this object is to initialize the application and present its window onscreen. The In an iPad application, you continue to use your delegate object to coordinate launch-time and quit-time behaviors for the application. However, you may need to include conditional checks in your delegate methods to provide custom support for each device type. Specifically, at launch time, you would typically need to load different nib files for your initial interface. Similarly, your initialization and termination code might also vary depending on the device type. |
Data model objects | Data model objects store your application’s content and are therefore custom to your application. Ideally, there should be few, if any, differences in your data objects on each device. The only time there might be differences is if you add or modify data objects to support iPad-specific features. |
View controller objects | View controller objects manage the presentation of your application’s user interface and also coordinate interactions between your data model objects and the views used to present that data. The When porting an iPhone application, most of the changes occur in your views and view controllers. How much you need to modify your view controllers depends entirely on how much you change your views. If the changes are small, you might be able to reuse your existing view controllers and make minor changes to support each device. If the changes are significant, you might need to define separate view controller classes for your iPad and iPhone applications. I |
A You use windows in essentially the same way in both iPad and iPhone applications. After creating the window and installing your root views, you essentially ignore it. Any changes to your user interface happen through manipulations to your view controllers and not to your window object. | |
Views and UI objects | Views and controls provide the visual representation of your application’s content. The UIKit framework provides standard views for implementing tables, buttons, picker controls, text labels, input fields, and many others. You can also define your own custom views by subclassing In an iPad application, you need to adjust your views to fit the larger screen of the device. The scope of this “adjustment” can range from scaling up the size of your existing views to replacing some or all of them entirely. Replacing views might seem extreme but might also yield better results, especially if the new views are able to use the extra screen space more efficiently. |
When porting an existing iPhone application to iPad, the biggest changes will be to your application’s custom views and view controllers. Other changes might also be required but your views and view controllers are the ones you almost certainly have to change.
For examples of how to use the new views and view controllers in iOS 3.2, see “Views and View Controllers.” For a list of design guidelines you should consider when putting together your user interface, see iPad Human Interface Guidelines.
The Application Bundle
An iPad application uses the same bundle structure as an iPhone application. In other words, most of the application’s code and resources reside in the top-level directory of the bundle. The contents of the bundle are also very similar, but there are some features that are available only in iPad applications.
New Keys for the Application’s Info.plist File
There are additional keys for the information property list file (Info.plist file) that you use to support features specific to iPad applications. Most of these keys are optional, although one key is required and one key is strongly recommend. Table 3-2 lists the new keys and when you would include them in your application’s Info.plist file. Whenever possible, you should modify Info.plist keys by changing the appropriate build settings in Xcode. However, the addition of some keys may require you to edit the file manually.
Key | Description |
|---|---|
| (Required) Identifies which devices the application supports. Set the value of this key by modifying the value in the Targeted Device Family build setting of your Xcode project. Any new applications you create specifically for iPad should include this key automatically. Similarly, any projects you transition over to support iPad should add this key automatically. |
| Contains a string that identifies the name of the launch image to use. If this key is not present, the application looks for an image with the name For more information about launch images, see “Providing Launch Images for Different Orientations.” |
| (Recommended) Contains an array of strings that specifies the orientations that the application supports at launch time. Possible values are the constants specified by the The system uses this information to choose an appropriate launch image for the application, as described in “Providing Launch Images for Different Orientations.” Your application must similarly be prepared to configure its initial user interface in the any of the designated orientations. |
| Contains an array of dictionaries, each of which specifies a document type the application is able to open. You can use this key to let the system know that your application supports the opening of specific file types. To specify document type information, select your application target and open the inspector window. In the Properties pane, use the Document Types section to enter your document type information. The only fields you are required to fill in are the Name and UTI fields. Most other fields are ignored. |
| Specifies an array of file names identifying the image resources to use for the application icon. If your application supports iPhone and iPad devices, you can specify different image resources for each. The system automatically uses the most appropriately sized image on each system. For more information about how to use this key, see the discussion of application icons in “Build-Time Configuration Details” in iOS Application Programming Guide. |
For a complete list of the keys you can include in your application’s Info.plist file, see Information Property List Key Reference.
Providing Launch Images for Different Orientations
A launch image is a static image file provided by the application and displayed by the system when the application is first launched. The system displays the launch image to give the user immediate feedback that the application launched and to give the application time to initialize itself and prepare its initial set of views for display. Because iPad applications can launch in any interface orientation, they can specify different launch images for each unique starting orientation.
For more information about how to specify launch images for different orientations, see the discussion of launch images in “Build-Time Configuration Details” in iOS Application Programming Guide.
Note: Although the image may be different at launch time, the configuration process for your application remains largely the same as for iPhone and iPod touch devices. Your application:didFinishLaunchingWithOptions: method should set up your window and views using a single preferred orientation. In other words, you should not attempt to match the initial orientation of your window and views to match the device’s current orientation. Shortly after your application:didFinishLaunchingWithOptions: method returns, the system notifies your window of the correct starting orientation to give it a chance to reorient your content using the standard process.
Providing Application Icons for iPad
An iPad application supports the following icon sizes:
A 72 x 72 pixel for the main application icon.
A 50 x 50 pixel icon for displaying with Spotlight search results.
A 29 x 29 pixel icon for the application’s Settings bundle, if present.
For information about how to specify these icons in your application bundle, see the discussion of application icons in “Build-Time Configuration Details” in iOS Application Programming Guide.
Document Support on iPad Devices
Applications running on iPad devices have access to enhanced support for handling and managing documents and files. The purpose of this support is to make it easier for applications to work with files behind the scenes. When an application encounters a file of an unknown type, it can ask the system for help in displaying that file’s contents or finding an application that can display them. If your application is able to display certain file formats, you can also register with the system as an application capable of displaying that file.
Previewing and Opening Files
When your application needs to interact with files of unknown types, you can use a UIDocumentInteractionController object to manage those interactions. A document interaction controller works with the system to determine whether files can be previewed in place or opened by another application. Your application works with the document interaction controller to present the available options to the user at appropriate times.
To use a document interaction controller in your application, you do the following:
Create an instance of the
UIDocumentInteractionControllerclass for each file you want to manage.Present the file in your application’s user interface. (Typically, you would do this by displaying the file name or icon somewhere in your interface.)
When the user interacts with the file, ask the document interaction controller to present one of the following interfaces:
A file preview view that displays the contents of the file
A menu containing options to preview the file, copy its contents, or open it using another application
A menu prompting the user to open it with another application
Any application that interacts with files can use a document interaction controller. Programs that download files from the network are the most likely candidates to need these capabilities. For example, an email program might use document interaction controllers to preview or open files attached to an email. Of course, you do not need to download files from the network to use this feature.
Creating and Configuring a Document Interaction Controller
To create a new document interaction controller, initialize a new instance of the UIDocumentInteractionController class with the file you want it to manage and assign an appropriate delegate object. Your delegate object is responsible for providing the document interaction controller with information it needs to present its views. You can also use the delegate to perform additional actions when those views are displayed. The following code creates a new document interaction controller and sets the delegate to the current object. Note that the caller of this method needs to retain the returned object.
- (UIDocumentInteractionController*)docControllerForFile:(NSURL*)fileURL |
{ |
UIDocumentInteractionController* docController = |
[UIDocumentInteractionController interactionControllerWithURL:fileURL]; |
docController.delegate = self; |
return docController; |
} |
Once you have a document interaction controller object, you can use its properties to get information about the file, including its name, type information, and path information. The controller also has an icons property that contains UIImage objects representing the document’s icon in various sizes. You can use all of this information when presenting the document in your user interface.
If you plan to let the user open the file in another application, you can use the annotation property of the document interaction controller to pass custom information to the opening application. It is up to you to provide information in a format that the other application will recognize. For example, this property is typically used by application suites that want to communicate additional information about a file to other applications in the suite. The opening application sees the annotation data in the UIApplicationLaunchOptionsAnnotationKey key of the options dictionary that is passed to it at launch time.
Presenting a Document Interaction Controller
When the user interacts with a file, you use the document interaction controller to display the appropriate user interface. You have the choice of displaying a document preview or of prompting the user to choose an appropriate action for the file using one of the following methods:
Use the
presentOptionsMenuFromRect:inView:animated:orpresentOptionsMenuFromBarButtonItem:animated:method to present the user with a variety of options.Use the
presentPreviewAnimated:method to display a document preview.Use the
presentOpenInMenuFromRect:inView:animated:orpresentOpenInMenuFromBarButtonItem:animated:method to present the user with a list of applications with which to open the file.
Each of the preceding methods attempts to display a custom view with the appropriate content. When calling these methods, you should always check the return value to see if the attempt was actually successful. These methods may return NO if the resulting interface would have contained no content. For example, the presentOpenInMenuFromRect:inView:animated: method returns NO if there are no applications capable of opening the file.
If you choose a method that might display a preview of the file, your delegate object must implement the documentInteractionControllerViewControllerForPreview: method. Document previews are displayed using a modal view, so the view controller you return becomes the parent of the modal document preview. If you do not implement this method, if your implementation returns nil, or if the specified view controller is unable to present another modal view controller, a document preview is not displayed.
Normally, the document interaction controller automatically handles the dismissal of the view it presents. However, you can dismiss the view programmatically as needed by calling the dismissMenuAnimated: or dismissPreviewAnimated: methods.
Registering the File Types Your Application Supports
If your application is capable of opening specific types of files, you should register that support with the system. To declare its support for file types, your application must include the CFBundleDocumentTypes key in its Info.plist file. The system gathers this information from your application and maintains a registry that other applications can access through a document interaction controller.
The CFBundleDocumentTypes key contains an array of dictionaries, each of which identifies information about a specific document type. A document type usually has a one-to-one correspondence with a particular document type. However, if your application treats more than one file type the same way, you can group those types together as a single document type. For example, if you have two different file formats for your application’s native document type, you could group both the old type and new type together in a single document type entry. By doing so, both the new and old files would appear to be the same type of file and would be treated in the same way.
Each dictionary in the CFBundleDocumentTypes array can include the following keys:
CFBundleTypeNamespecifies the name of the document type.CFBundleTypeIconFilesis an array of filenames for the image resources to use as the document’s icon.LSItemContentTypescontains an array of strings with the UTI types that represent the supported file types in this group.LSHandlerRankdescribes whether this application owns the document type or is merely able to open it.
From the perspective of your application, a document is a file type (or file types) that the application supports and treats as a single entity. For example, an image processing application might treat different image file formats as different document types so that it can fine tune the behavior associated with each one. Conversely, a word processing application might not care about the underlying image formats and just manage all image formats using a single document type.
Listing 3-1 shows a sample XML snippet from the Info.plist of an application that is capable of opening a custom file type. The LSItemContentTypes key identifies the UTI associated with the file format and the CFBundleTypeIconFiles key points to the icon resources to use when displaying it.
Listing 3-1 Document type information for a custom file format
<dict> |
<key>CFBundleTypeName</key> |
<string>My File Format</string> |
<key>CFBundleTypeIconFiles</key> |
<array> |
<string>MySmallIcon.png</string> |
<string>MyLargeIcon.png</string> |
</array> |
<key>LSItemContentTypes</key> |
<array> |
<string>com.example.myformat</string> |
</array> |
<key>LSHandlerRank</key> |
<string>Owner</string> |
</dict> |
For more information about the contents of the CFBundleDocumentTypes key, see the description of that key in Information Property List Key Reference.
Opening Supported File Types
At launch time, the system may ask your application to open a specific file and present it to the user. This typically occurs because another application encountered the file and used a document interaction controller to handle it. You receive information about the file to be opened in the application:didFinishLaunchingWithOptions: method of your application delegate. If your application handles custom file types, you must implement this delegate method (instead of the applicationDidFinishLaunching: method) and use it to initialize your application.
The options dictionary passed to the application:didFinishLaunchingWithOptions: method contains information about the file to be opened. Specifically, your application should look in this dictionary for the following keys:
UIApplicationLaunchOptionsURLKeycontains anNSURLobject that specifies the file to open.UIApplicationLaunchOptionsSourceApplicationKeycontains anNSStringwith the bundle identifier of the application that initiated the open request.UIApplicationLaunchOptionsAnnotationKeycontains a property list object that the source application wanted to associate with the file when it was opened.
If the UIApplicationLaunchOptionsURLKey key is present, your application must open the file referenced by that key and present its contents immediately. You can use the other keys in the dictionary to gather information about the circumstances surrounding the opening of the file.
Last updated: 2010-04-13