Motion Events
An iPhone, iPad, or iPod touch device generates motion events when users move the device in a certain way, such as shaking it or tilting it. All motion events have their origin in the device accelerometer or gyroscope.
If you want to detect motions as gestures—specifically shaking motions—you should handle motion events as described in “Shaking-Motion Events.” If you want to receive and handle high-rate, continuous motion data, you should instead follow the approaches described in “Core Motion” or “Accessing Accelerometer Events Using UIAccelerometer.”
Notes: This chapter contains information that used to be in iPhone Application Programming Guide. The information in this chapter has not been updated specifically for iOS 4.0.
Shaking-Motion Events
When users shake a device, the system evaluates the accelerometer data and, if that data meets certain criteria, interprets it as a shaking gesture. The system creates a UIEvent object representing this gesture and sends the event object to the currently active application for processing.
Note: Motion events as a type of UIEvent were introduced in iOS 3.0. Currently, only shaking motions are interpreted as gestures and become motion events.
Motion events are much simpler than touch events. The system tells an application when a motion starts and when it stops, and not when each individual motion occurs. And, whereas a touch event includes a set of touches and their related state, a motion event carries with it no state other than the event type, event subtype, and timestamp. The system interprets motion gestures in a way that does not conflict with orientation changes.
To receive motion events, the responder object that is to handle them must be the first responder. Listing 4-1 shows how a responder can make itself the first responder.
Listing 4-1 Becoming first responder
- (BOOL)canBecomeFirstResponder { |
return YES; |
} |
- (void)viewDidAppear:(BOOL)animated { |
[self becomeFirstResponder]; |
} |
To handle motion events, a class inheriting from UIResponder must implement either the motionBegan:withEvent: method or motionEnded:withEvent: method, or possibly both of these methods (see “Best Practices for Handling Multitouch Events”). For example, if an application wants to give horizontal shakes and vertical shakes different meanings, it can cache the current acceleration axis values in motionBegan:withEvent:, compare those cached values to the same axis values in motionEnded:withEvent:, and act on the results accordingly. A responder should also implement the motionCancelled:withEvent: method to respond to events that the system sends to cancel a motion event; these events sometimes reflect the system’s determination that the motion is not a valid gesture after all.
Listing 4-2 shows code that handles a shaking-motion event by resetting views that have have been altered (by translation, rotation, and scaling) to their original positions, orientations, and sizes.
Listing 4-2 Handling a motion event
- (void)motionBegan:(UIEventSubtype)motion withEvent:(UIEvent *)event |
{ |
} |
- (void)motionEnded:(UIEventSubtype)motion withEvent:(UIEvent *)event |
{ |
[UIView beginAnimations:nil context:nil]; |
[UIView setAnimationDuration:0.5]; |
self.view.transform = CGAffineTransformIdentity; |
for (UIView *subview in self.view.subviews) { |
subview.transform = CGAffineTransformIdentity; |
} |
[UIView commitAnimations]; |
for (TransformGesture *gesture in [window allTransformGestures]) { |
[gesture resetTransform]; |
} |
} |
- (void)motionCancelled:(UIEventSubtype)motion withEvent:(UIEvent *)event |
{ |
} |
An application and its key window deliver a motion event to a window’s first responder for handling. If the first responder doesn’t handle it, the event progresses up the responder chain in the same way touch events do until it is either handled or ignored. (See “Event Delivery” for details.) However, there is one important difference between touch events and shaking-motion events. When the user starts shaking the device, the system sends a motion event to the first responder in a motionBegan:withEvent: message; if the first responder doesn’t handle the event, it travels up the responder chain. If the shaking lasts less than a second or so, the system sends a motionEnded:withEvent: message to the first responder. But if the shaking lasts longer or if the system determines the motion is not a shake, the first responder receives a motionCancelled:withEvent: message.
If a shaking-motion event travels up the responder chain to the window without being handled and the applicationSupportsShakeToEdit property of UIApplication is set to YES, iOS displays a sheet with Undo and Redo commands. By default, this property is set to YES.
Getting the Current Device Orientation
If you need to know only the general orientation of the device, and not the exact vector of orientation, you should use the methods of the UIDevice class to retrieve that information. Using the UIDevice interface is simple and does not require that you calculate the orientation vector yourself.
Before getting the current orientation, you must tell the UIDevice class to begin generating device orientation notifications by calling the beginGeneratingDeviceOrientationNotifications method. Doing so turns on the accelerometer hardware (which may otherwise be off to conserve power).
Shortly after enabling orientation notifications, you can get the current orientation from the orientationproperty of the shared UIDevice object. You can also register to receive UIDeviceOrientationDidChangeNotification notifications, which are posted whenever the general orientation changes. The device orientation is reported using the UIDeviceOrientation constants, which indicate whether the device is in landscape or portrait mode or whether the device is face up or face down. These constants indicate the physical orientation of the device and need not correspond to the orientation of your application’s user interface.
When you no longer need to know the orientation of the device, you should always disable orientation notifications by calling the endGeneratingDeviceOrientationNotifications method of UIDevice. Doing so gives the system the opportunity to disable the accelerometer hardware if it is not in use elsewhere.
Setting Required Hardware Capabilities for Accelerometer and Gyroscope Events
If your application requires device-related features in order to run—such as the ability to receive accelerometer data—you must add a list of required capabilities to your application. At runtime, iOS launches your application only if those capabilities are present on the device. Furthermore, the App Store uses the information in this key to generate a list of requirements for user devices and prevent users from downloading applications that they cannot run.
You declare your application’s required capabilities by adding the UIRequiredDeviceCapabilities key to your application’s Info.plist file. This key, supported in iOS 3.0 and later, has a value that is either an array or a dictionary. If you use an array, the presence of a given key indicates the corresponding feature is required. If you use a dictionary, you must specify a Boolean value for each key indicating whether the feature is required. In both cases, having no key for a feature indicates that the feature is not required.
The following UIRequiredDeviceCapabilities keys are for motion events, based on hardware source:
accelerometer(for accelerometer events)You do not need to include this key if your application detects only device orientation changes or if your application handles shaking-motion events delivered via
UIEventobjects.gyroscope(for gyroscope events)
Accessing Accelerometer Events Using UIAccelerometer
Every application has a single UIAccelerometer object that can be used to receive acceleration data. You get the instance of this class using the sharedAccelerometerclass method of UIAccelerometer. Using this object, you set the desired reporting interval and a custom delegate to receive acceleration events. You can set the reporting interval to be as small as 10 milliseconds (ms), which corresponds to a 100 Hz update rate, although most applications can operate sufficiently with a larger interval. As soon as you assign your delegate object, the accelerometer starts sending it data. Thereafter, your delegate receives data at the requested update interval.
Listing 4-3 shows the basic steps for configuring an accelerometer. In this example, the update frequency is 50 Hz, which corresponds to an update interval of 20 ms. The myDelegateObject is a custom object that you define; it must support the UIAccelerometerDelegate protocol, which defines the method used to receive acceleration data.
Listing 4-3 Configuring the accelerometer
#define kAccelerometerFrequency 50.0 //Hz |
-(void)configureAccelerometer |
{ |
UIAccelerometer* theAccelerometer = [UIAccelerometer sharedAccelerometer]; |
theAccelerometer.updateInterval = 1 / kAccelerometerFrequency; |
theAccelerometer.delegate = self; |
// Delegate events begin immediately. |
} |
At regular intervals, the shared accelerometer object delivers event data to your delegate’s accelerometer:didAccelerate: method, shown in Listing 4-4. You can use this method to process the accelerometer data however you want. In general it is recommended that you use some sort of filter to isolate the component of the data in which you are interested.
Listing 4-4 Receiving an accelerometer event
- (void)accelerometer:(UIAccelerometer *)accelerometer didAccelerate:(UIAcceleration *)acceleration |
{ |
UIAccelerationValue x, y, z; |
x = acceleration.x; |
y = acceleration.y; |
z = acceleration.z; |
// Do something with the values. |
} |
To stop the delivery of acceleration events, set the delegate of the shared UIAccelerometer object to nil. Setting the delegate object to nil lets the system know that it can turn off the accelerometer hardware as needed and thus save battery life.
The acceleration data you receive in your delegate method represents the instantaneous values reported by the accelerometer hardware. Even when a device is completely at rest, the values reported by this hardware can fluctuate slightly. When using these values, you should be sure to account for these fluctuations by averaging out the values over time or by calibrating the data you receive. For example, the Bubble Level sample application provides controls for calibrating the current angle against a known surface. Subsequent readings are then reported relative to the calibrated angle. If your own code requires a similar level of accuracy, you should also include a calibration option in your user interface.
Choosing an Appropriate Update Interval
When configuring the update interval for acceleration events, it is best to choose an interval that minimizes the number of delivered events and still meets the needs of your application. Few applications need acceleration events delivered 100 times a second. Using a lower frequency prevents your application from running as often and can therefore improve battery life. Table 4-1 lists some typical update frequencies and explains what you can do with the acceleration data generated at that frequency.
Event frequency (Hz) | Usage |
|---|---|
10–20 | Suitable for use in determining the vector representing the current orientation of the device. |
30–60 | Suitable for games and other applications that use the accelerometers for real-time user input. |
70–100 | Suitable for applications that need to detect high-frequency motion. For example, you might use this interval to detect the user hitting the device or shaking it very quickly. |
Isolating the Gravity Component from Acceleration Data
If you are using the accelerometer data to detect the current orientation of a device, you need to be able to filter out the portion of the acceleration data caused by gravity from the portion of the data that is caused by motion of the device. To do this, you can use a low-pass filter to reduce the influence of sudden changes on the accelerometer data. The resulting filtered values then reflect the more constant effects of gravity.
Listing 4-5 shows a simplified version of a low-pass filter. This example uses a low-value filtering factor to generate a value that uses 10 percent of the unfiltered acceleration data and 90 percent of the previously filtered value. The previous values are stored in the accelX, accelY, and accelZ member variables of the class. Because acceleration data comes in regularly, these values settle out quickly and respond slowly to sudden but short-lived changes in motion.
Listing 4-5 Isolating the effects of gravity from accelerometer data
#define kFilteringFactor 0.1 |
- (void)accelerometer:(UIAccelerometer *)accelerometer didAccelerate:(UIAcceleration *)acceleration { |
// Use a basic low-pass filter to keep only the gravity component of each axis. |
accelX = (acceleration.x * kFilteringFactor) + (accelX * (1.0 - kFilteringFactor)); |
accelY = (acceleration.y * kFilteringFactor) + (accelY * (1.0 - kFilteringFactor)); |
accelZ = (acceleration.z * kFilteringFactor) + (accelZ * (1.0 - kFilteringFactor)); |
// Use the acceleration data. |
} |
Isolating Instantaneous Motion from Acceleration Data
If you are using accelerometer data to detect just the instant motion of a device, you need to be able to isolate sudden changes in movement from the constant effect of gravity. You can do that with a high-pass filter.
Listing 4-6 shows a simplified high-pass filter computation. The acceleration values from the previous event are stored in the accelX, accelY, and accelZ member variables of the class. This example computes the low-pass filter value and then subtracts it from the current value to obtain just the instantaneous component of motion.
Listing 4-6 Getting the instantaneous portion of movement from accelerometer data
#define kFilteringFactor 0.1 |
- (void)accelerometer:(UIAccelerometer *)accelerometer didAccelerate:(UIAcceleration *)acceleration { |
// Subtract the low-pass value from the current value to get a simplified high-pass filter |
accelX = acceleration.x - ( (acceleration.x * kFilteringFactor) + (accelX * (1.0 - kFilteringFactor)) ); |
accelY = acceleration.y - ( (acceleration.y * kFilteringFactor) + (accelY * (1.0 - kFilteringFactor)) ); |
accelZ = acceleration.z - ( (acceleration.z * kFilteringFactor) + (accelZ * (1.0 - kFilteringFactor)) ); |
// Use the acceleration data. |
} |
Core Motion
Core Motion is a system framework that obtains motion data from sensors on a device and presents that data to applications for processing. The handling of the sensor data and the application of related algorithms occurs on Core Motion’s own thread. The items of hardware that detect and originate these motion events are the accelerometer and the gyroscope. (The gyroscope is currently available only on iPhone 4.) Core Motion publishes an Objective-C programmatic interface that enables applications to receive device-motion data of various types, which they can then process in appropriate ways.
As illustrated by Figure 4-1, Core Motion defines a manager class, CMMotionManager, and three classes whose instances encapsulate measurements of motion data of various types:
A
CMAccelerometerDataobject encapsulates a data structure that records a measurement of device acceleration along the three spatial axes. This data derives from the accelerometer.For more on
CMAccelerometerData, see “Handling Accelerometer Events Using Core Motion.”A
CMGyroDataobject encapsulates a data structure that records a biased estimate of a device’s rate of rotation along the three spatial axes. This “raw” data derives from the gyroscope. (“Biased” in this context refers to an offset from the true rotation rate. Thus, if the device is not rotating, this estimate from the gyroscope will still give a non-zero value.)For more on
CMGyroData, see “Handling Rotation-Rate Data.”A
CMDeviceMotionobject encapsulates processed device-motion data that derives from both the accelerometer and the gyroscope. Core Motion’s sensor fusion algorithms process both accelerometer and gyroscope data and provide an application with highly accurate measurements of device attitude, the (unbiased) rotation rate of a device, the direction of gravity on a device, and the acceleration that the user is giving to a device. ACMAttitudeobject, which is contained in anCMDeviceMotioninstance, contains properties giving different measurements of attitude, including the Euler angles indicated by roll, pitch, and yaw.Attitude refers to the orientation of a device in three dimensions relative to a reference frame that is external to the device. For more on attitude and
CMDeviceMotion, see “Handling Processed Device-Motion Data.”

All of the data-encapsulating classes of Core Motion are subclasses of CMLogItem, which defines a timestamp so that motion data can be tagged with the event time and logged to a file. An application can also compare the timestamp of motion events with earlier motion events to determine the true update interval between events.
For of each of the data-motion types described above, the CMMotionManager class offers two approaches for obtaining motion data, a push approach and a pull approach:
Push. An application requests an update interval and implements a block (of a specific type) for handling the motion data; it then starts updates for that type of motion data, passing into Core Motion an operation queue as well as the block. Core Motion delivers each update to the block, which executes as a task in the operation queue.
Pull. An application starts updates of a type of motion data and periodically samples the most recent measurement of motion data.
The pull approach is the recommended approach for most applications, especially games; it is generally more efficient and requires less code. The push approach is appropriate for data-collection applications and similar applications that cannot miss a sample measurement. Both approaches have benign thread-safety effects; with the push approach, your block executes on the operation-queue’s thread whereas, with the pull approach, Core Motion never interrupts your threads.
Important: An application should create only a single instance of the CMMotionManager class. Multiple instances of this class can affect the rate at which an application receives data from the accelerometer and gyroscope.
Be aware that there is no simulator support for application features related to Core Motion. You have to test and debug applications on a device.
Handling Accelerometer Events Using Core Motion
Core Motion provides an alternative programmatic interface to UIAccelerometer for accessing accelerometer events. Each of these events is an instance of CMAccelerometerData that encapsulates a measurement of accelerometer activity in a structure of type CMAcceleration.
To start receiving and handling accelerometer data, create an instance of the CMMotionManager class and call one of the following two methods on it:
After this method is called, Core Motion continuously updates the
accelerometerDataproperty ofCMMotionManagerwith the latest measurement of accelerometer activity. The application periodically samples this property, usually in a render loop typical of games. If you adopt this polling approach, you should set the update-interval property (accelerometerUpdateInterval) to the maximum interval at which Core Motion performs updates. (Core Motion might perform updates at a faster rate, however.)The code examples in this section illustrate this first approach.
startAccelerometerUpdatesToQueue:withHandler:Before calling this method, the application assigns an update interval to the
accelerometerUpdateIntervalproperty. It also creates an instance ofNSOperationQueueand implements a block of theCMAccelerometerHandlertype that handles the accelerometer updates. Then it callsstartAccelerometerUpdatesToQueue:withHandler:on the motion-manager object, passing in the operation queue and the block. At the specified update interval, Core Motion passes the latest sample of accelerometer activity to the block, which executes as a task in the queue.
You should stop updates of motion data as soon as your application is finished processing the data. Doing so allows Core Motion to turn off motion sensors, thereby saving battery power.
For Core Motion accelerometer events, you configure the update interval exactly as you do when using UIAccelerometer. You must identify an interval suitable for your application and then assign that value (expressed as seconds) to the accelerometerUpdateInterval property. If you prefer to think of the update interval in terms of cycles per second (Hertz), divide 1 by the desired Hertz value to get the update-interval value. Listing 4-3 gives an example. (“Choosing an Appropriate Update Interval” offers guidance for choosing a suitable update interval.)
The following code examples are based on the OpenGL ES project template in Xcode. An OpenGL ES application periodically samples device-motion updates using the render loop it sets up for drawing its view. The application first declares an instance variable—a three-member C array—to hold the acceleration values:
double filteredAcceleration[3]; |
As shown in Listing 4-7, the application creates an instance of CMMotionManager in the same template method used for configuring and scheduling the timing mechanism of the render loop (startAnimation). The application then assigns an appropriate accelerometer-update interval to the motion manager, allocates memory for the C array, and starts accelerometer updates. Note that the application stops accelerometer updates in the same template method (stopAnimation) used for invalidating the timing mechanism of the render loop.
Listing 4-7 Configuring the motion manager and starting updates
- (void)startAnimation { |
if (!animating) { |
// code that configures and schedules CADisplayLink or timer here ... |
} |
motionManager = [[CMMotionManager alloc] init]; // motionManager is an instance variable |
motionManager.accelerometerUpdateInterval = 0.01; // 100Hz |
memset(filteredAcceleration, 0, sizeof(filteredAcceleration)); |
[motionManager startAccelerometerUpdates]; |
} |
- (void)stopAnimation { |
if (animating) { |
// code that invalidates CADisplayLink or timer here... |
} |
[motionManager stopAccelerometerUpdates]; |
} |
In the OpenGL ES application template, the drawView method is invoked at each cycle of the render loop. Listing 4-8 shows how the application, in this same method, gets the latest accelerometer data and runs it through a low-pass filter. It then updates the drawing model with the filtered acceleration values and renders its view.
Listing 4-8 Sampling and filtering accelerometer data
- (void)drawView { |
// alpha is the filter value (instance variable) |
CMAccelerometerData *newestAccel = motionManager.accelerometerData; |
filteredAcceleration[0] = filteredAcceleration[0] * (1.0-alpha) + newestAccel.acceleration.x * alpha; |
filteredAcceleration[1] = filteredAcceleration[1] * (1.0-alpha) + newestAccel.acceleration.y * alpha; |
filteredAcceleration[2] = filteredAcceleration[2] * (1.0-alpha) + newestAccel.acceleration.z * alpha; |
[self updateModelsWithAcceleration:filteredAcceleration]; |
[renderer render]; |
} |
Note: You can apply a low-pass or high-pass filter to acceleration values and thereby isolate the gravity and user-acceleration components:
To apply a low-pass filter, thereby isolating the gravity component, see “Isolating the Gravity Component from Acceleration Data.”
To apply a high-pass filter, thereby isolating the user-acceleration component, see “Isolating Instantaneous Motion from Acceleration Data” (which refers to the user-acceleration component as “instantaneous motion.”)
Handling Rotation-Rate Data
A gyroscope measures the rate at which a device rotates around each of the three spatial axes. (Compare this with the accelerometer, which measures the acceleration of the device along each of the three spatial axes.) For each requested gyroscope update, Core Motion takes a biased estimate of the rate of rotation and returns this information to an application in the form of a CMGyroData object. The object has a rotationRate property through which you can access a CMRotationRate structure that captures the rotation rate (in radians per second) for each of the three axes.
Note: The measurement of rotation rate encapsulated by a CMGyroData object is biased. You can obtain a much more accurate (unbiased) measurement by accessing the rotationRate property of CMDeviceMotion.
To start receiving and handling rotation-rate data, create an instance of the CMMotionManager class and call one of the following two methods on it:
After this method is called, Core Motion continuously updates the
gyroDataproperty ofCMMotionManagerwith the latest measurement of gyroscope activity. The application periodically samples this property, usually in a render loop that is typical of games. If you adopt this polling approach, you should set the update-interval property (gyroUpdateInterval) to the maximum interval at which Core Motion performs updates. (Core Motion might perform updates at a faster rate, however.)startGyroUpdatesToQueue:withHandler:Before calling this method, the application assigns an update interval to the
gyroUpdateIntervalproperty. It also creates an instance ofNSOperationQueueand implements a block of theCMGyroHandlertype that handles the accelerometer updates. Then it callsstartGyroUpdatesToQueue:withHandler:on the motion-manager object, passing in the operation queue and the block. At the specified update interval, Core Motion passes the latest sample of gyroscope activity to the block, which executes as a task in the queue.The code examples in this section illustrate this approach.
You should stop updates of motion data as soon as your application is finished processing the data. Doing so allows Core Motion to turn off motion sensors, thereby saving battery power.
When configuring the update interval for rotation-rate (gyroscope) events, identify an interval suitable for your application and then assign that value (expressed as seconds) to the gyroUpdateInterval property. If you prefer to think of the update interval in terms of cycles per second (Hertz), divide 1 by the desired Hertz value to get the update-interval value. Listing 4-3 in “Choosing an Appropriate Update Interval” gives an example in the context of accelerometer updates.
The following code segments illustrate how to start gyroscope updates by calling the startGyroUpdatesToQueue:withHandler: method. In Listing 4-9, a view controller in its viewDidLoad instantiates a CMMotionManager object and assigns an update interval for gyroscope data. If the device has a gyroscope, the view controller creates an NSOperationQueue object and defines a block handler for gyroscope updates.
Listing 4-9 Creating the CMMotionManager object and setting up for gyroscope updates
- (void)viewDidLoad { |
[super viewDidLoad]; |
motionManager = [[CMMotionManager alloc] init]; |
motionManager.gyroUpdateInterval = 1.0/60.0; |
if (motionManager.gyroAvailable) { |
opQ = [[NSOperationQueue currentQueue] retain]; |
gyroHandler = ^ (CMGyroData *gyroData, NSError *error) { |
CMRotationRate rotate = gyroData.rotationRate; |
// handle rotation-rate data here...... |
}; |
} else { |
NSLog(@"No gyroscope on device."); |
toggleButton.enabled = NO; |
[motionManager release]; |
} |
} |
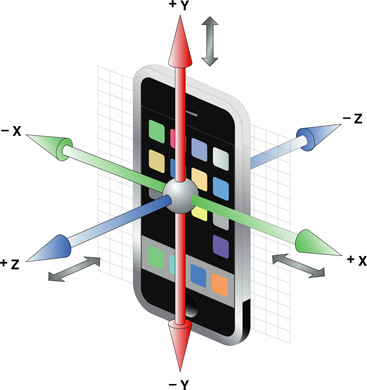
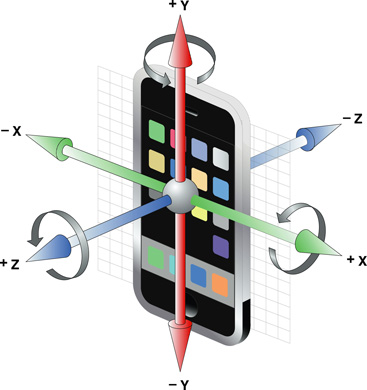
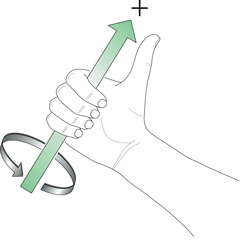
When analyzing rotation-rate data—that is, the fields of the CMRotationMatrix structure—follow the “right-hand rule” to determine the direction of rotation (see . For example, if you wrap your right hand around the X axis such that the tip of the thumb points toward positive X, a positive rotation is one toward the tips of the other 4 fingers. A negative rotation goes away from the tips of those fingers.
When the user taps a button, an action message is sent to the view controller. The view controller implements the action method to toggle between starting updates and stopping updates. Listing 4-10 shows how it does this.
Listing 4-10 Starting and stopping gyroscope updates
- (IBAction)toggleGyroUpdates:(id)sender { |
if ([[(UIButton *)sender currentTitle] isEqualToString:@"Start"]) { |
[motionManager startGyroUpdatesToQueue:opQ withHandler:gyroHandler]; |
} else { |
[motionManager stopGyroUpdates]; |
} |
} |
Handling Processed Device-Motion Data
If a device has an accelerometer and a gyroscope, Core Motion offers a device-motion service that reads raw motion data from both sensors. The service uses sensor fusion algorithms to refine the raw data and generate information on a device’s attitude, its unbiased rotation rate, the direction of gravity on a device, and the acceleration that the user imparts to a device. An instance of the CMDeviceMotion class encapsulates this data.
You can access attitude data through the attitude property of a CMDeviceMotion object. An instance of the CMAttitude class encapsulates a measurement of attitude. This class defines three mathematical representations of attitude:
a quaternion
a rotation matrix
the three Euler angles (roll, pitch, and yaw)
Because the device-motion service returns gravity and user acceleration as separate items of data, there is no need to filter the acceleration data.
To start receiving and handling device-motion updates, create an instance of the CMMotionManager class and call one of the following two methods on it:
After this method is called, Core Motion continuously updates the
deviceMotionproperty ofCMMotionManagerwith the latest refined measurements of accelerometer and gyroscope activity (as encapsulated in aCMDeviceMotionobject). The application periodically samples this property, usually in a render loop that is typical of games. If you adopt this polling approach, you should set the update-interval property (deviceMotionUpdateInterval) to the maximum interval at which Core Motion performs updates. (Core Motion might perform updates at a faster rate, however.)The code examples in this section illustrate this approach.
startDeviceMotionUpdatesToQueue:withHandler:Before calling this method, the application assigns an update interval to the
deviceMotionUpdateIntervalproperty. It also creates an instance ofNSOperationQueueand implements a block of theCMDeviceMotionHandlertype that handles the accelerometer updates. Then it callsstartDeviceMotionUpdatesToQueue:withHandler:on the motion-manager object, passing in the operation queue and the block. At the specified update interval, Core Motion passes the latest sample of combined accelerometer and gyroscope activity (as represented by aCMDeviceMotionobject) to the block, which executes as a task in the queue.
You should stop updates of motion data as soon as your application is finished processing the data. Doing so allows Core Motion to turn off motion sensors, thereby saving battery power.
When configuring the update interval for device-motion events, identify an interval suitable for your application and then assign that value (expressed as seconds) to the deviceMotionUpdateInterval property. If you prefer to think of the update interval in terms of cycles per second (Hertz), divide 1 by the desired Hertz value to get the update-interval value. Listing 4-3 in “Choosing an Appropriate Update Interval” gives an example of this in the context of accelerometer updates.
An Example of Handling Device-Motion Data
The following code examples are based on the OpenGL ES project template in Xcode. An OpenGL ES application periodically samples device-motion updates using the render loop it sets up for drawing the view. In Listing 4-11, the application creates an instance of CMMotionManager in initWithCoder: and assigns this object to an instance variable. It also specifies a minimum update interval for device-motion data. The application then starts device-motion updates when the OpenGL view schedules the render loop; it stops device-motion updates when the view invalidates that loop.
Listing 4-11 Starting and stopping device-motion updates
- (id)initWithCoder:(NSCoder*)coder { |
if ((self = [super initWithCoder:coder])) { |
motionManager = [[CMMotionManager alloc] init]; |
motionManager.deviceMotionUpdateInterval = 0.02; // 50 Hz |
// other initialization code here... |
} |
} |
- (void)startAnimation { |
if (!animating) { |
// code that configures and schedules CADisplayLink or timer here ... |
} |
if ([motionManager.isDeviceMotionAvailable]) |
[motionManager startDeviceMotionUpdates]; |
} |
- (void)stopAnimation { |
if (animating) { |
// code that invalidates CADisplayLink or timer here... |
} |
if ([motionManager.isDeviceMotionActive]) |
[motionManager stopDeviceMotionUpdates]; |
} |
Note that if device-motion services are not available—most likely because the device lacks a gyroscope—you might want to implement an alternative approach that responds to device motion by handling accelerometer data.
Device Attitude and the Reference Frame
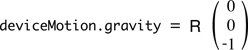
A particularly useful bit of information yielded by a CMDeviceMotion object is device attitude. From a practical standpoint, an even more useful bit of information is the change in device attitude. The attitude, or spatial orientation of a device is always measured in relation to a reference frame. Core Motion establishes the reference frame when your application starts device-motion updates. An instance of CMAttitude gives the rotation from a this initial reference frame to the device's current reference frame. Core Motion's reference frame is always chosen so that the z-axis is always vertical, and the x-axis and y-axis are always orthogonal to gravity. When expressed in Core Motion's reference frame, gravity is always the vector [0, 0, -1]; this is called the gravity reference. If you multiply the rotation matrix obtained from a CMAttitude object by the gravity reference, you get gravity in the device's frame. Or, mathematically:
You can change the reference frame used by a CMAttitude instance. To do that, cache the attitude object that contains that reference frame and pass that as the argument to multiplyByInverseOfAttitude:. The attitude argument receiving the message is changed to represent the change in attitude from that reference frame.
To see how this might be useful, consider a baseball game where the user rotates the device to swing. Normally, at the beginning of a pitch, the bat would be at some resting orientation. After that, the bat would be rendered at an orientation determined by how the device's attitude had changed from where it was at the start of a pitch. “Note” illustrates how you might do this.
Listing 4-12 Getting the change in attitude prior to rendering
-(void) startPitch { |
// referenceAttitude is an instance variable |
referenceAttitude = [motionManager.deviceMotion.attitude retain]; |
} |
- (void)drawView { |
CMAttitude *currentAttitude = motionManager.deviceMotion.attitude; |
[currentAttitude multiplyByInverseOfAttitude: referenceAttitude]; |
// render bat using currentAttitude ..... |
[self updateModelsWithAttitude:currentAttitude]; |
[renderer render]; |
} |
After multiplyByInverseOfAttitude: returns, currentAttitude in this example represents the change in attitude (that is, the rotation) from referenceAttitude to the most recently sampled CMAttitude instance.
Last updated: 2010-08-03