 |
|||||||

 Adding a help file - Part 1 Helen Bradley shows you how to add a help file to your Visual Basic projects.
|
|||
| The
help file that you'll create in this project will fit into the Quote of the day
program which was the project in the May and July '98 issues. If you didn't complete the project you can still complete all of this month's project and create and test your own help file (see Figure 1e). Next month you'll learn how to link the help file to your Visual Basic project - if you haven't created the Quotes project you won't be able to link the help file to it but you will learn how it can be done for your own projects.
|
|
||
| Installing the Help Compiler Before you can create a help file you'll need to install the Help compiler which is included in the Visual Basic Professional edition but isn't installed in a Typical install. If you don't have the Professional edition you can download the Help Compiler (called Help Workshop) from Microsoft's Web site; see the box 'Help Workshop and Word 97 incompatibility warning' for details on finding it. To install the Help Complier from your CD-ROM: Step 1: Place the Visual Basic program disc in your CD-ROM drive and select Start, Run. Step 2: Select Browse and change to the \Tools\Hcw directory of your CD and select the file Setup.exe from that directory. Click Open and then OK. Step 3: Follow the installation routine (select Typical) and the help program will be installed in a new group called Microsoft Help Workshop in your Programs list.
|
|
||
| Tools you'll need In addition to installing the Help Compiler, you'll need a word processor capable of saving files in Rich Text Format (*.rtf) and one capable of saving pure ASCII text files. All recent versions of Microsoft Word for Windows allow you to do both as will a number of other word processors. In this column we'll use Word 97 as the word processor; see box 'Help Workshop and Word 97 incompatibility warning' for overcoming incompatibility problems with Word 97.
The only theory you really need know The jump phrases for your popup links appear in the help window with green dashed underlines; when the user clicks on one a small box appears over the current help window. Typically this box will contain additional information such as a definition of the term or word that the user has clicked on although it can also contain graphics or multimedia files. Jump phrases for jump links appear in the help window with solid green underline. When a user selects one of these they will 'jump' to another help window containing more information about that topic. You'll create the topic file as a rich text file and each popup topic or jump topic will appear on a separate page of your text file. Within the text, the type of link will be indicated by the formatting of the jump phrase itself -- jump links are formatted with a double underline and popup links with a single underline. Each underlined phrase is followed immediately (no spaces between them) by a topic ID which is a piece of text identifying the topic which you will 'jump' to or which will 'pop up'. The topic ID should be formatted as hidden text (no underlining) and can be up to 255 characters in length. A handy rule of thumb is to use only characters and numbers for your topic IDs and don't use spaces or other special characters (look up 'Topic ID' in the Help Author's Guide if you are interested in exactly what you can and can't use). The actual links within the help file are created using the footnote function of your word processor. There are three main types of footnote symbols you can use -- each topic must have, at least, a topic ID footnote. See the table 'Footnote symbols used in help file' for the footnote symbols used in this month's help file. If this all seems a little complicated, it is! However, once you've created your first help file come back to this section and study the file alongside these notes and it will all make sense.
|
 Figure 1e: In this month's Visual Basic column you'll learn how to create professional looking help files for your projects.
|
||
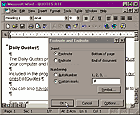
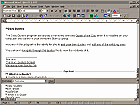
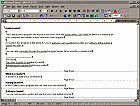
| Creating the Topic file To create the topic file for the Quotes program: Step 1: Open your word processor. If you're using Word 97 (or an earlier version) turn on display of Hidden text by selecting the Show/Hide button on the Standard toolbar. You'll also find that it is easier to see what's going on if you select View, Normal. Step 2: Select Arial, nine point type and then type the Topic file text from the box 'Code for Topic file'. Just before each topic heading (they are formatted in bold type in the table) select Insert, Break, Page Break (or press Control+Enter) to insert a page break and format each topic heading as bold type. Step 3: Apply the required formatting to these words which all appear on the first page of your document (this is your main help screen). Do this by selecting the text and, for single underlining, select the underline button on the Formatting toolbar or press Control+U. For double underline select Format, Font, select the Font tab and from the Underline list box select Double and OK, or press Control+Shift+D to toggle double underline on and off. For hidden text select Format, Font, select the Font tab and select Hidden and OK, or simply press Control+Shift+H to toggle hidden text on and off. The Explanations are to help you follow what is being created with each format selection. Note that there are no spaces between the underlined text (jump phrase) and the topic ID which follows it. Your first page should now resemble the one in Figure 2e. Step 4: Add the footnote text for each of the help topics. To do this, place the insertion point immediately before the text to add a footnote for and select Insert, Footnote. Select the 'Custom mark:' option button, type the footnote symbol in the text box and click OK (see Figure 3e). The footnote area will appear on the screen with the footnote symbol and you can then type the text for that footnote (see Figure 4e). Repeat for each footnote required for each topic. The explanations are simply to help you follow what is being defined. Step 5: Save the topic file using File, Save As. In the Filename text box type quotes.rtf and from the Save As Type list box select Rich Text Format (*.rtf) and click Save.
|
 Figure 3e: Help topics are marked for indexing and as places to jump to or popup using the footnote function in your word processor.
|
||
| Create the project file The project file contains all the information that Help Workshop needs to create a help file from your topic file. The project file used here contains the minimum information required in a project file. Step 6: Open a new word processing document and type the text of the project file from the box 'Project file'. Step 7: Save the project file in the same directory as your topics file (quotes.rtf) using File, Save As. In the Filename text box type quotes.hpj and from the Save As Type list box select Text Only (*.txt) and click Save. The project file has an [OPTIONS] section containing the Topic ID of the main contents screen which is the page titled 'Daily Quotes' and text which specifies the title for the Help window -- 'Daily Quotes Help'. It also has a [FILES] section which contains the name of the topics file -- quotes.rtf.
|
 Figure 4e: Topic pages are marked so that they can be jumped to using the footnote function in your word processor. |
||
| Compiling your help file Once you've created the topic file and the project file you're ready to compile your help file. Load the Help Workshop (from the Microsoft Help Workshop program group) and select File, Open. Locate your quotes.hpj file in the Open window, select it and click Open. From the Help Workshop's main screen select the 'Save and Compile' button to compile your help file. Once the file is compiled the screen will display a report from the compiler (see Figure 5e). Read this as it will tell you if there were any errors during the compiling process, what they were and where the compiler found them (Note: if you are using Word 97 see the box 'Help Workshop and Word 97 incompatibility warning' for details of overcoming the incompatibility between Word 97 and the Help Workshop). If the compiler encountered errors you'll need to return to your word processor, open quotes.rtf or quotes.hpj file (the problems are most likely to occur in quotes.rtf), make your changes and save the file again. Then return to the Help Workshop, open quotes.hpj again and run the compiler a second time. Repeat this process until you eliminate all errors in your help file.
|
 Figure 5e: Once you've compiled your help file you'll see a report from the compiler indicating if there were any errors encountered. |
||
| Testing your help file To test your help file, open Windows Explorer and locate the file quotes.hlp which will be in the directory that contained your project file. Double-click on the file and it will be loaded so that you can test it. The contents page should look like the one in Figure 1e. Experiment with selecting the popup links and the jump links and select Index to view an index of help topics.
|
|||
| Simple refinements to your help file The help file that you have created is only the 'bare bones' of a help file. The topics 'The Main Quotes Screen' and 'Managing your Quotes file' need more information added to them and you may want to add more help topics to the file and other jump or popup links. You can add to your help file and change any of the details in it by editing your quotes.rtf file. You can also alter the formatting of the text as this will be retained in the compiled help file. After you have made alterations to your quotes.rtf file, save it and then compile it again using the above instructions.
|
|

