This section contains detailed information regarding the advanced
features of BounceBack and should only be utilized by advanced users.
Note:
All of the features in this section are available
only in BounceBack Professional. This is an upgrade from the BounceBack Express
software. To purchase BounceBack Professional, go to www.cmsproducts.com.
Section Topics
6-1: Using Bi-Directional
Synchronization
6-2: Using Version Control
6-3: Using BounceBack
QuickRestore
6-4: Using the Security
Administrator
6-5: Using the BounceBack
Formatter
6-6: Using Background
Backup
6-1: Using Bi-Directional
Synchronization
Note:
This feature is only available with BounceBack Professional
Professional users can be assured that their files are
always updated and synchronized, no matter where they are computing. It’s as
simple as plugging your backup drive into a computer which has BounceBack
software loaded and configured for bi-directional synchronization. The
BounceBack software automatically checks both the computer and the backup drive
for changed files and automatically synchronizes the out-of-date location with
a fresh, updated version of the files.
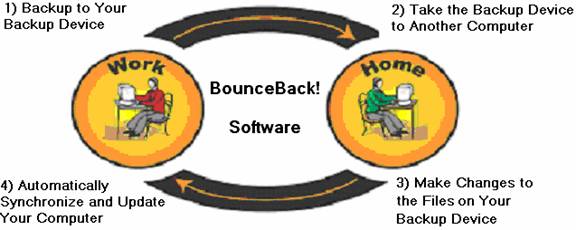
For example, you can run a backup to the backup drive after
a long day at work. You can then disconnect the backup drive, take it home with
you, and connect it to your home computer. Now you can work on any of the files
on the backup drive. After saving changes on the backup drive, you can take the
drive back to work in the morning, connect it, and the updates/changes you made
the night before are automatically updated on your work computer.
To use the bi-directional synchronization features of BounceBack:
1. Start
BounceBack Settings.
2. From
the Backup tab click the Add Set button.
1. Click
Add Item from the Backup Set dialog and select the data
you would like to synchronize. See Customized Backups
for more information.
Note:
It’s highly recommended that only data
transported between machines be included in a Synchronization Set. The synchronization process is lengthier than
that of a normal backup set, which is better suited for large backups such as
the entire boot drive. Folders such as “My Documents” are ideal for
synchronization.
2. Click
the Synchronize radio button.
3. Click
OK. You’ve just created your first
Synchronization Set.
4. Repeat
steps 1-9 on each computer you wish to synchronize your data on, making sure to
include the same data in the Synchronization
Set created on each machine.
Note:
Using the Auto-Launch option will launch the synchronization process each
time the backup drive is connected.
6-2: Using
Version Control
Note:
This feature is only available with BounceBack Professional

BounceBack
users now have the ability to go back in time and access all files and
folders on any date in the past that a backup took place. Agreements, reports,
designs, presentations¾any
file can be rolled back to an older version. This gives you the power to
actually change the past and recreate the future. Take full advantage of this
feature by setting up version control and using the BounceBack Version
Administrator.
Knowledge of the following topics is required to successfully
utilize version control with the BounceBack software.
Creating
Version Control Sets
Backing
Up Version Control Sets
Running
the BounceBack Version Administrator
Accessing
and Restoring Versions
Deleting
Versions
To create your first version control backup set, use the
following steps:
1. Start
BounceBack Settings.
2. From
the Backup tab click the Add Set button.
3. Click
Add Item from the Backup Set dialog and select the data
you would like Bounceback to maintain versions of. See Customized
Backups for more information.
Important:
It’s highly recommended that ONLY data files which need version control be
included in a Version Set. The
versioning process is lengthier than that of a normal backup set, which is
better suited for large backups such as the entire boot drive. Folders such as
“My Documents” are ideal for
versioning.
Note: A Versioned
Backup Set can only backup data to a single drive letter on the backup
drive. If you wish to have multiple backup destinations for your version files,
you must create a new version set for each backup drive.
Note: A Versioned Backup Set can ONLY backup to the
root of a drive on the backup drive. Backing up versions into sub-folders is
not allowed.
4. Click
the Versioning radio button.
5. Click
OK. You’ve just created your first
Versioning Set.
Note:
Using the Auto-Launch option will launch the versioning process each time the
backup drive is connected.
You can start creating versions of the data in your version control set by launching a backup. The number of versions you can
maintain for any file is limited only by the amount of disk space on the backup
drive. Each time a backup is launched a new version of every changed file in
the version set will be created. The versioning process is limited however, to
one new version per hour. If two backups are launched in the same hour, the
version of each changed file during the second backup will be updated to the
first backup version during the backup process. Once the clock passes the top
of the hour, a new version will be created if a new backup is launched. This is
required because the versioning process can potentially take up a large amount
of disk space on the backup drive.
By default, version control sets will be launched each time a
backup is launched along with any other backup sets you may have created. If
you wish to have your version control sets launched at specific times, you can
set a separate schedule for any or
all of the backup sets you create. By utilizing the auto-Launch option in the BounceBack
Settings program, version control sets can be setup to launch each time the
backup drive is connected. If your backup drive is always connected to your
computer, you can also schedule the version process to launch on a daily or monthly schedule. If at
any time you wish to temporarily disable the versioning process of any set,
simply disable the set in BounceBack
Settings. For more information on scheduling, see Scheduling Backups.
Accessing or restoring older files requires the use of the
BounceBack Version Administrator. This is the ONLY method you should use to
access your versioned backup data. There are two ways to run the Version
Administrator:
1. Click
the BounceBack Launcher icon  and select BounceBack Version Administrator. If BounceBack Version Administrator does not appear in the launcher menu, then
you have not created a valid version control set.
and select BounceBack Version Administrator. If BounceBack Version Administrator does not appear in the launcher menu, then
you have not created a valid version control set.
or
2. Click the Start button, Programs,
BounceBack Backup, and select BounceBack
Version Administrator.
After completing a backup, the BounceBack Version Administrator display
should look something like this:

Version Pane
The version pane appears on the left side of the display and allows
the user to select and view the current version backup by date. By default, this window displays dated version tabs at the top of the version
pane corresponding to the last 5 backup
versions for this data set. Clicking the different tabs will display your
data as it existed on that date. By changing the window view to display a version list, all backup versions on
the backup drive (not just the last 5) will be displayed as a list of dated
items. Clicking the dates in this list will display your data as it existed on
that date.
Data Pane
The data pane appears on the right side of the display and allows
the user to view the actual files and folders in each version backup.
Double-clicking a file will open it with the default program for that file
type. Double-clicking a folder will open that folder and re-display its
contents in the Data Pane. When the Data Pane is displayed in detailed mode
(the default mode), the filename, file size, status, file type, and
modification date is displayed for each file. The status value represents a
comparison of each file with that of the original file on the source drive. The
status can be any one of the following:
Unchanged
– this version of the file is the same as the original source file
Older
– this version of the file is older than the original source file
Newer
– this version of the file is newer than the original source file
Deleted
– the original source file has been deleted
The Title Bar of
each window in BounceBack Version Administrator displays the current backup set
being displayed along with the date it was backed up.
The menu below the
title bar contains the following items:
File Menu
Version
Info – displays the number of versions in the current backup set and the
date of the last backup; to switch to another backup set, use the Backup Set pull-down; has the same
functionality as the Version Info
button
Properties
– displays information about the currently selected item(s) in the Version and
Data window panes, can be drives, files, or folders; has the same functionality
as the Properties button
Remove
– removes (deletes) all versions preceding the selected version backup; has the
same functionality as the Remove
button
Restore
– restores the currently selected files and folders to the path displayed in
the Restore Path pull-down; has the
same functionality as the Restore
button
Exit
– exits the BounceBack Version Administrator
View Menu
Each of these menu items changes the display mode of the Data Pane window.
Large
Icons – displays large icons for each file and folder listed
Small
Icons – displays small icons for each file and folder listed
List
– displays the files and folders in a list with no details
Details
– displays detailed information for each file an folder
Window Menu
The Window menu
introduces an alternate form of viewing the versions in your backup sets. The
default version tab window only
displays the last five versions of your data. Using the version list window, you are able to view all the versions that
exist for your backup sets.
New
Version Tab Window – opens a new version tab window; this allows you to
view the same files from different versions at the same time, this window only
displays the last five version backups, one per day
New
Version List Window – opens a new version list window; this also allows you
to view multiple versions of the same file at the same time, and additionally
allows access to all the dated backup versions on the backup drive
Close
Current Window – closes the current version display window
Cascade
– cascades all the open version windows in descending order
Tile
– equally resizes all the open version windows
Help Menu
Contents
– displays context-sensitive help
for the Version Administrator
About
Version Administrator – displays info about Version Administrator
The tool bar in BounceBack Version Administrator contains the following
items:
Version Info Button
The Version Info
button displays the number of versions in the current backup set and the date
of the last backup. To switch to another backup set, use the Backup Set pull-down.
Properties Button
The Properties button displays information about the currently
selected item(s) in the Version and Data pane windows. It can display info for
drives, files, or folders.
Remove Button
The Remove button removes (deletes) all versions preceding the
currently selected version backup. See Deleting
Versions for more information.
Restore Button
The Restore button restores the currently selected files and
folders to the path displayed in the Restore
Path pull-down. See Accessing and
Restoring File Versions for more information.
Backup Set Pull-Down
The backup set pull-down lists each versioned backup set you
create. You can navigate to any of the listed backup sets by selecting it. Each
version window you open from the Window
menu can independently view any backup set and version that’s backed up to the
backup drive.
Note: The Backup Set pull-down is
only useful if you create more than one version set in the BounceBack Settings program.
Restore Path Pull-Down
The Restore Path pull-down indicates where files and folders you
restore with the Restore button
should be copied to. By default, the selected data is restored back to its original location on the source drive.
You can use the Browse option in the
pull-down to choose a re-directed location such as the desktop to restore to.
The program will automatically remember the last ten restore paths you select
the next time you restore data.
The status bar at the bottom of the Version Administrator is
divided into two sections. The first displays the currently selected backup
path in the Version Pane, the second
displays the number of items selected (highlighted) in the Data Pane.
Accessing and Restoring File Versions
BounceBack Version Administrator can be used as a means to not
only view your data as it existed on a prior date, but also provides powerful
tools to restore prior file versions.
Version Administrator has the ability to display multiple
versions of the same backup set at the same time. You can even view versions
from other backup sets you create at the same time. The following example
demonstrates this:
1. Start
BounceBack Version Administrator.
2. Click
Window, then New Version Tab Window.
3. Click
Window, then Tile.
4. Navigate
to the data you wish to view in both Version
Windows.
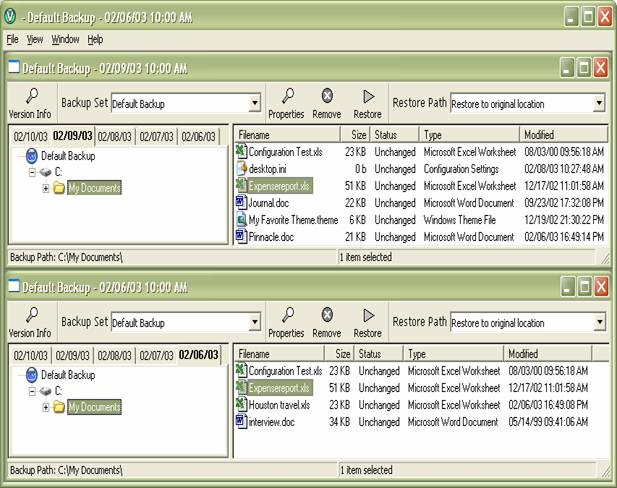
In the above example, the same file from different versions is
highlighted in each Version Window.
Double-clicking each file would open Microsoft Word and allow the user to view
the contents of both file versions.
BounceBack Version Administrator can restore files from any
version backed up to the backup drive quickly and easily. The steps to restore
data are as follows:
1. Start
BounceBack Version Administrator.
2. Click
the dated Version Tab corresponding
to the date you wish to restore files from.
3. Navigate
the folder tree in the Version Pane
window to locate the parent folder containing the file versions to restore.
4. Select
the files and/or folders to restore in the Data
Pane window.
Note:
If you wish to restore your data to a
folder other than the original location, use the Restore Path pull-down and Browse
for the new location to restore your data.
5. Click
the Restore button. Your data will be
restored to the location indicated in the Restore
Path pull-down.

6. At
the Restore Files window you have
the following Restore Options:
Overwrite
Existing Files Without Asking – this option will overwrite any corresponding
files that already exist with the same name in the Restore Path with the files you select for restore
Prompt
before Overwriting – this option will prompt you and ask if you want to
overwrite any files in the Restore Path
with the same name
Do
Not Overwrite Existing Files – this option will only overwrite files in the
Restore Path which do not have a corresponding file with the same name
Select the Restore Option and click OK.

7.
The Restore Statistics displays the size and
number of files and folders you have chosen to restore, along with the disk
space available at the Restore Location.
Click Continue to begin the restore
process.
From time to time, you may wish to remove (delete) old backup versions.
By clicking the Remove button, you can permanently remove old versions from the
backup drive that you no longer need. You select which versions to remove
according to the currently selected date in the Version Pane. When using the Version
Tab window (default), all versions prior to the currently selected tab will
be removed. When using the Version List Window,
all versions prior to the currently selected list entry will be removed.
Important:
When performing the Remove command,
ALL prior versions will be deleted up to but not including the currently
selected version. Version Administrator cannot remove versions in the middle of
the version list.
The following example demonstrates a Remove
operation to delete old versions. In this example, we clicked New Version List Window from the Window
menu first.

6-3: Using
BounceBack QuickRestore
Note:
This feature is only available with BounceBack Professional
BounceBack QuickRestore provides a convenient method of accessing
or restoring files from the backup drive. This is not the only method you can
use to access your data however. Because BounceBack Backup transfers your data
in native file format, any program such as My Computer or Windows Explorer can be
used to recover data from the backup drive. There are 3 ways to run BounceBack
QuickRestore:
1. Click
the BounceBack Launcher icon and select BounceBack QuickRestore.
2. Click the Start button, Programs,
BounceBack Backup, and select BounceBack QuickRestore.
or
3. Click
on the QuickRestore shortcut icon on your desktop.
After completing a backup, the BounceBack QuickRestore display should
look something like this:

Each of the items in BounceBack QuickRestore is explained
below:
Folder Pane
The folder pane appears on the left side of the display and
allows the user to navigate the drives and folders contained in the backup. A
BounceBack icon

next to a folder indicates the starting location of a backup item
from the source drive.
Data Pane
The data pane appears on the right side of the display and allows
the user to view the actual files and folders backed up to the backup drive.
Double-clicking a file will open it with the default program for that file
type. Double-clicking a folder will open that folder and re-display its
contents in the Data Pane. When the Data Pane is displayed in detailed mode
(the default mode), the filename, file size, status, file type, and
modification date is displayed for each file. The status value represents a
comparison of each file with that of the original file on the source drive. The
status can be any one of the following:
Unchanged – this version of the file is
the same as the original source file
Older – this version of the file is
older than the original source file
Newer – this version of the file is
newer than the original source file
Deleted – the original source file has
been deleted
The menu above the
Tool bar contains the following items:
File Menu
Properties – displays information about
the currently selected item(s) in the Folder and Data window panes, can be
drives, files, or folders; has the same functionality as the Properties button
Purge – allows you to remove from the
backup drive all folders and files that have been deleted from the original
source drive; has the same functionality as the Purge button
Restore – restores the currently
selected files and folders to the path displayed in the Restore Path pull-down; has the same functionality as the Restore button
Exit – exits BounceBack QuickRestore
View Menu
Each of these menu items changes the display mode of the Data Pane window.
Large Icons – displays large icons for
each file and folder listed
Small Icons – displays small icons for
each file and folder listed
List – displays the files and folders
in a list with no details
Details – displays detailed information
for each file an folder
Help Menu
Contents – displays context-sensitive help for BounceBack
QuickRestore
About BounceBack QuickRestore –
displays info about BounceBack QuickRestore
The tool bar in BounceBack QuickRestore contains the following items:
Properties Button
The Properties button displays information about the currently
selected item(s) in the Folder and Data pane windows. It can display info for
drives, files, or folders.
Purge Button
The Purge button allows you to remove from the backup drive all
folders and files that have been deleted from the original source drive.
Restore Button
The Restore button restores the currently selected files and folders
to the path displayed in the Restore
Path pull-down.
Restore Path Pull-Down
The Restore Path pull-down indicates where files and folders you
restore with the Restore button
should be copied to. By default, the selected data is restored back to its original location on the source drive.
You can use the Browse option in the
pull-down to choose a re-directed
location such as the desktop to restore to. The program will automatically
remember the last ten restore paths you select the next time you restore data.
The status bar at the bottom of the BounceBack QuickRestore is
divided into two sections. The first displays the currently selected backup
path in the Folder Pane, the second
displays the number of items selected (highlighted) in the Data Pane.
BounceBack QuickRestore can restore files and folders backed up
to the backup drive quickly and easily. The steps to restore data are as
follows:
1. Start
BounceBack QuickRestore.
2. Navigate
the folder tree in the Folder Pane
window to locate the parent folder containing the files and folders to restore.
3. Select
the files and/or folders to restore in the Data
Pane window. Selecting nothing in the Data Pane window will select the
highlighted folder in the Folder Pane for restore.
Note:
If you wish to restore your data to a
folder other than the original location, use the Restore Path pull-down and Browse
for the new location to restore your data.
4. Click
the Restore button. Your data will
be restored to the location indicated in the Restore Path pull-down.
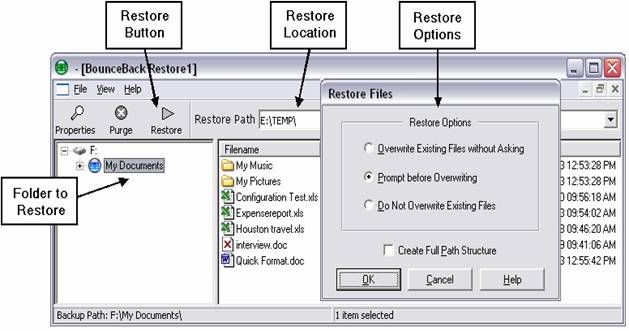
5. At
the Restore Files window you have
the following Restore Options:
Overwrite Existing Files Without Asking
– this option will overwrite any corresponding files that already exist with
the same name in the Restore Path with
the files you select for restore
Prompt before Overwriting – this option
will prompt you and ask if you want to overwrite any files in the Restore Path with the same name
Do Not Overwrite Existing Files – this
option will only overwrite files in the Restore Path which do not have a
corresponding file with the same name
Create Full Path Structure – this
option will re-create the path structure of the file to restore, as it exists
on the backup drive before copying it to the restore location
Note:
The Create
Full Path Structure option is ONLY available when re-directing the restore
to a path other than the original source location.
Select the Restore Option and click OK.

6.
The Restore Statistics displays the size and
number of files and folders you have chosen to restore, along with the disk
space available at the Restore Location.
Click Continue to begin the restore
process.

In this example, BounceBack QuickRestore would restore the following folder as:
Source – N:\My
Documents\*.*
Destination – F:\TEMP
Restored as –
F:\TEMP\MyDocuments\*.*
When
complete, the restore results will be displayed.

Section 5-2, Removing
Deleted Files from the Backup Drive, introduces the concept of purging
deleted files. BounceBack QuickRestore provides an alternate method of removing
files which have been deleted from the source drive but that still exist on the
backup drive.
To purge deleted files from the backup drive, follow these steps:
1. Start
BounceBack QuickRestore.
2. Click
(highlight) the folder in the Folder
Pane you would like to perform the purge operation on. Any folder or
subfolder in the backup structure can be selected. To purge all the deleted
files from the entire backup drive, click the icon representing the backup
drive letter.
3. Click
the Purge button.
After a
warning message, the BounceBack QuickRestore display should be similar to:

4. At
the Purge Files window, you have the
following Purge Options:
Delete Purged Files Without Asking –
this option purges all deleted files in the folder selected in the Folder Pane
from the backup drive without prompting
Prompt before Purging Each File – this
option also purges all deleted files in the folder selected in the Folder Pane,
but will prompt you each
Display a List of Purged Files – this
option displays a list of all the deleted files on the backup drive that are
contained in the folder you select in the Folder
Pane; with this option, you can also restore
deleted files from the backup drive back to the source drive
Note:
All three of these options will not only
search the selected folder for deleted files, but will also search any
sub-folders inside of the selected folder.
Select the Restore Option and click OK.
5.
If you have NOT selected the Display a List of Purged Files option,
the Purge Results window will be
displayed. Click OK.

6.
If you chose the Display a List of Purged Files option, a list of all the deleted
files in the folder you selected in the Folder
Pane of BounceBack QuickRestore will be displayed. The BounceBack QuickRestore Purged File List window will look similar
to this:

To purge items in the list, select (highlight) the files and
folders you no longer need and click the Purge
button. This will permanently remove them from the backup drive. Clicking the Restore button will restore the files
you select back to their original location on the source drive, before they
were deleted.
6-4: Using
the BounceBack Security Administrator
Note:
This feature is only available with BounceBack Professional
The BounceBack Security Administrator allows advanced users to
set and remove passwords and set a Master
password on your backup drive. With a master password, if you forget your
normal password, you can still unlock the drive with the master. You can also
use this tool to determine if a drive is already password-protected. For
example, suppose a co-worker handed you a presentation on an backup drive and
"forgot" that it was password-protected. You or your IT administrator
can unlock the drive if it was configured with a master password.
If you want to password-protect your backup drive during backup
operations, use the Password Protection
option in the BounceBack Settings
program. See Password
Protecting the Backup Drive for instructions.
Important:
The Security Administrator program
is for advanced users or IT personnel and system administrators only. It is a
diagnostic tool that allows the setting of a Master password for the backup drive which meets corporate security
standards. This is NOT a software password! The password is stored in encrypted
form on the hard drive itself. If both user and master passwords are forgotten,
the drive will NOT be accessible, even when connected to another computer!
Important:
Once an backup drive is locked by a password, the drive will not be seen by the
operating system until it is unlocked.
Note:
A master password can only be
installed on an backup drive when it is unlocked, i.e., before a user password
is installed.
There are two levels of security available with the BounceBack Security Administrator:
High – this level allows two passwords
to protect the backup drive: User
and Master. The Master password overrides the User
password. In other words, the Master
can "unlock" an backup drive that is password-protected by a User level password.
Maximum – this level allows for only
one password to lock and unlock the backup drive. If a user locks the backup
drive using this security level, you will not be able to unlock it with a Master password.
There are two identifications for the person locking the backup
drive:
Master –Allows you to unlock an backup
drive if you have locked it with a security level of High. This level of protection is ideal for system administrators.
User – This password is for the user.
If he or she uses a High level to
enter a password, the Master
password can unlock the backup drive. If he or she uses the Maximum security level and forgets the
password, no one will be able to unlock the backup drive.
Note:
When you use the BounceBack Security Administrator to set passwords to lock or
unlock the backup drive, you must disconnect and reconnect the backup drive
from the computer to complete the process.
Note:
This feature not available in BounceBack Express
To start the BounceBack
Security Administrator software, click the Windows Start button, Programs,
BounceBack Backup, and then choose BounceBack Security Administrator.
The BounceBack Security Administrator program
looks similar to this:

The status bar of the window displays information about the
security of the backup drive:
Security - Disabled or Enabled informs
you if the backup drive is protected by a password.
Backup drive – Locked, Unlocked or Not
Present informs you if the backup drive is locked or not. A locked backup
drive will not display in Windows Explorer or be accessible from another
computer.
When you set a Master
password, the Security Level choices
are disabled. The Master password
overrides a user password. You must complete two passes: one for the Master password, and one for the User password.
Note:
A Master
password may only be set before a User
password is added.
Follow these steps:
In the Identifier group, select Master.
Enter a master password into the Password text box.
Enter the password again into the Verification text box.
Note:
Master passwords are case-sensitive. You
can enter from 1 to 32 characters in this text box.
Click the Add Password button.
You are prompted to confirm the
protection. You will see a confirmation for the protection when it is finished.
Click the Stop Device icon in the taskbar to stop the backup drive.
Disconnect the backup drive from the
computer. The Master password will now be enabled.
Now repeat the process for the User password:
In the Identifier group, select User.
In the Security Level group, select High.
Enter a user password into the Password
text box.
Enter the password again into the Verification
text box.
Note:
User passwords are case-sensitive. You
can enter from 1 to 32 characters in this text box.
Click the Add Password button.
You are prompted to confirm the
protection. You will see a confirmation for the protection when it is finished.
Click the Stop Device icon in the taskbar to stop the backup drive.
Disconnect the backup drive from the
computer.
The backup drive is now locked and no
longer visible or accessible until the password is removed.
When removing this type of password, you can provide either a Master or User level password.
Follow these steps:
6. Connect
the locked backup drive to the computer.
7. Start
the BounceBack Security Administrator software.
8. In
the Identifier group, select Master or User, which ever is
appropriate.
9. Enter
the password in the Password and Verification text boxes.
10. Click
the Remove Password button.
11. You
are prompted to confirm the protection removal. You will see a confirmation for
the protection removal when it is finished.
12. Click
the Stop Device icon in the taskbar
to stop the backup drive.
13. Disconnect
the backup drive from the computer. When the backup drive is re-connected to
the computer, your backup data will once again be available for use.
If you set the maximum security level as a user and lock the
backup drive, no one can unlock it but you. If you forget your password, you
will not be able to access the data on the backup drive.
Follow these steps:
14. In the
Identifier group, select User.
15. In the
Security Level group, select Maximum.
16. Enter
a user password into the Password
text box.
17. Enter
the password again into the Verification
text box.
Note:
User passwords are case-sensitive. You
can enter from 1 to 32 characters in this text box.
18. Click
the Add Password button.
19. You
are prompted to confirm the protection. You will see a confirmation for the
protection when it is finished.
20. Click
the Stop Device icon in the taskbar
to stop the backup drive.
21. Disconnect
the backup drive from the computer.
22. To remove
the password, follow the same procedure you used to set the password, but click
the Remove Password button.
6-5: Using
the BounceBack Formatter
Note:
This feature is only available with BounceBack Professional
The BounceBack
Formatter software allows you to manage the backup device. Management tasks
include:
Creating
partitions on the backup device
Deleting
partitions
Formatting
an existing or new partition
Changing the
drive letter associated with a partition
Important:
When you reformat a backup drive, you destroy any data that is currently stored
on that drive. Verify that you do not need the data on a backup drive before
reformatting it.
To start the BounceBack
Formatter software, click Start,
Programs, BounceBack Backup, and choose
BounceBack Formatter. The BounceBack
Formatter window looks similar to this:
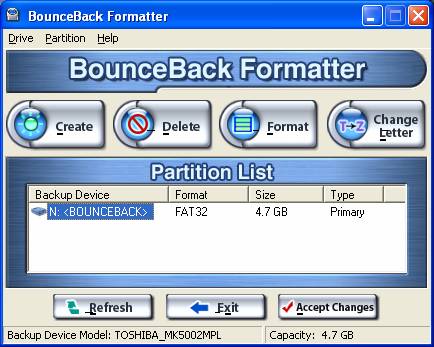
The BounceBack Formatter
window displays the model type and capacity of the backup drive, as well as
information about its partitions.
The Drive menu
provides commands that duplicate the functions of most of the buttons in the
window:
Refresh List – refreshes the drive list
in the window.
Change Drive – stops BounceBack driver so
that you can switch backup drives. Use this when you are managing several
backup drives at once.
Accept Changes – applies the partition
changes you made to the backup drive.
Exit – quits the BounceBack Formatter software.
The Partition menu
provides commands for managing drive partitions. These commands also have
matching button functions:
Create Partition – applies only to free
space on the backup drive. Allows you to create a new partition.
Delete Partition – deletes a partition.
Format Drive – allows you to change the
file system format for a partition on the backup drive (or the entire drive).
New Drive Letter – allows you to change
the backup drive letter or change the drive letters for partitions on the
backup drive.
Note:
To implement the changes you make to the
partition structure of the backup drive, you must click the Accept Changes button.
When you are creating new partitions, keep the total backup drive
disk capacity in mind. For example, if your backup drive has a capacity of 20
Gigabytes, you might want to create two partitions, each one with an
approximately 10 Gigabyte capacity.
IMPORTANT: You
can make multiple changes such as deleting and creating partitions before
applying those changes to the backup device. Apply Changes normally needs to be executed only once.
The BounceBack Formatter
automatically assigns the next available drive letters to the new partitions.
You can change these later.
Follow these steps to create and format a new partition:
1.
Select Free
Space in the BounceBack Formatter
window.
2.
Click the Create button.
3.
In the Create
New Partition window, enter a value for the drive size (in Megabytes) and
choose the type of file system format you want. The File Format drop-down list provides the file systems supported by
the Windows operating system.

Note: Possible Files Formats:
FAT Recommended
for partitions smaller than 2GB
FAT32 Windows 98/Me/2000/XP format from 7MB to 32GB
NTFS Windows 2000/XP
format from 7MB to 2TB (Terabytes)
4.
Click OK.
5.
Click Accept
Changes in the BounceBack Formatter
window.
6.
You will then be prompted to disconnect then
reconnect the backup drive to complete the partition procedure.
After you create a partition you need to format it (required) and
label it (optional).
Follow these steps:
Select the partition to format in the
BounceBack Formatter window.
Click the Format button.
In the Format window, make your
selections. If utilizing Disaster Recovery, you should only use the following:
Quick (erase) – deletes the files on
the backup drive. You are not allowed to use this choice on drives that have
never been formatted or drives used for external storage.
Full – deletes the files and reformats
the drive.
Label text box – enter a name for the
partition into this box.
No label – select if you do not want to
label the partition.
Click Start
to begin formatting.
When the formatting is complete, you may
be prompted to run Windows ScanDisk on the backup drive. Follow the
instructions provided by ScanDisk.
By default, the BounceBack Formatter assigns new partitions the
next available drive letter. Follow these steps to change the drive letter:
1.
Select the partition for which you want to
change the drive letter.
2.
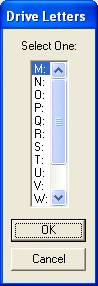
Click the New Letter button.
3.
Choose a new letter from the list provided
in the Drive Letters window. Only
available letters are included in this list.
Note:
When you change a drive letter for the
backup drive in Windows 95B/98/Me, you are prompted to remove the backup drive
and to re-insert it.
You can only create and format partitions on available disk space
on the backup drive. If you do not have any free space, you must first delete a
partition. The BounceBack Formatter
identifies available space on the backup drive as "Free Space."
Follow these steps to delete a partition:
Select (highlight) the partition you want
to delete.
Click the Delete button.
Click the Accept Changes button.
You are then prompted to disconnect and
then reconnect the backup drive.
6-6 Using
Background Backup
Note:
This feature is only available with BounceBack Professional
For users who wish to perform backups of their most important
data on a frequent basis, the Background Backup function is ideal. Background
Backup allows you the option of backing up data folders in the background
without interfering with your normal routine. At a set interval, BounceBack
backup will update the backup drive with no user intervension.
To create a Background Backup set, use the following steps:
1. Start
BounceBack Settings.
2. Click
the Options tab and select how often you would like
the backup process to update the backup drive. Do this by entering the interval
in minutes in the box next to the text: Background Backup of Sets Every.
Note:
The interval for Background Backup sets
can be from 1 to 120 minutes. It’s recommended that a small interval such as 1
minute be used only on small data sets.
3. Click
OK.
4. Click
the Backup tab and then click the Add Set
button.
5. Click
Add Item from the Backup Set dialog and select the data
you would like to have backed up in the background. See Customized
Backups for more information.
Note:
Background Backup does NOT work well with
large data sets and should only include folders such as “My Documents”.
6. Click
the Background Backup radio button.
7. Click
OK. You’ve just created your first
Background Backup set.