What’s in this Section?
In this section you will learn how to configure BounceBack, and run customized backups. The instructions in this section build on the information contained in Section 2. We recommend that you become familiar with the information presented in Section 2 before moving on to this section.
Section Topics
3-1: Reviewing BounceBack Features
3-2: Configuring BounceBack
3-3: Creating Backup Sets
3-4: Scheduling a Backup
3-5: Setting Backup Options
3-6: Setting Backup Device Options
3-7: Using the Backup with Compare List
3-8: Viewing the Log File
The BounceBack Launcher is a multi function application with the following features:
û Detects when you connect the backup drive to your system and automatically launches the backup program.
û Enable or disable the automatic launch feature.
û Start a backup manually.
û Start a backup with compare manually, which displays a list of the changed or altered files before backing them up.
û Launch programs included with BounceBack (BounceBack Settings, etc.)
The BounceBack software gives you complete control over what you back up and when. Use BounceBack to:
û Select files and directories to back up, or exclude them from a backup.
û Change the drive letter(s) for the backup drive (See Changing the Drive Letter Assigned to the Backup Drive).
û
Create backup sets (files, directories, or
folders) for scheduled backups.
û
Restore lost or altered files easily to
their original locations or alternate ones.
The following
features are only available in BounceBack Professional.
û Password-protect your backup drive (See Password Protecting the Backup Drive).
û Choose backup options, such as automatically starting a backup each time you connect the backup drive to your system.
û
Synchronize files automatically between the
backup drive and your computer (BounceBack version only; See Using Bi-Directional
Synchronization).
û Set backup reminders and view the backup log.
û
Maintain versions of your backup files. See Using Version Control).
BounceBack is the software program that backs up the data you specify in the BounceBack Settings program. If you select the password option, BounceBack will automatically password-protect the backup drive.
When you connect the backup drive to your computer,
BounceBack installs on your system and configures itself. It then completes an
automatic full backup of your hard drive, creating a bootable copy on the
backup drive that is identical to the hard drive on your system. This means you
can easily recover from a complete disk crash by simply replacing the damaged
disk in your system with the backup drive. If you own the
After the initial installation and complete backup, each time you connect your backup drive BounceBack scans your system disk for any new files or modified ones, and automatically backs them up to the backup drive.
BounceBack is represented by this icon in the taskbar: ![]()
Note: If you have password-protected the BounceBack drive (PCMCIA drives only), it changes the BounceBack Launcher icon to red. When the password is removed, the Launcher icon changes back to blue.
Click the BounceBack icon ![]() to see the BounceBack Launcher menu. You can
right-click or left-click the icon.
to see the BounceBack Launcher menu. You can
right-click or left-click the icon.

Use the commands in the BounceBack Launcher menu for the following tasks:
û Launch BounceBack Backup—starts a backup immediately.
û Launch BounceBack Backup/Compare—starts a backup immediately and displays all changed or altered files for your review before backing up.
û BounceBack Version Administrator—allows you to view previously backed up versions of your data (BounceBack software only). Use this feature to view previously backed up files, restore files, or remove versions. This item will only display in the menu if at least one version set is currently created.
Note: This feature not available in BounceBack Express
û BounceBack QuickRestore—allows you to restore files quickly and easily.
Note: This feature not available in BounceBack Express
û BounceBack Professional Settings—allows you to configure various backup settings.
û Enable/Disable BounceBack Launcher—toggles between enabling or disabling the launching of an automatic backup each time you connect the backup drive to your system.
Note: This feature not available in BounceBack Express
û Close Bounceback Launcher—exits the BounceBack Launcher software and removes the icon from the taskbar. If you do this, you must click Start, Programs, BounceBack Backup, and select BounceBack Launcher to start the program again.
Accessing BounceBack Components
To access BounceBack components click Start, Programs, and BounceBack Backup.

Use the software components in the BounceBack menu for the following tasks:
û BounceBack Backup—starts a backup immediately
û BounceBack Launcher—starts the BounceBack Launcher software and displays an icon for it in the taskbar
û BounceBack Settings—opens the BounceBack Settings program, where you can configure and customize your backups
û BounceBack TechRepair—opens the BounceBack TroubleShooter program. This program is designed to be used by technical support to assist you with problematic computers or installations’ It also provides access to the backup log files. (See Using the BounceBack TechRepair)
- The following
features are only available in BounceBack Professional -
û BounceBack Formatter—opens the BounceBack Formatter program, where you can repartition or reformat the backup drive (See Using the BounceBack Formatter)
û BounceBack Security Administrator—opens the Security Administrator program, where advanced users can set a master password for the backup drive (PCMCIA only; See Using the BounceBack Security Administrator)
û BounceBack Reminder—informs you when you last performed a backup
û BounceBack
QuickRestore—allows you to restore files quickly and easily (See Using BounceBack QuickRestore)
û BounceBack Version Administrator—allows you to view previous backup versions. Use this feature to view versions of previously backed up files, restore files, or remove old versions (See Using Version Control)
Each of the software components is explained in more detail in Section 5.
This section explains how to use the features in the BounceBack Settings program to select specific folders and files from one or more drives to backup.
There are two ways to access BounceBack Settings:
û
Click the Launcher icon ![]() in the taskbar and select BounceBack Settings.
in the taskbar and select BounceBack Settings.
û Click Start, Programs, BounceBack, and select BounceBack Settings.
The BounceBack Settings program looks similar to this:

Use the Backup tab to select the drives, folders, and files you want to back up, and to organize them on the backup drive. This is your starting place for organizing and scheduling data sets for automatic backup.
û Use the Options tab to set backup options (See Options of BounceBack Professional).
Note: This feature is only available in BounceBack Professional
û Use the Exclusions tab to exclude drives, folders, or files from a backup or a backup set. (See Excluding Data from the Backup Process)
û Use the Backup Devices tab to view backup device information and change the drive letter(s) of the backup device. (See Setting Backup Device Options Tab)
On the Backup tab in BounceBack Settings, there are two major areas. One depicts the backup set by its name, schedule and any options. The other identifies the backup paths associated with the highlighted set name. The drive letters under the Source column represent the drives on your computer. The drive letters under Backup to represents the backup drive.
By default the boot drive of your computer (usually drive C:) is listed in the Source column, and the drive letter representing the backup drive is listed in the Backup to column. This means all the data on your boot drive is backed up to the backup drive.
To create a backup set, follow these steps to add a drive, folder, or files to the backup:
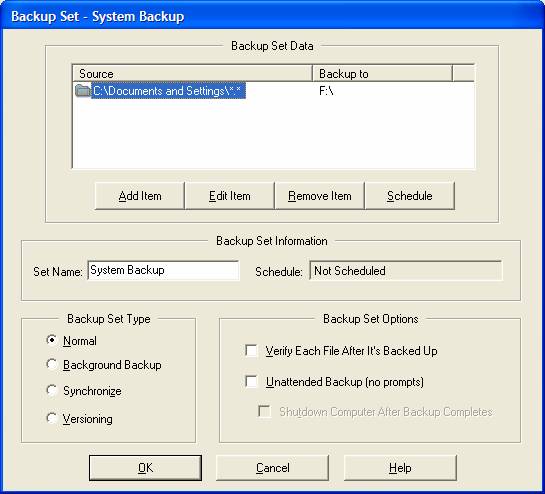
1. Click the Add button (or highlight and existing set and click Edit) on the settings backup tab and the Backup Set window appears:
2. Select the Add Item and the Select Source Data window opens, displaying all the drives on your system, including the backup drive.

3. You can navigate to your drives, folders, and files in this window just as you would in Windows Explorer. Double-click a drive to view its contents. Use the Folder icon to return to the previous directory.
1. Select the drive or folder you want to back up. You can selectively back up files of certain types by entering a file extension into the File Type field. For example, *.doc.
2. Click OK.
3. The Select Backup Path window opens, where you can select the destination for your data to be backed up. The drive letter assigned to the backup drive will be pre-selected
 .
.
4. Select the backup drive letter and click OK.
Note: you can double-click the drive icon and enter a folder name into the New Folder text box. This step can help you organize your data by backing it up into folders on the backup drive.

Removing Backup Sets
Use the Remove Item button to delete items from a backup.
1. In the BounceBack Settings program, click the Backup tab.
2. Select (highlight) the item you want to delete from a backup.
3. Click the Remove Item button.
At some time you may have a need to disable a backup set without deleting it. The method to do this is as follows:
1. In the BounceBack Settings program, click the Backup tab.
2. Select (highlight) the item you want to delete from a backup.
3. Click the Disable button and the green button to the left of highlighted Set Name will change to Red, indicating the backup set is disabled.
4. The Disable button will now changed to Enable the disabled set is highlighted.

The following features can optionally be applied to any backup set you create when editing an existing backup set or creating a new one.
In the Backup Set Items window, you can enter a unique name that describes the Backup Set in the Set Name edit box.
Note: When you create Backup Sets, the software automatically increments the name for each Backup Set as "Set 2," "Set 3," and so forth. You can change these names to names with more meaning, or names that remind you of what is included in the Backup Set.
In the Backup Set Type section, you can select additional Backup Set Types
û Normal — the default backup type
û Background Backup — launches a backup in the background at a set interval
û Synchronize — will synchronize the data from two different machines so both will have the latest copy of each file
û Versioning — will create and maintain versions of the data you backup
In the Backup Set Options sections, select any of the Backup Set Options you wish to apply to the backup set.
û Verify — This option will display a verify progress bar during the actual backing up of the data set to show progress of the verify function. Each file will be verified after is has been backed up against its source. Verifies take a slightly shorter time than backup operations because no writing to the hard drives is required.
û Unattended Backup — Select this option if you want the BounceBack to run without any user interaction. The program will log all results. Unattended Backup is not utilized if Backup with Compare is selected.
û Shutdown Computer — Select this option if you want BounceBack to shut down your computer after it performs a backup. The software will display a 30 second countdown warning you before it shuts down the system (requires Unattended Backup).
Scheduling has been reduced to a few keystrokes and the only prerequisite is to have a data set to schedule.
BounceBack has a scheduling feature to further automate your data backups. You can group drives, folders, or even files of a certain type into a Backup Set. You can determine if you want the Backup Set to always be backed up when you connect the backup drive, or on a weekly or monthly basis. For example, you may have files and folders that change daily, so you want this data to be backed up each time you connect the backup drive to your system. Program files and data that you rarely access can be backed up on a monthly or weekly basis. This added power gives you more control over which drives and directories are backed up and when.
To Schedule a backup use the follows:
1. In the BounceBack Settings program, click the Backup tab.
2. Select (highlight) the backup Set Name you want to schedule.
3. Click the Schedule button and the following dialog box will be displayed:

4. The options available allow for a single event Once (by date and time), a Daily event (by day and time) and a Monthly event (set by date and time)
5. For this example, Daily is selected and the dialog box will be days of the week and a time.

6. In
this sample the scheduled time is set for
7. Once a schedule has been set it is displayed by the Settings program, in the Backup Tab next to the backup Set Name under Scheduled for. Schedules may be changed at any time. If a scheduled event is missed, because the computer was off, then on powering up the system you will be informed of the missed backup and prompted to start one immediately or to wait until a more convenient time.

The following section will describe how to schedule backup sets for launch when the backup drive is connected. This mode of scheduling is best utilized by mobile users who connect the backup drive to their laptop only when they need to perform a backup.
1. Start BounceBack Settings program and click on the Options tab.
2. Select
3. Click the OK button.
4. Highlight the Backup Set in the Backup Set tab.
5. Click the Schedule button.
6. In the Backup Set Schedule window, select either Daily or Monthly.
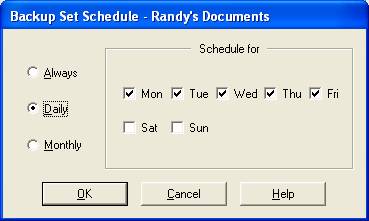
If you select Daily, check the appropriate days. If you select Monthly, choose a day of the month from the pull-down menu.
Note: This option will configure your backup drive to Auto Launch only on this day. This will allow you to connect your backup drive to your computer without auto launching a backup, except on the day that you scheduled.
Click OK to save the settings, then click OK to return to the BounceBack Settings program.
The BounceBack Settings window could look similar to this:

In the main window of the settings program there is a backup option. This option allows you to highlight any backup Set Name, irregardless of the enable/disable setting, and launch that data set backup only. The method to do this is as follows:
8. In the BounceBack Settings program, click the Backup tab.
9. Select (highlight) the backup Set Name you want to schedule.
10. Click on the Backup button and the following dialog will be displayed:

11. Click
Yes to continue the backup or No to cancel the backup
Note: This feature is only available with BounceBack Professional
The Options button displays the Backup Options window, where you can review and configure more options for backing up your data. BounceBack includes a scheduling feature that allows for automatic backup of selected data on a schedule. A set of data that you group for a scheduled backup is a called a Backup Set. Once you enable creating Backup Sets, you can choose to schedule when your data is automatically backed-up for you on a regular basis.
The following is a list of all the options available with BounceBack Backup.
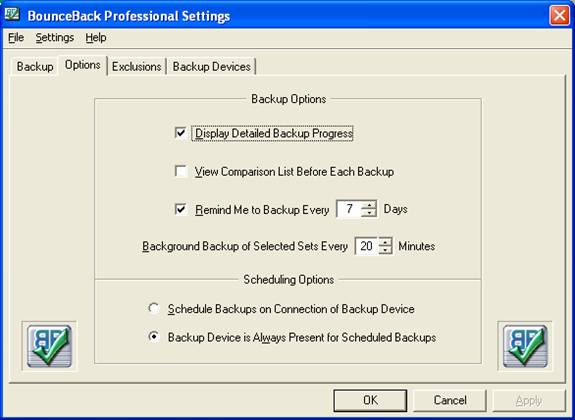
Display Detailed Backup Progress ¾ Select this option to see a detailed display of the backup process each time a backup is launched. Unselect this option to display the default display with minimal details.
View a List of Changed Files Before Backup ¾ Each time you launch a backup, BounceBack compares the data on your system drive with the data on the backup drive. Before it continues, it offers you a chance to view the files that have been changed or deleted since the last backup. You can then selectively back up, delete, or restore files. This option cannot be utilized if Unattended Backup is selected.
Remind me to backup every… – To set a backup reminder, use the arrows to set the number of days before a reminder occurs. BounceBack tracks the time between backups and reminds you when you need to perform a backup.
Background Backup of Selected Data Set ¾ This number represents in minutes the time interval between Background Backups of selected data sets. The range of this setting is 1 to 100 minutes. The time interval should be set large enough to complete a data scan and backup, the default is set to 20 minutes.
Re-run the Disaster Recovery Process (Settings Menu Option
Only)
Using this option will re-run the disaster recovery process. BounceBack will repartition and format the backup drive and begin a full backup of you computer. ALL DATA WILL BE LOST FROM PREVIOUS BACKUPS.
Schedule
Backups on Connection of
Backup Drive Is Always Present for Scheduled Backup ¾ Use this option if you plan to keep your backup drive always connected to your PC. The scheduler automatically backs up your data as you defined in each of your Backup Sets. If you disconnect the backup drive, BounceBack will remind you that you have missed any scheduled backups. If this option is NOT checked, scheduled backups will only occur when the device is connected to your computer (requires Backup Sets).
The BounceBack programs come defaulted with many options preset. However, there are options available to each backup device. Each device in the list can have different capabilities, USB, Firewire and PCMCIA devices all have the capability of launching a backup on connection to the computer. PCMCIA has the added capability of having passwords on the backup device itself.
To review and change options for each data set use the following method:
1. In the BounceBack Settings program, click the Backup Device tab.

Auto Launch on Connection of Backup Device ¾ Each time you connect the backup drive to your computer, BounceBack automatically starts a backup. To disable, uncheck the box.
Password Protect the
Prompt For Password Before Backing Up ¾ Selecting this option will force BounceBack Backup to prompt for the password before allowing the backup process to continue. If this option is unchecked, the password will be stored by BounceBack Backup (with encryption) and automatically entered for you during the next backup (requires the Password Protect option).
Some users may wish to view all folders and files, after an initial backup, before they are backed up to the backup drive. The View Comparison List Before Backup option creates a list of the files that differ between the data stored on the backup drive and the hard drive in your computer.
Note: BounceBack Express can access this feature by selecting Launch BounceBack Express/Compare from the BounceBack Launcher located in the windows system tray.
You can view the list, cancel the backup, or just continue with the backup by clicking the appropriate button in this BounceBack Options window:

Click View Changes if you want to see the list of files that differ.
Note: Click the Disable this message check box if you no longer wish the Comparison List to display before each backup.
The BounceBack Comparison window lists all the files that differ between your system disk and the backup drive. It looks similar to this:

There are three categories of files:
Missing – These files are new on the computer, but have not been backed up to the backup drive. Backup Size displays MISSING.
Deleted – These files are on the backup drive, but have been deleted from your computer. Source Size displays DELETED.
Changed – These files are found on both the backup drive and on your computer, but the files have changed, they are no longer identical.
You can view additional information about each file by resizing the window and using the horizontal scrollbar (Source means the file on your computer, Backup means the file on the backup drive):
Source File Name – The directory location and name of the file.
Source Size – The original size of the file in bytes.
Backup Size – The size of the backed-up file on the backup drive.
Source Date – The last day and time you changed the file on your PC.
Backup Date – The last day and time you changed the file on the backup drive.
Backup Path – The location of the file on the backup drive.
Source Path – The location of the file on your notebook or PC.
Each of the menu items at the top of the BounceBack Comparison window are utilized as follows:
The File menu has the following commands:
Backup – select this command to back up the files you select in the backup drive Comparison Results window. This command performs the same function as the Backup button.
Restore – select this command to recover or restore the files you select. This command performs the same function as the Restore button.
Exit – exits the Compare List and cancels the backup.
The Edit menu has the following commands:
Select All – selects (and highlights) all of the files and folders in the Compare List.
Invert Selection – changes the selection to include the files you did not originally select and exclude the ones you did originally select.
Use the View menu to selectively view the type of files in the Compare List.
Missing – displays only the files that have never been backed up to the backup drive.
Changed – displays only the files that exist on both drives but are different.
Deleted – displays only the files that exist on the backup drive but are no longer on your computer.
All – displays all the files.
The Compare List has four buttons, three of which perform the task moving the files and folders you select in the Compare List either to the backup drive or back to their original location. Each button has a corresponding menu item in the File menu that serves the same purpose. The following is an explanation of each:
The Backup button is enabled only for Missing and Changed files in the Compare List and works in the following manner:
Missing – This will backup files to the backup drive which exist on the source drive but are not currently on the backup drive.
Changed – This will backup the version of each file selected as it exists on the source drive to the backup drive. This operation will overwrite the current copy of each file that exists on the backup drive, even if it’s newer
If you do not select any files, clicking the Backup button will close the Compare List and backup all the Missing and Changed files that were listed.
The Restore button is enabled only for Changed and Deleted files in the Compare List and works in the following manner:
Changed – This will restore the version of each file selected as it exists on the backup drive to the source drive. This operation will overwrite the current copy of each file that exists on the source, even if it’s newer.
Deleted – This will restore all the deleted files you select for restore back to the source drive. This is a good way to recover files you mistakenly deleted from your source drive but which still exist on the backup drive.
The Purge button is enabled only for Deleted files in the Compare List and works in the following manner:
Deleted – This will remove all the files you select from the backup drive which no longer exist on the source drive.
Note:
It’s a good practice to frequently purge from the backup drive those files
and folders which have been deleted from the source drive. For more
information, see Removing
Deleted Files from the Backup Drive.
Each time you perform a backup, the results are logged to a log file. To view the BounceBack log file:
1. Click Start, Programs, BounceBack, and select BounceBack TechRepair.
2. Click the View Log button.
The BounceBack TechRepair program looks like this:

BounceBack
TechRepair is not needed during normal use of the backup software. Its main
purpose is to allow tech support the ability to troubleshoot any problems that
may arise with the software. To find out what the other features in the
TechRepair program are for, see Using
BounceBack TechRepair.