Section 5: Managing the
What’s in this Section?
This section contains information regarding maintenance and tasks frequently required to ensure proper operation of the backup drive. The instructions in this section build on the information contained in Section 2. We recommend that you become familiar with the information presented in Section 2 before moving on to this section.
Section Topics
5-1: Changing the Drive Letters Assigned to the backup drive
5-2: Removing Deleted
Files from the
5-3: Excluding Data from the Backup Process
5-4: Password Protecting
the
5-5: Installing BounceBack on Several Computers
From the Backup Devices tab in the BounceBack Settings program, you can change the backup drive letter(s), or view information about the backup drive.
The Backup Devices tab looks similar to this:
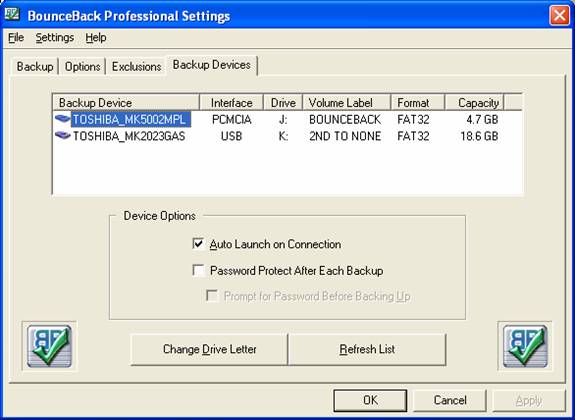
You can change the drive letter for the backup drive to another letter with the Change Drive Letter button.
Follow these steps:
1. Select (highlight) the drive letter in the list that you want to change (usually, there’s just one).
2. Click the Change Drive Letter button.
3. The BounceBack software displays the Drive Letter window. Only letters that are available and not already used on your system are listed in this window.

4. Select a different letter and click OK.
When you start a backup by selecting the Launch BounceBack Backup/Compare command from the BounceBack Launcher, BounceBack compares the files on your system disk with the ones stored on the backup drive and gives you an opportunity to view the files that are deleted from your system drive.
Follow these steps:
1. Select Launch BounceBack Backup/Compare from the BounceBack Launcher icon menu.
2. Wait a few minutes for the scan to complete.
3. Click the View Changes button in the BounceBack Backup window.

4. In the BounceBack Comparison Results window, select Deleted Files from the View menu. This displays all files and folders that have been deleted from your system disk, but still exist on the backup drive.

5. Click the Purge button to delete from the backup drive all the files and folders which have been deleted from your main hard drive, or select the ones you want to delete and then click Purge.
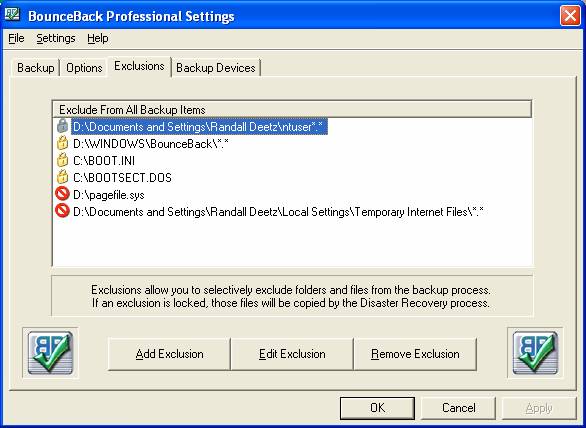
Use the Exclusions tab in the BounceBack Settings program to selectively exclude drives, folders, or files from a backup. You may want to exclude excessively large files or folders to speed up the backup process.
To exclude data from a backup:
1. Click the Add Exclusion button, or select an existing item in the Exclusions tab and click the Edit Exclusion button.
2. In the Select Excluded Data window, select a drive letter to exclude, or double-click to find the folders or files you want to exclude from the backup. Multiple items can be highlighted for selection.
3. Click OK. Your excluded items are added to the list on the Exclusions tab, and will not be backed up from now on.
NOTE:
If the Disaster Recovery process was selected during setup, Locked
Exclusions will be created by the software. These folders and files will still
be copied to the backup drive with the exclusive
NOTE:
When you add an item to the excluded
list which was backed up from a previous full backup, that item will still
exist on your backup backup drive.
Removing an item from the backup Exclusions list is the opposite of adding it. By removing the item from the list, you are allowing BounceBack to back it up in future backups.
Follow these steps:
1. Select the item you want to remove from the Exclusions list.
2. Click the Remove Exclusion button.
3. The exclusion will be removed from the list.
Note: This feature is only available with BounceBack Professional
Password-protection is available for the PCMCIA version of BounceBack software. It’s good practice to password-protect the backup drive when you travel or transport it, especially if you have sensitive or confidential data stored on it.
To password-protect your backup device, follow these steps:
1. Click
the BounceBack Launcher icon ![]() and select Launch BounceBack
Settings.
and select Launch BounceBack
Settings.
2. Click the Backup Devices tab.

3. Click the Password Protect After Each Backup checkbox.
Note: If you would like to be prompted for the password before each backup: Click the Prompt for Password checkbox, and Click OK. Otherwise, the software will store the password (with encryption) and not prompt you for a password.
4. Click OK
5. To set the password, start a backup. Click the BounceBack Launcher icon in the taskbar and select Launch BounceBack Backup. The password-protection will be initialized after your next backup.
Note: Your password can contain letters and numbers, and is case-sensitive.
6. The backup drive is password-protected when you disconnect it from the computer. Each time you perform a backup, you will be prompted to remove and re-insert the backup drive to reset the password protection.
Follow these steps to remove the password-protection:
1. In the BounceBack Settings program, click the Backup Devices tab.
2. Clear the Password Protection checkbox.
3. Perform a backup. Once the backup is complete, the password protection will be removed.
Note:
You can use the same backup device or software CD to install BounceBack and back up the data on several computers.
The following instructions and settings are for secondary computers.
Note: Only the first computer that you backed up will have the full disaster recovery option.
There are several important differences in the installation procedure when you are completing multiple installations:
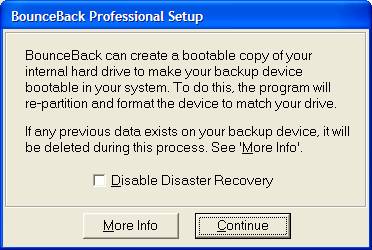
û You must disable the disaster recovery option. Since you are backing up several computers, you cannot allow BounceBack to reformat the backup drive each time you install the software on a computer.
û You must create separate folders on the backup drive for each computer. When you back up each computer, make sure the data for each one is kept in a separate folder. This will avoid co-mingling and possible overwriting of data from each backup.
Follow these steps:
1. If you are running a virus protection program, disable it by clicking the icon for the anti-virus program in the taskbar, and following the instructions for temporarily disabling the program.
2. In the Welcome window, click Next to start the installation. Clicking Next copies the BounceBack software to the hard drive on your notebook or PC.
3. In the Setup Complete window, click Yes, I want to restart my computer now, then click Finish to reboot your system (Windows 98/Me users only) and go to the next setup window. If you choose to reboot your system later, the software installation will finish at that time.
4. Check the Disable Disaster Recover checkbox and click Continue.
After you have installed BounceBack on each computer, you must create a new Source folder for the data of each computer that you want to backup.
The BounceBack Settings program provides you with a means to create separate directories (folders) for the data you want to back up.
Follow these steps:
1. Start BounceBack Settings and make sure the Backup tab is selected.
2. Click the Add Backup Item button.
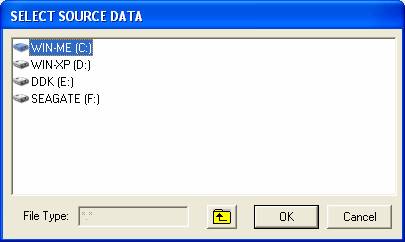
3. In the Select Source Data window, click (select) a drive letter that you want to back up. The drive letter represents the data on the hard disk of the notebook. If you want to see what is on that drive, double-click it. You can then select specific folders that you want to back up. Click OK.
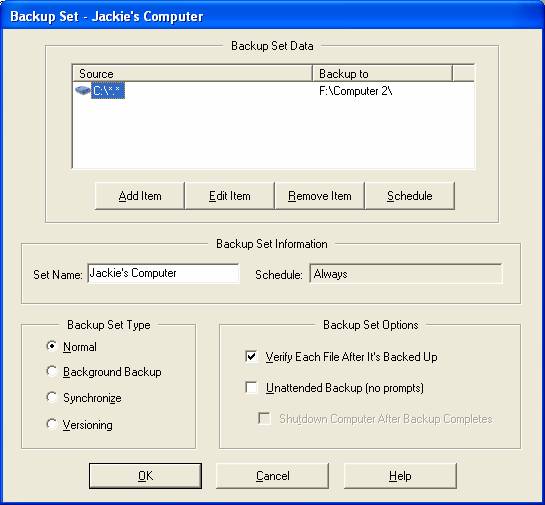
4. In the Select Backup Path window, double-click the Backup drive letter. This is the destination for the data to be backed up. Enter a name for the computer’s data into the New Folder text box. In our example "Computer 2" was used.

5. Click OK. During the next backup, the source files (data from the computer) will be copied to the destination—a folder named "Notebook2" on the backup drive in this example.