
![]() The following step by step instructions will lead you through the creation
of a LiveG-Map. PageCharmer's most fully featured--yet easy to use-- AppletSet'r.
The AppletSet'rs have many common properties, so by working with one AppletSet'r
it becomes easy to understand the rest. On the other hand, the LiveG-Map, LiveT-Map,
LiveG-Marquee, and the LiveT-Marquee contain some unique properties in their respective
AppletSet'rs. Each has a dedicated section in "Unique
AppletSet'r Properties" where these are covered in detail.
The following step by step instructions will lead you through the creation
of a LiveG-Map. PageCharmer's most fully featured--yet easy to use-- AppletSet'r.
The AppletSet'rs have many common properties, so by working with one AppletSet'r
it becomes easy to understand the rest. On the other hand, the LiveG-Map, LiveT-Map,
LiveG-Marquee, and the LiveT-Marquee contain some unique properties in their respective
AppletSet'rs. Each has a dedicated section in "Unique
AppletSet'r Properties" where these are covered in detail.
![]() For the most part you will be creating your own graphics when using the
LiveG-Map Appletset'r. So please review the "Creating
LiveG-Buttons, LiveGT-Buttons and LiveG-Maps" and Creating
Transparent GIF Images before starting the steps.
For the most part you will be creating your own graphics when using the
LiveG-Map Appletset'r. So please review the "Creating
LiveG-Buttons, LiveGT-Buttons and LiveG-Maps" and Creating
Transparent GIF Images before starting the steps.
Special note about Netscape for Macintosh: The nature of this browser is to reload the page when the window is changed in any way. This causes the AppletSet'r to return to its default settings.
There are three approaches to starting a LiveG-Map depending on its complexity:
1) Basic Multi-Tiled/Single-Tile Image Map
2) Detailed Multi-Tiled/Single-Tile Image Map (Excellent for revisions)
3) Add Existing HTML Image Map
![]() Create the applet by working your way down the AppletSet'r display then
through the tabs left to right. Note that after entering a value, you must press
the "return" key for the AppletSet'r to respond. For simplicity the
AppletSet'r display has been modified to add interspersed explanatory comments:
Create the applet by working your way down the AppletSet'r display then
through the tabs left to right. Note that after entering a value, you must press
the "return" key for the AppletSet'r to respond. For simplicity the
AppletSet'r display has been modified to add interspersed explanatory comments:
The following values have a universal effect on the LiveG-Map applet.

Note: An "ALT" (alternative) image offers decided advantages. We highly recommend reviewing the Creating Alternative Images, and Alternative Images in Place of Java before you continue.


Tip: To make the pop-up menu appear instantly when the cursor rolls over an Area, enter a zero in the "Menu Start" field. For a delay, enter any positive value (1000 = approximately 1 second). To keep the pop-up menu on the screen indefinitely while the cursor is inside an Area, enter a zero value in the "Menu End" field. To make the pop-up menu disappear after a specific amount of time, enter any positive value (1000 = approximately 1 second).

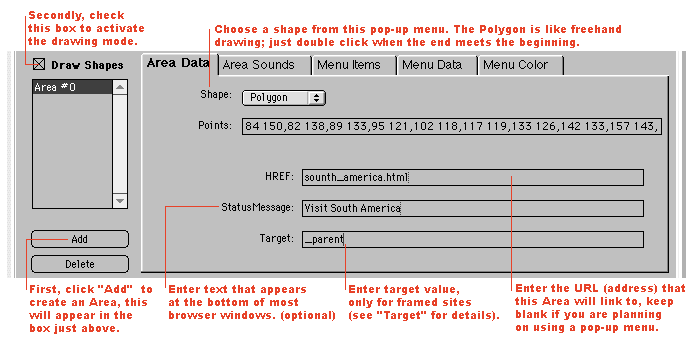
Because each "Area" (live area) can have unique values, an "Area"must be selected, as you follow all of the steps below in order for the entered values to take effect. For more information regarding URL and Targets.
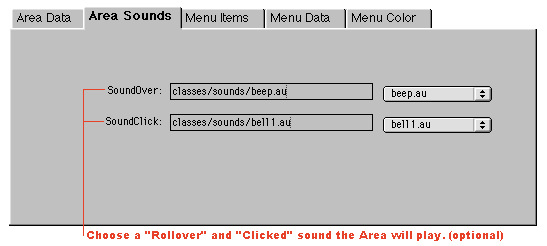
Within the Area Sounds tab, two sounds can be assigned to each "Area"(live area).
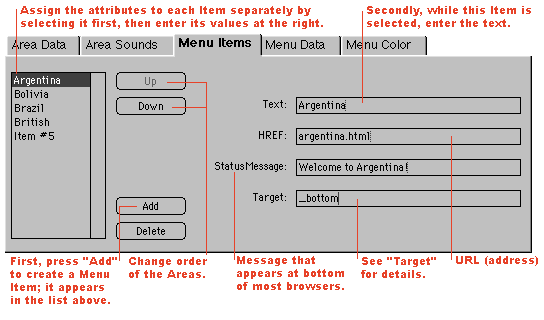
An "Item" created in the Menu Items tab is related to a selected "Area" (live area). You can create an unlimited number of menu items.
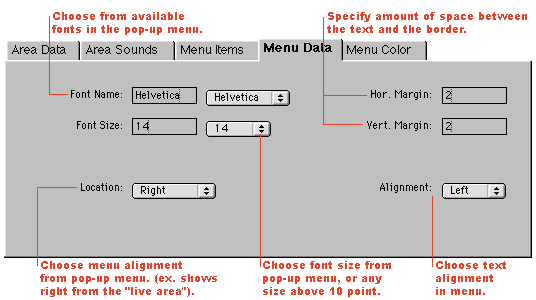
The menu's cosmetic attributes, assigned in the Menu Data tab, are related to an individual "Area" (live area).
Each area's menu can be assigned a unique style in the Menu Color tab, by using different colors.

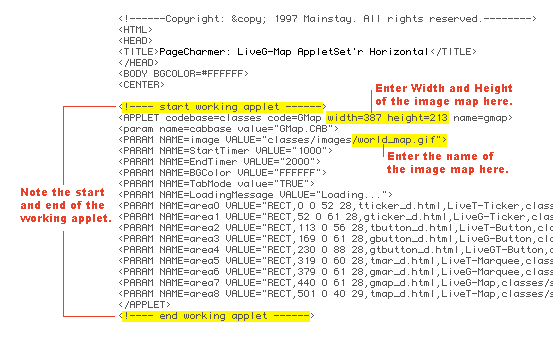
On the occasion of creating a complex LiveG-Map, we highly suggest copying the HTML code generated often, about the time you finish completing one or two Area's attributes. Simply press the "Create HTML" key. Then open the current file, using a Web page layout editor or word processor. And paste the HTML code between the "start working applet" and "end working applet" note lines. Then Save and reopen the file in your browser to continue. All of the values that you have set will now be the default of this .html file.
Now that your image map is the way you want it, press the HTML button and copy and paste the generated HTML code appropriately into the existing HTML code on your Web page.

Congratulations, now that the LiveG-Map is running in your Web page it's time to make sure it's properly organized and uploaded to your server or Web site provider.