
![]()
![]() The following step by step instructions lead you through the creation
of a LiveG-Marquee. The AppletSet'rs have many common properties, so by working with
one AppletSet'r it becomes easy to understand the rest. However, the LiveG-Map, LiveT-Map,
LiveG-Marquee, and the LiveT-Marquee contain some unique properties in their respective
AppletSet'rs. Each has a dedicated section in "Unique
AppletSet'r Properties" where these are covered in detail.
The following step by step instructions lead you through the creation
of a LiveG-Marquee. The AppletSet'rs have many common properties, so by working with
one AppletSet'r it becomes easy to understand the rest. However, the LiveG-Map, LiveT-Map,
LiveG-Marquee, and the LiveT-Marquee contain some unique properties in their respective
AppletSet'rs. Each has a dedicated section in "Unique
AppletSet'r Properties" where these are covered in detail.
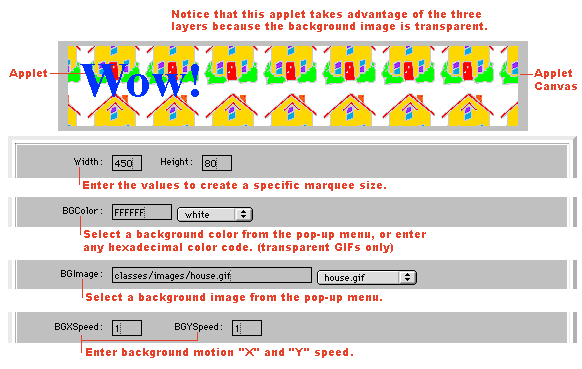
![]() The LiveG-Marquee is one of the quickest PageCharmer applets to learn.
Create the applet by working your way down the AppletSet'r display. Note that
after entering a value, you must press the "return" key for the AppletSet'r
to respond. For simplicity the AppletSet'r has been modified to add interspersed
explanatory comments:
The LiveG-Marquee is one of the quickest PageCharmer applets to learn.
Create the applet by working your way down the AppletSet'r display. Note that
after entering a value, you must press the "return" key for the AppletSet'r
to respond. For simplicity the AppletSet'r has been modified to add interspersed
explanatory comments:
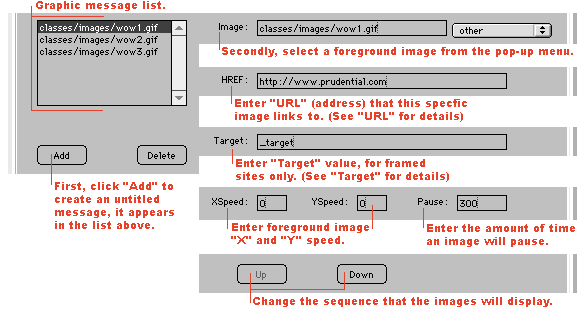
Because each "Message" can have unique values, a "Message"must be selected from the graphic message list, as you follow the instructions below in order for the entered values to take effect. For more information regarding URL and Targets.
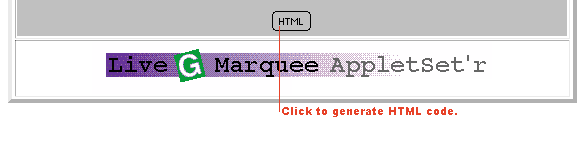
Now that your graphic marquee is the way you want it; press the HTML button and copy and paste the generated HTML code appropriately into the existing HTML code on your Web page.
Congratulations, now that the LiveG-Marquee is running in your Web page it's time to make sure it's properly organized and uploaded to your server or Web site provider.