When you create a Web page in Claris Home Page, it is displayed in Edit Page mode by default. Working in Edit Page mode is similar to working in word processing documents. For example, you can type text, insert images, or copy and paste elements in much the same way. However, because of HTML limitations, there are some things you can't do, such as set tabs or page margins. Claris Home Page provides toolbars, palettes, and object and link editors that let you apply HTML attributes to your Web page elements.
Keyboard shortcuts are listed next to options in the menus and a context menu is also available for some elements like text and images while you're working on a page. To display the context menu, right-click (Windows) or Control-click (Macintosh) the element in the page. For a listing of keyboard, mouse, and context menu shortcuts, see appendix B Shortcuts for using Claris Home Page.
You can open and edit any HTML file in Claris Home Page.
To open an HTML file:
You can change the size of your document window to view it using your monitor's specific size.
To change the size of your document window:
Edit Page mode displays the contents of your Web page in a format that allows you to perform all of the editing tasks involved in creating your Web page, such as typing and formatting text, inserting images, creating links, and so forth.
By default, when you first open a file or create a new document, Claris Home Page displays the document in Edit Page mode.
If you want to change the default mode that Claris Home Page opens documents in, choose Application Options from the Tools menu (Windows) or Preferences from the Edit menu (Macintosh), click the General tab, and then choose Preview Page or Edit HTML Source from the Open Documents in pop-up menu.
To switch to Edit Page mode, choose Edit Page from the View menu
(Windows) or from the Window menu (Macintosh) or click the Edit Page button ![]() on
the toolbar.
on
the toolbar.
In Claris Home Page, you can cut, copy and paste text, tables, links, images, and other elements within your Web page, between other Web pages, or between Claris Home Page documents and other applications.
To cut or copy and paste an element:
Tip You can also drag elements to cut, copy, and paste them. If you drag an element within the same document, it is cut and pasted. If you drag an element from one Claris Home Page document to another, it is copied and pasted.
If you want to delete something in your document, select it and press the Backspace or Delete key.
If you want to cancel the last action you performed, choose Undo from the Edit menu.
Claris Home Page includes toolbars and special tool palettes you can use to perform tasks quicker than selecting the corresponding option from a menu. Tool tips display a description of the tools when you hold the mouse pointer over them.
The Basic toolbar provides access to many of the commonly used features in Claris Home Page such as Edit Page, Preview Page, and Preview in Browser modes. Click a button to activate your choice. When you click a button to insert an element, the element is inserted at the insertion point in the page.
Tip You can also
drag the Insert
Anchor ![]() , Insert Horizontal Rule
, Insert Horizontal Rule ![]() ,
or Insert Table
,
or Insert Table
![]() buttons onto your page to insert those elements.
buttons onto your page to insert those elements.
![]()
![]()
The Style toolbar has buttons you can use to format text. Select the text and click a button to activate your choice, or choose an option from the pop-up menu.
Tip You can also
drag the Make Numbered List
Entry button
![]() , or Make Bullet List Entry button
, or Make Bullet List Entry button ![]() onto your page to insert those elements.
onto your page to insert those elements.
![]()
The Basic and Style toolbars appear by default.
The toolbars in the Image editors provide tools for you to add transparency or interlacing to images and hotspots to image maps. To use these toolbars, double-click the image to open the Image Object Editor. To open the Client-Side Image Map Editor, click the Behavior tab, if necessary, and then click the Edit button. To open the Transparency and Interlacing Image Editor, click the Appearance tab, if necessary, and then click the Set button.
![]()
![]()
When you create a frame page, the Edit Frames button ![]() appears on the Basic toolbar to let you know you are working in Edit
Frames mode. Also added to the toolbar are five frame layout buttons.
Click on these buttons to subdivide a frame vertically, subdivide a
frame horizontally, add a frame to your frame page, select a parent
frameset, or select a root frameset.
appears on the Basic toolbar to let you know you are working in Edit
Frames mode. Also added to the toolbar are five frame layout buttons.
Click on these buttons to subdivide a frame vertically, subdivide a
frame horizontally, add a frame to your frame page, select a parent
frameset, or select a root frameset.
![]()
When you open a Claris Home Page library, a library toolbar appears on the library window along with a Library menu option. This toolbar provides buttons for new entries into a library, inserting a specific element into a page, and using a specific element for the background of a page.
![]()
Another toolbar is found in the Site Editor. This toolbar provides buttons for adding a new page, setting document options, checking site statistics, verifying links and references, consolidating, and uploading.
![]()
Claris Home Page has a floating Forms tool palette you can use to
insert form elements into your documents. To display the Forms tool
palette, choose Forms
Palette from the View menu (Windows) or Show Forms Palette from the Window
menu (Macintosh). To hide the Forms tool palette, click the close box
or choose it again from the View menu (Windows) or from the Window
menu (Macintosh).
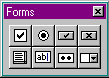
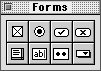
To use the Forms tool palette, drag one of the buttons onto your Web page to add the corresponding element. You can also click once on a button in the Forms tool palette to insert an element at the insertion point. Move the Forms tool palette anywhere on your screen by dragging its title bar.
When you add an element to your Web page, such as a table, an image, or a hypertext link, you use an object editor or the link editor to specify or make changes to its characteristics.
In all of the object and link editors, you will find an additional field in which you can add extra HTML. You can add the HTML directly to the object or hypertext link in Edit Page mode without having to go to Edit HTML Source mode. For more information, see Adding extra HTML to your page.
Most object editors open for you when you insert an element into the page. You can use different methods to open the object editor for an element:

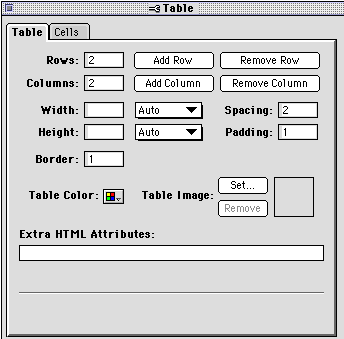
You can see the results of a change without having to close the object editor by clicking in a different text box.
Hypertext links can be edited using the Link Editor. To open the Link Editor and edit a particular link: select the link in Edit Page mode and choose Link Editor from the View menu (Windows) or Show Link Editor from the Window menu (Macintosh).
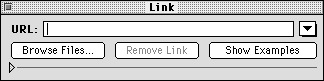
The Link Editor is displayed in an expandable window. Click the
triangle ![]() on the bottom section of the window to display more
information.
on the bottom section of the window to display more
information.
Besides using the object editors, you can resize many of the elements in your page, such as tables, images, frames, and form elements, using the mouse.
To resize an element using the mouse:
To resize graphic elements proportionately, Shift-drag the corner handle.
You can change the horizontal alignment of text, images, and other elements in relation to the Web page.
To change the alignment of an element:
You can also change the alignment of text and other elements using
the Align Left
![]() , Align
Center
, Align
Center ![]() , and Align Right
, and Align Right ![]() buttons on the toolbar.
buttons on the toolbar.
To align elements within a table cell, select the table cell that contains the element you want to align. In the Table Object Editor, click the Cells tab, and then select the appropriate option from the Horizontal Align or Vertical Align pop-up menu. For more information, see Changing the alignment of elements in a table.