You can add extra HTML to your pages using Edit HTML Source mode and to specific elements in a page while you are working in Edit Page mode. You can also change some of the file output tags that Claris Home Page automatically inserts for you. There are several ways to add extra HTML to your Web pages:
As you create your Web page in Edit Page mode, Claris Home Page inserts the HTML tags for you. You can view these tags and add your own HTML to it in Edit HTML Source mode. Claris Home Page saves and incorporates the changes you make.
Important Be careful when editing your Web page in Edit HTML Source mode. Unless you are familiar with HTML and its syntax, you can destroy your work. As a precaution, make a copy of your Web page before you change it in Edit HTML Source mode.
To switch to Edit HTML Source mode:
When in Edit HTML Source mode, the HTML menu appears on the menu bar, which contains options for setting the text display in this mode.
Tip When you wish to edit an element in Edit HTML Source mode, first select the element in Edit Page mode and then switch to Edit HTML Source mode. This way you open to the exact location you want to edit without having to search for the element.
In Edit HTML Source mode, you can use all of the usual text editing operations such as typing, undoing, cutting, copying, pasting, dragging, and finding and replacing text. You can also change the display of text and HTML tags to make viewing it easier. Other options, such as those found in the Insert, Format, and Style menus, are not available in Edit HTML Source mode.
To make viewing easier, you can change the way HTML tags and text are displayed in Edit HTML Source mode. You can change the font type and font size of the source, use syntax coloring to distinguish tags from text, and use the word wrap option to temporarily break lines of text within the document window so you don't have to scroll horizontally.
To change the display in Edit HTML Source mode:
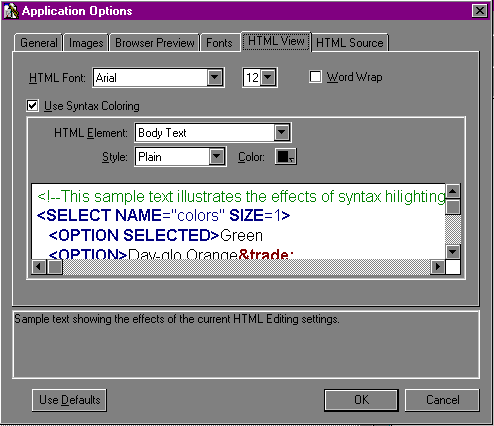
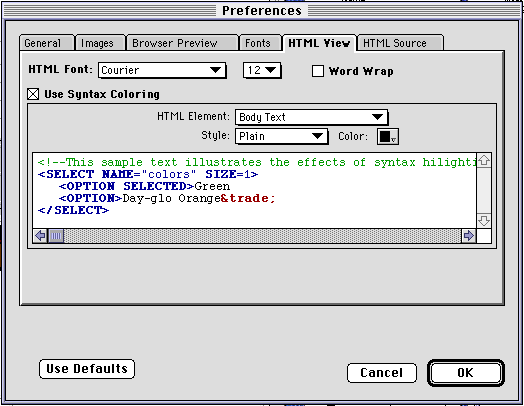
Claris Home Page displays a sample of text with your selections applied to it. Use the scroll bars to view your full settings. When Syntax Coloring is not selected, the sample text appears as black.
To distinguish tags from text, use different colors and styles for them. Select Use Syntax Coloring, choose a tag type from the HTML Element pop- up menu, and select a color and style for that type.
To change the font type and size of the source, choose them from the HTML Font pop-up menus. The settings apply to all pages you view in Edit HTML Source mode.
To make temporary line breaks and turn off horizontal scrolling, select the Word Wrap check box.
Note You can also turn Syntax Coloring and Word Wrap on and off from the HTML menu.
To restore all the HTML Editing settings to their default values, click Use Defaults.
You can add extra HTML attributes to an element in Edit Page mode. To do this:
You can add HTML code or comment to your text in a Web page to format special characters or insert a comment that is visible in the source on a browser (you can view it in Edit HTML Source mode).
To add HTML to the text in your Web page:
You can add extra HTML attributes to the document tags for your Web page.
To add attributes to a document tag:
|
Type extra HTML |
To add |
|---|---|
|
Prefix Comments |
Commented text to the beginning of your HTML file, such as the name of the author, messages, and so on. |
|
<HTML> Tag Attributes |
Attributes to the <HTML> tag. Commented text that states the enclosed text is HTML and may contain two elements, HEAD and BODY, such as the title of a document, list elements, and so on. |
|
<HEAD> Tag Attributes |
Attributes to the <HEAD> tag. Commented text that contains general information about your HTML file, such as a record of the HTML file's original URL, a relationship between files, and so on. |
|
Text in Head Section |
Text that appears in the HEAD section of the file. This option allows you to add tags other than <TITLE>. |
|
<Body> Tag Attributes |
Attributes to the <BODY> tag. Commented elements that contain the actual text of the HTML file, such as headings lists, addresses and so on. |
The extra HTML you type in these text boxes only affects the current Web page you have open unless you have selected several pages using the Site Editor. To apply your changes to multiple pages, open the Site Editor (choose Open Site Folder from the File menu), select the pages you want to change, and make the appropriate option changes in the Document Options dialog box.
HTML output are automatically inserted for you. These application options affect the way a file is saved, and the type of HTML that Claris Home Page applies for text and hypertext links.
You can change the default settings if you want to. Your change affects all pages that you create in Claris Home Page.
To change the default HTML output settings:
|
Select this HTML output setting |
To do this |
|---|---|
|
Default HTML File Extension (Windows) or Suffix (Macintosh) |
Change the default filename suffix for new HTML files. Should typically be .htm or .html, for instance mypage.htm or mypage.html. |
|
Header Comment |
Add information that identifies your pages as Claris Home Page files at the beginning of the HTML. (These comments are only visible when viewing the HTML source.) Choose None if you don't want any information added. Choose Identify as Home Page file if you want a comment added identifying your Web pages as Claris Home Page files. Choose Identify and time-stamp if you want a comment added identifying your Web pages as Claris Home Page files and a time- stamp identifying the last time each file was saved. |
|
Line Break Format |
Specify the line break format your files will follow. Use this option only if you want to edit the HTML code of your Web page in a text editor since Claris Home Page can handle all line break conventions. Choose Macintosh (CR), Windows (CRLF), or Unix (LF) to specify the kind of line breaks you want to use. |
|
Paragraph Alignment Uses |
Specify how centered text is coded. Choose <CENTER> tag to have Claris Home Page use the <CENTER> tag. Choose ALIGN attribute to have Claris Home Page use the ALIGN=CENTER parameter within other tags (such as <P>). |
|
Generate </P> Tags |
Add a closing paragraph tag to every opening paragraph tag in your files. This option is selected by default. |
|
Generate X-CLARIS Tags |
Claris Home Page uses several custom tags (beginning with "X- CLARIS") to save information such as where the Claris Home Page application window appears on the screen and what size the window is. Enable this option to display these additional tags in the HTML file. |
|
Use Absolute Pathnames |
Specifies fixed pathnames for hypertext links between files based on the computer where they reside. Because the pathnames do not change, links can be broken when files are moved to another computer. When this option is deselected, Claris Home Page uses relative pathnames based on the location of files that contains the links. |