Creating Your First SWiSH Movie

This is a step-by-step tutorial on how to create your first SWiSH Movie. This tutorial illustrates some of the Text Effects seen in the "first.swi" file in the Samples Menu.

1. Start the SWiSH application   

2. From the File Menu select Samples | "first.swi"

3. From the File Menu select Test | testplayer.png In Player

When you are ready to begin creating your Movie, you can close the player window or minimize it to view the Movie as a reference while you work on the following tutorials.

1.From the File Menu select newmovie.png New  

2.Define your Movie's properties by select the Movie Panel and changing the Width to 700, Height to 450, and Frame Rate to 15. Make sure that the Background color is set to white  
 
The 'Movie' Panel should look like this:  
 
tute1_1.png  
 
3.In the Zoom Controls of the Layout Panel, click on the zoom100.png Zoom 100% button. This will centre the stage area within the Layout window.  
 
4.Ensure Scene 1 is selected in the Outline Panel, and press the inserttext.png Insert Text button on the Insert Toolbar. You should see the word 'Text' appear in the center of the stage in the Layout Panel.  
 
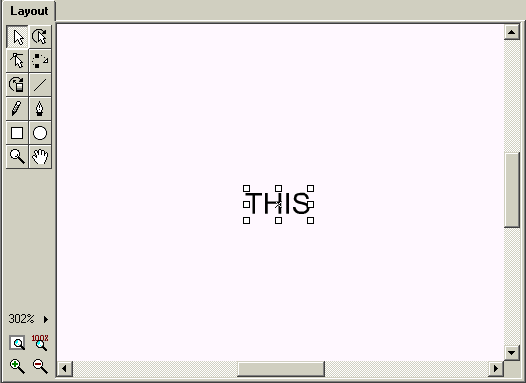
5. Select the Text Panel and change the word 'Text' to the word 'THIS' in the text window. Change the font size to 48 point from the drop-down font size menu, or by or entering 48 in the font size box of the 'Text' Panel  
 
The 'Layout' Panel should look like this:  
tute1_2.png  
 
5)In the Timeline Panel, click on Frame 0 in the row for 'THIS'. Ppress the addeffect.png 'Add Effect' button which is on the left of the Timeline Panel. Select Fade In from the dropdown menu. The Fade In Settings dialog box will appear. From the 'Fade In Settings' dialog box, uncheck the Continue from previous Effect box to access the Start At tab. From the Start At tab, select X Scale | Scale Factor, and enter the value 20 in the % edit box and press enter. Select the Motion tab, and select X Scale | Resize to 100%. Press the 'Close' button, at the top right of the dialog, to close the dialog.  
 
The Timeline should look like this:  
tute1_3.png  
 
6.Press the playmovie.png Play Movie button on the Control Toolbar. You should see the word 'THIS' increase in scale as it fades in. This will continue to loop. Press the stopmovie.png Stop button.  
7.Click on Frame 14 in the row for 'THIS'. Press the addeffect.png 'Add Effect' button, and select Fade Out from the Menu. Press the 'Close' button in the Fade Out Settings dialog box to accept the default settings  
 
Now the Timeline should look like this:  
tute1_4.png  
 
8.Press the playmovie.png 'Play Movie' button. You should see the word 'THIS' fade in, and then fade out. Press the stopmovie.png 'Stop' button  
 
9.Right-click on the Fade Out Effect in the Timeline, and select 'Properties' from the context Menu to access the 'Fade Out Settings' dialog box. Change the Duration from 10 to 4  
 
10.Press the playmovie.png 'Play Movie' button again. You should now see the word 'THIS' fade out faster than before, because you have shortened its duration. Press the stopmovie.png 'Stop' button  
 
11.Press the inserttext.png 'Insert Text' button. By default, the last word that was selected while the Text Panel was active will be duplicated. You will not see this word as the text will be directly over your first word on the stage, but it will appear in the Timeline and the Outline Panel. In the Text Panel, change the word 'THIS' to the word 'IS', the font size should be set to 48 point  
 
12.Press the inserttext.png 'Insert Text' button to create a third word. Change this word to 'MY' and leave the font size at 48 point  
 
13.Press the inserttext.png 'Insert Text' button again to create a fourth word, change this word to 'MESSAGE' and leave the font size at 48 point  
 
14.From the Timeline, click on the Fade In Effect you created for the word 'THIS' and while holding the Shift key down, click on the Fade Out Effect next to it. Both the Fade In and the Fade Out Effects should be highlighted. Right-click, and select Copy Effect from the context Menu. You may need to resize of scroll the timeline so you can see the rows you want to working on.  
 
15.On the Timeline right-click at Frame 17, next to the word 'IS' and select Paste Effect. Paste these Effects at Frame 34 next to the word 'MY' and at Frame 51 next to the word 'MESSAGE'  
 
The Timeline should now look like this:  
tute1_5.png  
 
16.Click on the Fade Out Effect for the word 'MESSAGE' to select the effet, then Right-click on it and select 'Properties' from the context Menu. The 'Fade Out Settings' dialog box should appear. Select the Motion Tab, and select X Scale | Resize to Scale and enter the value 400 in the % edit box, press enter and the click on the Close button  
 
17.Press the playmovie.png 'Play Movie' button on the Toolbar. You should now see the sequence of words 'THIS', 'IS', 'MY', fade in while increasing in scale and then fade out. The Word 'Message' will fade in while increasing in scale and then fade out while increasing in scale. Press the stopmovie.png 'Stop' button  
 
18.Now press the savemovie.png Save Movie button on the Toolbar. You should now see the 'Save As' dialog box. Type 'myfirst' into the File name edit box and press Save. Your Movie has now been saved as a .swi file and can be opened at a later time  

You are ready to continue with the Importing and Working with Images and Vector Graphics tutorial.


[Previous] [Main] [Next]