[Previous] [Main] [Next]
The 'Layout' Panel shows how objects are arranged in the workspace. You can arrange and edit objects, as well as preview Movies, Scenes or Effects in this Panel.
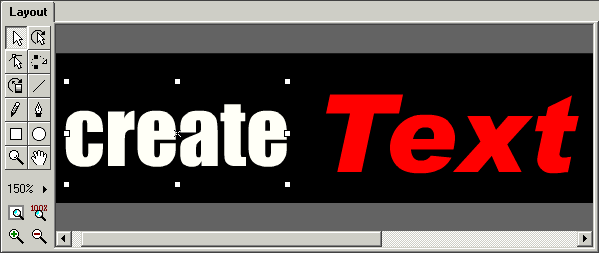
The 'Layout' Panel has three components:
The Workspace and Stage
The main area of the 'Layout' Panel is the workspace. The area within the workspace that corresponds to the viewable area of your Movie is called the stage.
Scroll bars automatically appear on the right and bottom of the workspace when the entire stage area does not fit within the 'Layout' Panel. In the picture above, the stage is too wide to fit in the 'Layout' Panel, so a scroll bar is displayed at the bottom. You can pan the workspace by moving the scroll bars or by using the Pan tool.
You can choose to display a Ruler at the top and left edges of the workspace. This helps you see x and y positions in pixels. Use the Rulers option on the View Menu or on the Movie Panel to turn the Rulers on or off. You can also choose to display a Grid over the workspace. Use the Show Grid option on the View Menu or on the Movie Panel to turn the Grid display on or off.
The Toolbox
The Toolbox is located along the the top-left edge of the workspace and contains the tools that operate on the stage/workspace. The selected tool determines what SWiSH does when you click and drag the mouse on the workspace.
The Zoom Controls
The Zoom controls are fixed to the bottom left of the workspace and allow you to change the scale of the stage/workspace. You can increase the amount of Movie visible by zooming out, or see more detail by zooming in. You can also use the Zoom In or Zoom Out functions or the Zoom tools on the View Menu.
The Layout Panel has three modes of operation:
Editing Mode
While in editing mode, you can arrange and edit objects for the current Scene. You can show a context Menu by right-clicking on an object or an unused area of the workspace. From this Menu you can perform various operations on the Scene or object. You can also use the Main Menus and Toolbars.
When you are using the Select, Rotate or Reshape tool, you can select an object in the 'Layout' Panel by clicking on it. To select multiple objects use Shift+Click or Control+Click. You can select an object within a Group or Sprite using Shift+Control+Click. You can move an object by dragging it. This changes the reference position of the object.
The object you have selected is displayed with 'handles' around it. Handles are small squares, or circles, at the bounding edges of the object. You can change the object or its Transform by dragging the handles that appear around it.
When a drawing tool is active, clicking and dragging will perform whatever action is appropriate for the selected drawing tool.
Preview Frame Mode
You can select 'Preview Frame' mode by selecting the Preview Frame option from the Control Menu or the Control Toolbar, by clicking on the Frame Ruler in the Timeline Panel, or by selecting the Motion Path tool. You can return to editing mode by turning off the 'Preview Frame' option, or by clicking on the Frame Ruler in the Timeline Panel.
When in 'Preview Frame' mode, the handles around the currently selected object are red and a red play head appears on the Timeline Panel. Any Motion Path for the currently selected object is indicated by a dotted line. Each dot on the Motion Path line corresponds to the position of the object at a given Frame. The motion is made up of one of more Effects. The last Frame of each Effect is called a Keyframe, and is indicated by a larger blue dot in the Motion Path.
Most of the things you can do in editing mode you can also do while in 'Preview Frame' mode. However, you can only make changes to the current Transform for an object (that is, position, scale, angle, skew, color or alpha) when a Keyframe is selected in the Timeline Panel. When in 'Preview Frame' mode, you can edit the Motion settings for the current Effect, rather than the reference position. This means you can directly edit the Transforms for a given Effect.
If you are using the Motion Path tool, then you can add Move Effects to the Motion Path by simply clicking the mouse. If you are using the Select, Rotate or Reshape tools, then you can double-click to add to the Motion Path.
Play Mode
You can view play mode by selecting Play Movie, Play Scene or Play Effect from the Control Menu or Control Toolbar. This previews the Movie inside the 'Layout' Panel as it would appear on a web page or in the Flash Player. Play Movie plays all the Scenes of the Movie in sequence. Play Scene plays only the current Scene. Play Effect starts at the first Frame of the first selected Effect and plays until the last Frame of the last selected Effect. If you have selected only one Effect, it will play the Frames for that Effect only. You can also select Play Effect from the 'Effect Settings' dialog box.
If you have checked the 'Loop preview animation' checkbox in the Movie Panel, then the preview will repeat until you stop it, otherwise it will play once and stop.
You can return to editing or 'Preview Frame' mode by selecting Stop from the Control Menu or Control Toolbar.
When in play mode, the currently selected object does not show its handles. Right-clicking on the 'Layout' Panel shows a context Menu with information about the Flash Player, rather than the usual right-click context Menu. In this case, the 'Layout' Panel effectively become a Flash Player window. Also, you cannot select objects or drag them about in the 'Layout' Panel.
[Previous] [Main] [Next]