
The charge indicator (
 ) turns off
when the battery is fully charged.
) turns off
when the battery is fully charged.
To charge the battery pack, install the battery pack in the computer and connect the AC Adapter.
When charging starts,
the battery status indicator looks like this:
The charge indicator () turns off
when the battery is fully charged.
|
Note:
|
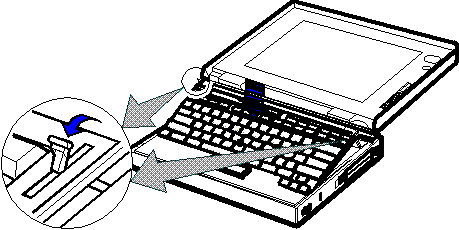
The battery pack can be replaced with computer power on or off. To replace the battery pack without turning off the computer, follow these instructions:
| Important |
|---|
| If you are using PC Cards, either connect the AC Adapter or stop the PC Card application and remove the PC Card before doing the following. |
|
Attention:
|
The computer automatically enters suspend mode. Wait for the beep, which indicates that the computer has completely entered suspend mode.
 Go to step 5.
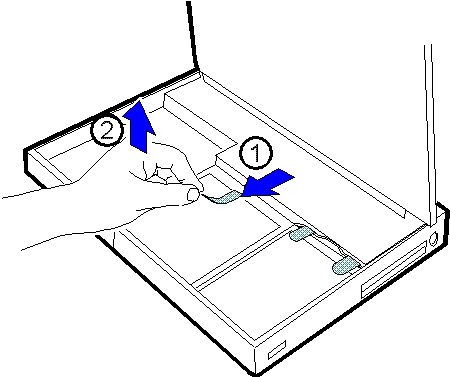
 Lift the handle on the CD-ROM drive with
the plastic tape, and remove the CD-ROM drive.
Lift the handle on the CD-ROM drive with
the plastic tape, and remove the CD-ROM drive.
|
Attention:
|
Some pressure might be needed to remove the CD-ROM drive if
it is tight.
 Go to step 8.
Reinstall the CD-ROM drive.
Go to step 8.
Reinstall the CD-ROM drive.
|
Attention:
|
Make sure the CD-ROM handle snaps into place after installing the CD-ROM drive.
If the computer does not resume normal operation, press the Fn key.
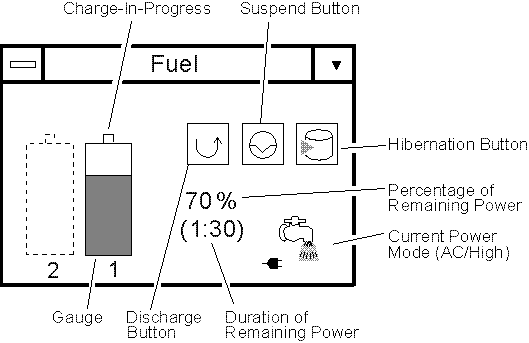
Battery power conditions can be determined through the battery status indicator and the Fuel-Gauge program.
The battery status indicator ( )
shows the current status of the battery pack.
Also, the remaining battery power in digits is displayed.
(Ref #50.)
)
shows the current status of the battery pack.
Also, the remaining battery power in digits is displayed.
(Ref #50.)
| Battery Status Indicator | Remaining Power
(Percentage) | Status/Action Required |
|---|---|---|
 | 100%-Less than 25% | Enough power remains for computer operation. |
 | 0% | Empty |
 (Blinking) | Approximately 10 minutes remains for operation. | The battery pack is almost discharged and is
about to enter the low-battery condition.
Take either of the following actions immediately:
|
| Percentage of charging completed. | The battery pack is being charged (only appears when the AC Adapter is connected). |
 | Percentage of discharging completed. |
The battery pack is being discharged (or is being used).
|
| Off (Not displayed) | -- |
|
|
Note:
|
|
Attention:
Do not leave the computer in this condition for an extended period of time. Data in memory will be lost. |
|
Note:
|
|
Note:
|
Remaining Battery Indicator shows the amount of
remaining battery power by a percentage
( ), day
(
), day
( ),
hour (
),
hour ( ), or hours and minutes
(
), or hours and minutes
( ).
).
When using a secondary battery, the percentage indicates the total remaining power for both battery packs, up to 100%.
| Hints |
|---|
|
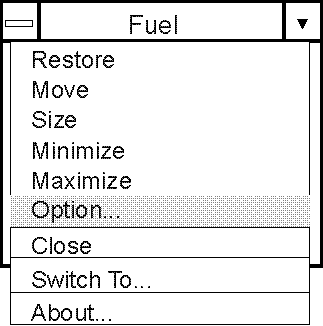
To change the display of remaining power between
hours and percent, select Option...
from the pull-down menu of the Fuel-Gauge program; then
click on your choice to display the remaining power
in either hours or percent.
|
|
To install the ThinkPad Features program
with the Fuel-gauge program:
|
The Fuel-Gauge program displays the following battery-pack conditions on the screen:
The Fuel-Gauge program is available in OS/2 or Windows.
(Ref #52.)
When you click on the Fuel-Gauge icon
in the ThinkPad Features
window, the Fuel-Gauge program appears. When you minimize the
program to an icon, every time you press the
Fn+F2 key
combination, the Fuel-Gauge icon appears or disappears alternately
from the screen.
For more information on how to use Fuel-Gauge program, see the online help. (Click the button at the left upper corner of the Fuel-Gauge window.)
When the battery pack needs to be discharged,
the computer prompts you with a message. To discharge the battery,
connect the AC Adapter to the computer and
click on the discharge button ( ) on the
Fuel-Gauge program.
) on the
Fuel-Gauge program.
|
Note:
|
The discharge-in-progress
( ) appears above the gauge symbol, and
the charge button (
) appears above the gauge symbol, and
the charge button ( ) appears in place
of the Discharge button.
) appears in place
of the Discharge button.
You can use the computer while the battery pack is discharging; however, do not enter suspend mode or turn off the computer until the discharge is complete. Complete discharging of the battery pack takes time.
When the battery pack is completely discharged, charging starts automatically.
To cancel discharging, click on the charge icon
().
To preserve the life of the battery pack:
|
Attention:
|
To save battery power:
APM allows you to reduce power consumption when your applications and devices are idle. Each operating system comes with its own APM.
If you have purchased the computer with a preloaded operating system, APM is already installed correctly.
Adjust the brightness control on the LCD to the lowest level possible that allows you to comfortably view the screen. This is an effective way of conserving battery power.
When you are operating the computer with battery power,
the LCD brightness is automatically decreased to save power.
However, if you want to see the bright LCD even when in battery
operation, do the following:
 ) icon
at the right side.
) icon
at the right side.
See the next section.
Your computer has the following built-in battery power-saving functions to save power when you use the battery pack or AC Adapter:
|
To install the ThinkPad Features program:
|
When resuming normal operation from one of the modes, use the resume function to return to where you were when you entered that mode. Because the operating system is already loaded, the resume function is faster than turning the power on.
The following are the three power-saving modes:
It takes more time to return to normal operation from suspend mode than to return from standby mode, but the computer does not use as much power.
The following figure shows the operations required when the computer
moves from a power-off condition to operation mode, and vice versa.

In standby mode, the LCD (and external monitor output) turns off. The computer immediately resumes normal operation when you press any key or use any pointing device.
To enter standby mode, press Fn+F3. You can also set the standby timer using the ThinkPad Features program. (To return to normal operation, press any key.)
The computer provides the following two types of suspend modes for you to save power:
To enter suspend mode, do one of the following:
When the computer is entering suspend mode,
the suspend indicator lamp ( )
blinks
first, and then stays on (in green) with a beep.
The power indicator lamp (
)
blinks
first, and then stays on (in green) with a beep.
The power indicator lamp ( )
turns off.
)
turns off.
To return to normal operation, press the Fn key.
In suspend mode, all tasks are stopped and stored in memory to save power. When the computer resumes normal operation, the tasks are automatically restored.
In RediSafe suspend mode, all tasks are stopped, and memory data and the status of the computer are stored on the hard disk drive. This prevents accidental loss of data during suspend mode. Resuming normal operation is faster in RediSafe suspend mode than it is in hibernation mode; the computer resumes normal operation when you press the Fn key in RediSafe suspend mode.
If all battery power is used and the computer turns off during RediSafe suspend mode, install a fully charged battery pack or connect the AC Adapter; then press the power switch to resume operation. All tasks are restored. Create the hibernation file before using this mode. (See "Creating the Hibernation File".)
To enable RediSafe suspend mode, first, create
the hibernation file; then set RediSafe suspend
in the ThinkPad Features program's Battery
( ) menu.
For more information, see the ThinkPad Features program
online help, or use PS2 commands.
) menu.
For more information, see the ThinkPad Features program
online help, or use PS2 commands.
Consider the following before using suspend mode.
| Important |
|---|
|
When you use Windows Version 3.11, ensure that Advanced Power Management (APM) is installed according to the instructions in "Installing Microsoft Windows Version 3.11". |
If communication for a PC Card is not reestablished after resuming normal operation, remove and then reinstall the PC Card before restarting the system or application program. For other kinds of PC Cards, if the PC Card or computer does not operate, restart the application or computer.
|
Note:
|
The following are the considerations when you use PC Card Director.
|
Standby mode:
|
When other PC Cards are used and the computer enters suspend mode, all application programs stop. Communication also stops for communication PC Cards not in the preceding list. For some PC Cards, power to the PC Cards might also turn off.
|
Note:
|
While a communication link is active, the computer does not enter suspend mode.
In hibernation mode, all tasks are stopped and
memory data and the current status of the computer
are stored on the hard disk drive; then power is
turned off. No battery power is used.
When power is turned on again, the computer
automatically restores the tasks and resumes normal
operation.
|
Note:
|
To enter hibernation mode, press Fn+F12. To return to normal operation, turn on the power switch.
Before you can use hibernation mode, you must first create a hibernation file. See the next section.
|
Attention:
|
|
Note:
|
The size of the hibernation file will be greater than total memory. For example, if base memory is 32MB and you have installed an optional 16MB memory module (DIMM), the hibernation file is 49MB:
(32MB + 16MB) + 1MB = 49MBSee the ThinkPad Features program online help or PS2 command help on how to create the hibernation file.
Consider the following before using hibernation mode:
|
Note:
|
This prevents possible problems from occurring with communication application programs after the computer returns to normal operation.
 ) stands for
the secondary battery pack installed in the UltraBay.
) stands for
the secondary battery pack installed in the UltraBay.


 ) option.

 ) icon; then select the
Resume on incoming call option.
) icon; then select the
Resume on incoming call option.