IBM ThinkPad 380 or 380D User's Guide
[ Bottom of Page | Previous Page | Next Page | Table of Contents | Index ]
Installing DOS Software

This section describes the installation procedures for
DOS Version 7.0 and its device drivers for
your ThinkPad computer.
| Important |
|---|
|
Before reinstalling the operating system and device drivers,
you need to create all installation diskettes
using
the Diskette Factory program (a diskette backup program
that is preloaded
on your computer).
|
(Ref #96.)
To install DOS,
follow the instructions in the operating-system documentation.
If you also are installing Microsoft Windows Version 3.11,
go to "Installing Microsoft Windows Version 3.11".
(Ref #97.)

Note:
When installing an operating system, you need to
install the CD-ROM device driver.
Note:
The default subdirectory is C:\CDROM\.
To install the CD-ROM device driver:
- Start DOS.
- Insert the CD-ROM device driver diskette
into the diskette drive; then
type A:UINSTALL and press
Enter.
- Follow the screen instruction.
- Select Install IBM ThinkPad CD-ROM Driver for
DOS/Windows at the Installation Options screen,
then follow the instructions on the screen.
- After the installation is complete,
remove any diskette from the diskette drive
and restart the computer.
(Ref #98.)
When the CD-ROM device driver is installed in your computer,
the installation program (UINSTALL.EXE) automatically
modifies the CONFIG.SYS file and AUTOEXEC.BAT file.
The following are the parameters for the CD-ROM device driver
for CONFIG.SYS:
DEVICE=[drive:][path]IBMTPCD.SYS [/C] [/S]
The CD-ROM device driver is IBMTPCD.SYS.
Make sure this line is inserted after the EMM386 statement.
- [/C]
- Sets the cache size in the XMS memory. When this parameter is
set, the cache size in the XMS memory is 512 sectors. When it is
not set, the default is 0.
- [/S]
- Sets the power-saving mode to OFF. When using DOS with another
operating system (for example, when using it with OS/2
in dual boot), set the power-saving mode to OFF using this parameter.
(Ref #99.)
| Note |
|---|
- For the software parameter in the AUTOEXEC.BAT file,
refer to the README file in the CD-ROM diskette.
- If you are using DOS SMARTDRV caches and planning to
use a photo CD or multisession discs, you have to add the
/U parameter to the SMARTDRV line in the AUTOEXEC.BAT
file. This is because photo CDs or multisession discs
are not compatible with the SMARTDRV caches.
- To be able to play CD-i movies in Windows Version 3.11,
do not cache the CD-ROM drive by the SMARTDRV Version 5.0 or
5.1, which is supplied with PC DOS Version 7.0.
|
(Ref #100.)
Note:
When installing an operating system, you need to
install the ThinkPad Features program.
To install the ThinkPad Features program:
- Start DOS.
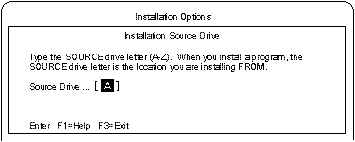
- Insert the Utility Diskette for DOS into the diskette drive; then
type A:UINSTALL and press Enter.
The following screen appears:

- Press Enter.
- Select
Install DOS ThinkPad Features
at the Installation Options screen;
then follow the instructions on the screen.
(Ref #101.)
To use the PC Cards in DOS, install the
CardSoft ** software:
- Insert the
diskette containing the CardSoft software.
- At the DOS command prompt, type a:
and press Enter.
- At the A:\> prompt, type install
and press Enter.
The installation panel appears.
- Follow the instructions on the screen.
During installation, use the Arrow keys
(V or ^) to highlight your selection;
then press Enter.
- After the installation is complete, remove any diskette from
the diskette drive and restart the computer.
To install the audio device driver:
- Start DOS.
- Insert the Audio Support diskette for Windows 3.1 into the
diskette drive.
- Type A: and press Enter.
- Type Install and press Enter.
[ Top of Page | Previous Page | Next Page | Table of Contents | Index ]
�