Attaching an External Keyboard
Note:
When installing an operating system, install the PC Card support
software that is on the PC Card Installation Diskette
before using the PC Card slots.
To install the PC Card support software:
 "Installing Software".
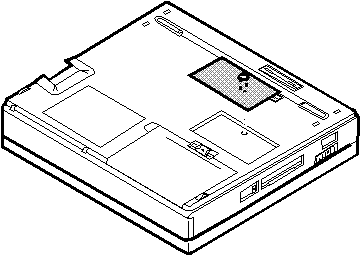
The computer has two PC Card slots (upper and lower slot)
to install two Type I or Type II PC Cards
(one in each slot), a single Type III PC Card (in
the lower slot), or a single Zoomed Video port card (in the
lower slot).
This section explains how to install and remove a
card from the PC Card slot.
For information about operating the computer with PC Cards,
refer to "Using PC Cards".
- Find the notched edge (1) of the
card as shown.
Note:
If you are using a PC Card with an XJACK **
connector, insert it into the upper slot.
If you are using a Zoomed Video port card, insert the card into
the lower slot.
- Insert the
card into an appropriate slot
according to your
card type. Slot covers
fold to the inside when you insert the cards:
- If you are using a Type I or Type II PC Card,
insert it into either the upper slot (A) or the lower
slot (B).
- If you are using a Type III PC Card,
insert the card into the lower
slot (B).
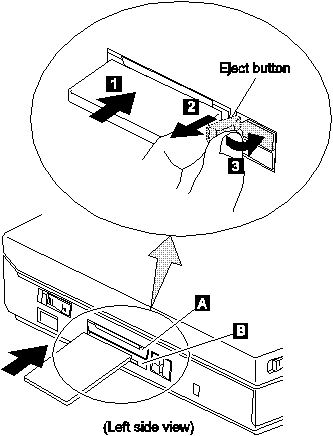
Press the
card firmly into the connector (1) until
the eject button pops out (2).
Then, pull the eject button out slightly and
fold it to the right(3).
You have completed the installation of the card.
Refer to the following sections:
- To use PC Cards, see "Using PC Cards".
- To use PC Cards with power-saving functions, see:
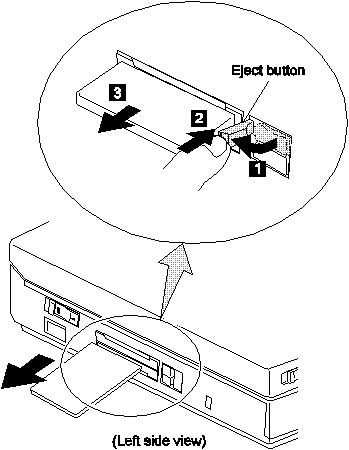
Raise the PC Card eject button (1)
for the
card you want to remove.
Then, press the PC Card eject button (2) until the
card pops out.
Remove the
card (3) and save it for future use.
Increasing the Memory Capacity
(Ref #79.)
Note:
IC DRAM cards cannot be used with 380 or 380D computers.
Increasing the memory capacity is an effective way to make
programs run faster.
You can increase the amount of memory in your computer by installing
a dual inline memory module (DIMM),
available as an option.
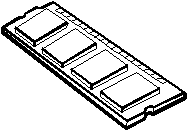
You can insert a DIMM directly in the memory slot
on the bottom of the computer and
expand
your computer memory capacity.
| Important |
|---|
|
Changing memory while your computer is in suspend mode or
hibernation mode may cause permanent damage to the equipment.
Make sure you turn off the computer power when
changing memory.
|
(Ref #80.)
Attention:
To avoid damaging the DIMM, do not touch
its contact edge.
- Turn off the computer; then disconnect the AC Adapter and
all cables from the computer.
- Touch any metal object with your hand to
release any static electricity.
- Turn the computer over.
- Loosen the screw on the memory slot cover
and remove the cover.
- Which are you going to do?
- Install a DIMM
- Go to the next step.
- Remove a DIMM
- Go to step 7.
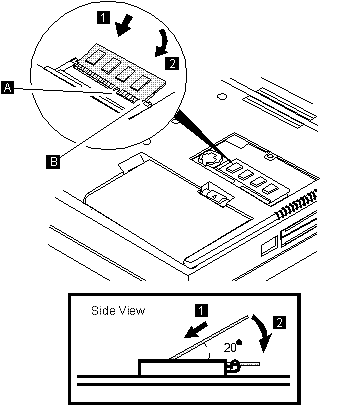
- Install the DIMM into the memory slot:
- Find the notches (A)and (B) on the edge of the DIMM.
- With the notched end of the DIMM
toward the right side of the socket (B),
insert the DIMM, at an angle of approximately 20°,
into the socket; then press it firmly.
- Pivot the DIMM until it snaps into place.
- Go to step 8.
- Remove the DIMM from the memory slot:
Attention:
To avoid damaging the DIMM, do not touch
its contact edge.
- Press out on the latches on both edges of
the socket at the same time.
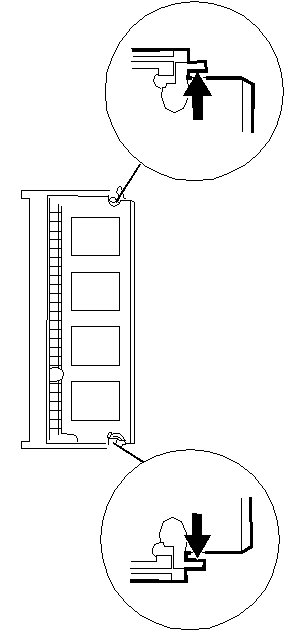
- Remove the DIMM.
Be sure to save the DIMM for future use.
- Go to the next step.
- Place the memory slot cover over the memory slot; then
install the screw back into its place.
- Turn the computer over again.
- Open the LCD and power on the computer.
- To confirm that the DIMM is correctly attached
to the computer, do the following:
Note:
1Megabytes=1024Kilobytes
- Calculate your total memory size in kilobytes (KB)
by adding the DIMM memory size to the base memory size
(16,384KB).
For example, if you installed a 16Megabytes DIMM,
calculate the total memory size as follows:
16(Megabytes) x 1024(Kilobytes) + 16000(Kb) = 32384(KB)
Note:
To start Easy-Setup, press and hold F1; then turn on
the computer.
- Start Easy-Setup and confirm the memory size count at the
upper left corner of the screen as shown:
+--------------------------------------------------+
| 032384 KB OK                                     |
|                                                  |
|                                                  |
|                                                  |
+--------------------------------------------------+
If a 201 error code appears under the memory count,
turn off the computer and
go to reference #80 to reinstall the DIMM.
+-------------------------+
| 032384 KB OK            |
|                         |
| 201                     |
|                         |
+-------------------------+
- Is the total memory size the same as the value
you calculated in step 1?
- Yes
- Go to the next step.
- No
- Turn off the computer and
go to reference #80 to reinstall the DIMM.
- Select Test from the main menu of Easy-Setup;
then select Memory.
The memory test starts.
Note:
It may take some time to complete the memory test.
- Does an OK message now appear
under the Memory icon?
- Yes
- You have installed the DIMM correctly.
Exit Easy-Setup and go to the next step.
- No
- You need to reinstall the DIMM.
Go to reference #80 and reinstall the DIMM.
- Reconnect all cables.
You have completed the installation or removal of the DIMM.
| Important |
|---|
|
If you changed the memory installed in the computer
and were using hibernation mode,
you need to create a new hibernation file.
See "Creating the Hibernation File".
|
(Ref #81.)
Attention:
When you connect a mouse other than
an IBM PS/2
Miniature Mouse,
turn off the computer.
Be careful not to insert the connector upside down
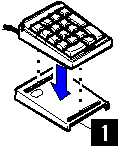
An external numeric keypad or a mouse can be attached directly to
the connector on the rear of the computer.
You can use both the
IBM PS/2 Miniature Mouse
and TrackPoint III as
the pointing device.
Note:
You can remove the keypad cover (1) and use it as a
stand for the keypad.

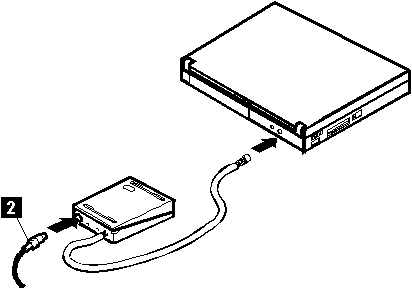
If you want to use the external numeric keypad and mouse
at the same time, first connect the
keypad cable to the computer; then connect
the mouse cable (2) to the connector at the rear of the keypad.
(Ref #82.)
(Ref #83.)
Note:
The appropriate software must have already been installed.
A serial mouse connected to the serial port or
a device that is not compatible with the PS/2 Mouse
can be connected to the external input-device connector.
Some mouse types require the TrackPoint III to be disabled
before you can use them.
To disable the TrackPoint III:
With OS/2 or Windows:
- Start the ThinkPad Features program.
- Click on the Keyboard/Pointing-Device
(
 ) icon.
- Click on Disable for the TrackPoint.
These changes become effective when computer power is
turned off and then on again.
| Using the IBM ThinkPad Space Saver Keyboard |
|---|
|
When using the IBM ThinkPad Space Saver Keyboard,
do not install the device driver supplied with the
Space Saver Keyboard. When the Space Saver Keyboard is used,
the device driver on the computer's Utility Diskette
automatically enables or disables the
TrackPoint III of the computer when power
is turned on.
|
(Ref #84.)
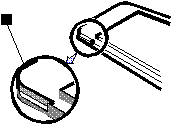
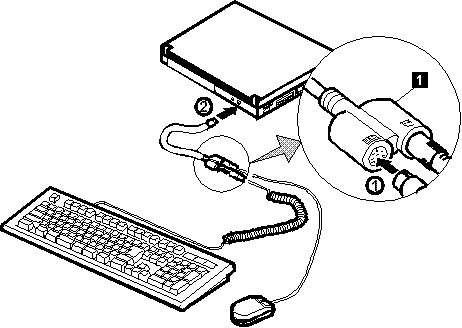
You can connect an external keyboard to your computer
through the keyboard/mouse connector (1)
(available separately as an option).
Note:
The computer enters suspend mode when the LCD is closed.
If you want to use the computer with the LCD closed, set
the suspend option in the ThinkPad Features program so
the computer does not enter suspend mode when the LCD is closed.
Be careful not to insert the connector
( )
upside down.
)
upside down.
ThinkPad Features program:
reference #15.
The external keyboard must be connected through
the keyboard/mouse connector. It will not work
if it is connected directly to the computer.
When the external keyboard is attached, the following
keys are not available:
- Numeric keypad on the computer keyboard.
- External numeric keypad.
You should use the numeric keypad
on the external keyboard.
When you attach the external keyboard,
turn off the computer, attach the keyboard to the
keyboard/mouse connector ( ), and then
attach the keyboard/mouse connector to the computer
().
), and then
attach the keyboard/mouse connector to the computer
().
[ Top of Page | Previous Page | Next Page | Table of Contents | Index ]
�