 "Installing Software".
Using the ThinkPad Features Program
Note:
When installing an operating system, you must also install the ThinkPad
Features program.
To install the ThinkPad Features program:
"Installing Software".
ThinkPad Features is a control program that allows you to configure your computer. Using the ThinkPad Features program, you can easily set up and customize the built-in devices, such as a parallel port or an infrared port.
It also provides the Device Configuration Management System, which automatically detects a system resource (such as IRQ, DMA, I/O address, or memory) conflict, so that you can easily set up your computer configuration for the new device or software. For more detail about each device's resource, see Appendix A. "Avoiding Hardware Conflicts".
ThinkPad Features also provides various features for your computer such as:
Fuel-Gauge program:
reference #51.
Personalization editor program:
reference #75.
The way you start the ThinkPad Features program depends
on the operating system.
 
|
 
|
To start the ThinkPad Features program:
In the ThinkPad Features window, you can:
| For your information |
|---|
| A Help button is available on the screen. For additional information on each menu item, click on the help button. |
Note:
Any buttons on the screen that appear
in gray are options that cannot be set.
(Ref #17.)
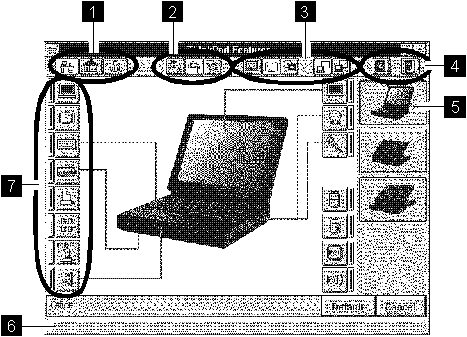
Click on one of the buttons to set the system
configuration automatically to fit
your office ( ), or
your home (
), or
your home ( ), or to
customize it (
), or to
customize it ( ).
).
Click on one of the buttons to set the power mode for
the battery operation to the
high performance mode ( ),
the automatic mode (
),
the automatic mode ( ),
or the customized mode (
),
or the customized mode ( ).
(Ref #18.)
).
(Ref #18.)
Click on one of the buttons to set the display output type to
the LCD ( ), an
external monitor (
), an
external monitor ( ), or
both (
), or
both ( ).
).
When making a presentation, you can
click on the presentation
button ( ) to disable any system timers,
such as turning the LCD off or entering a power-saving mode.
) to disable any system timers,
such as turning the LCD off or entering a power-saving mode.
Click on the left button for help. Click on the right button to save the changes made and exit the ThinkPad Features window.
Click on the buttons representing the front or the rear view to display the choices and options from that computer view.
When you place the cursor on a device button, the device name and its status appear in this status bar.
Click on the button of your choice from the screen; then set the options for that device in the window that appears.
When the device is enabled, the red indicator next to the icon is lit. Otherwise, it is disabled.
Click on the Cancel button to exit the ThinkPad Features program without saving the changes. Click on the Default button to set the default values for each option and cancel the changes you have made.
When you press the minimize button in the top-right corner
(
), the
following Tool Bar view is displayed:

(Ref #19.)
| Note |
|---|
You must share three DMA channels (0, 1, and 3) with the following
four system resources.
The default values are also described:
When enabling ECP and choosing one DMA channel for a parallel port, you must release the system resource that had been assigned as a DMA channel. |

Notes:
+----------------------------------------------------------------------+
|C:\>PS2 ?                                                             |
|                                                                      |
|(C) Copyright IBM Corp. 1993,1996. All rights reserved.               |
|    US Government Users Restricted Rights - Use, duplication          |
|    or disclosure restricted by GSA ADP Schedule Contract             |
|    with IBM Corp.                                                    |
|                                                                      |
|Command Syntax:  PS2   [Parameter1] [Parameter2] [Parameter3]         |
|                                                                      |
|Following are available [Parameter1].                                 |
|For the complete command syntax, type 'PS2 ? [Parameter]'.            |
|                                                                      |
|1.Power Management related                                            |
|                                                                      |
+----------------------------------------------------------------------+
You can select an item from the menu and follow the instructions on the screen to set any of the features. For details on the commands, see Appendix C. "Using PS2 Commands".
You can create a batch file to set your unique operating environment quickly and easily.
Note:
Refer to the manuals supplied with the operating system for more
information on batch files.
(Ref #21.)
The following example
batch file allows you to set up an operational
environment that is suitable for traveling and can result in
longer battery operation time.
@Echo Off

Rem  SAMPLE: Set the parameters to provide maximum power utilization.
Rem  ================================================================


          PS2 PMode Auto                      > Nul
          PS2 LCd 3                           > Nul
          PS2 DISK 3                          > Nul
          PS2 POwer 5                         > Nul
          PS2 SPeed Fixed MIN                 > Nul
          PS2 STandby 3                       > Nul
          PS2 IR OFf                          > Nul
          PS2 SErial OFf                      > Nul
|