 General Options
General Options is where the options for the entire tool are set. Everything
from the format for procedure headers to the prefix used for Strings.
General
First Frame - General Frame
This contains options that control TurboVB generally.
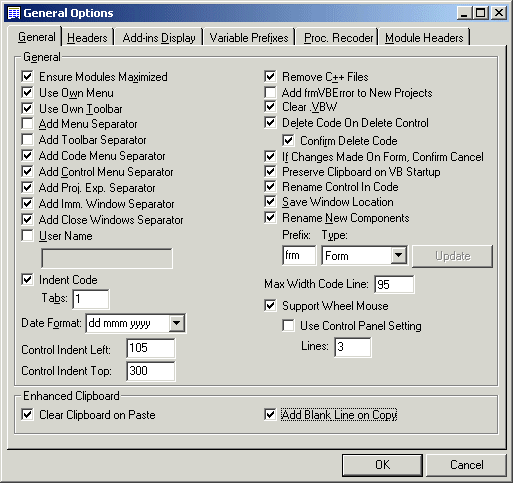
Tab 1 - General
The various options are listed and described in detail below: -
- Ensure Modules Maximized - When this is selected the code windows will be maximized automatically
- Use Own Menu - Create a menu for TurboVB
- Use Own Toolbar - Create a toolbar for TurboVB
- Add Menu Separator - This is used to add a separator between the TurboVB menu items and the other items in the VB Add-ins Menu
- Add Toolbar Separator - This is used to add a separator between the TurboVB toolbar items and the other items in the standard VB toolbar
- Add Code Menu Separator - This is used to add a separator between the VB menu items and the TurboVB items in the Code Menu.
- Add Control Menu Separator - This is used to add a separator between the TurboVB Control Menu items and the others.
- Add Proj. Exp. Menu Separator - Select this if you want to add a separator between the standard and TurboVB items in the Project Explorer.
- Add Imm. Window Separator - Select this if you want a separator in the Immediate Window.
- Add Close Windows Separator - Select this if you want a separator in the VB Windows menu.
- User Name - If selected the name you enter here will replace the login username
- Indent Code - Indent the code that is produced by TurboVB
- Tabs - The number of tabs used in the option above
- Date Format - The format for the date used by TurboVB
- Control Indent Left - The amount of left indent used by Control Alignment
- Control Indent Top - The amount of top indent used by Control Alignment
- Remove C++ Files - When TurboVB is unloaded the .exp and .lib files, if present in the project folder will be deleted
- Add frmVBError to New Projects - Used to add the supplied form, frmVBError, automatically to new projects. Its used with the 'Show Error' standard error type
- Clear .VBW - When a project is closed this will clear the .VBW file and make it read only.
The effect of this is that when you reload the project it will start with no open windows.
The .VBW file for the project must be read-write initially.
- Delete Code On Delete Control - When a control is deleted, TurboVB can delete the code for it.
- Confirm Delete Code - Confirm that you want to delete the code. If using the above option then this is recommended!!
- If Changes Made, Confirm Cancel - On add-ins with an 'Apply' CommandButton do you want to confirm a 'Cancel' CommandButton click?
- Preserve Clipboard on VB Startup - Simply stops VB from wiping the clipboard when a new project is opened.
- Rename control in code - When a control is renamed all code references to it are updated.
- Save Window Location - Add-ins will remember their previous location and size.
- Rename New Components - New components will be renamed to your standards i.e. frm1, frm2 for new forms.
- Max Width Code Line - Maximum width of a line used in the Split Line function in Proc. Recoder
- Support Wheel Mouse - If selected you can use your wheel mouse to move within a code window - Note: Changes will take effect the next time VB is started
- Use Control Panel Setting - Move the number of lines in the Mouse settings of the Control Panel each turn
- Lines - A custom number of lines to move if the Control Panel setting is not selected
Second Frame - Enhanced Clipboard
This frame contains two options for the Enhanced Clipboard Add-in. First, whether the
clipboard will be automatically cleared on a paste and whether a blank line will be added to each copy command.
Headers
Controls the format of procedure headers
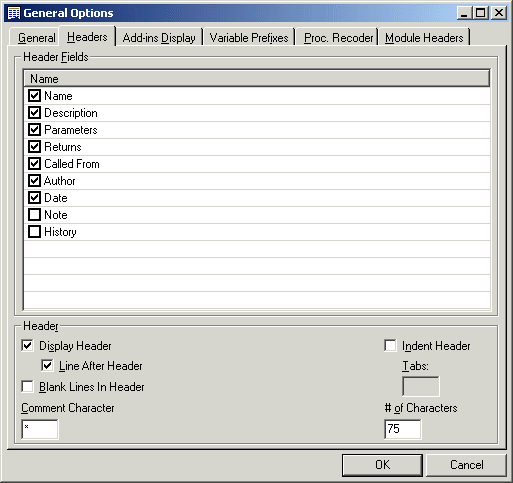
Tab 2 - Headers
First frame - Header Fields
These control the fields used in a procedure header.
Second frame - Header
Controls the format of the procedure header.
- Display Header - Controls whether a header is created for new procedures in Procedure Builder.
- Line After Header - Is a blank line created after the header?
- Blank Lines In Header - Are blank lines used in the header?
- Comment character - What is used as the comment character?
- Indent Header - Is the header indented?
- Tabs - If indented, by how many tabs?
- # of characters - Max. width of longest line.
Add-ins Display
Controls the display and order of the add-ins
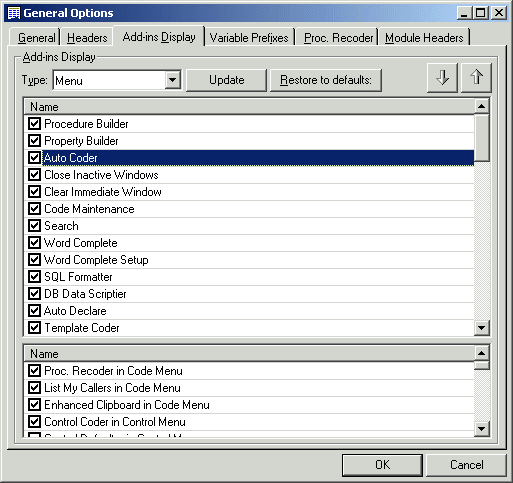
Tab 3 - Add-ins Display
For the main menu and toolbar you can specify what add-ins appear and the order they appear in. Select whether
an add-in appears by checking it. To move a particular add-in up or down in the order first select either 'Menu' or
'Toolbar' at the top left then select the add-in you want and use the 'Up' and 'Down' CommandButtons at the top right. Any
changes need to be confirmed by clicking the 'Update' CommandButton. The Proc. Recoder functions can be added to the
menu and/or toolbar.
By clicking the CommandButton 'Restore to Defaults' you can select to return to the default settings.
For the Code, Control, Immediate, Window and Project Explorer menus you can control whether particular
add-ins will appear. You can also select to have 'Open Folder of File', 'Open File in Notepad'
and 'Revert to Saved Version' in the Project Explorer Menu. You have individual control of the
four tools in the Control Alignment add-in.
Variable Prefixes
Sets the prefixes to be used for different variable types
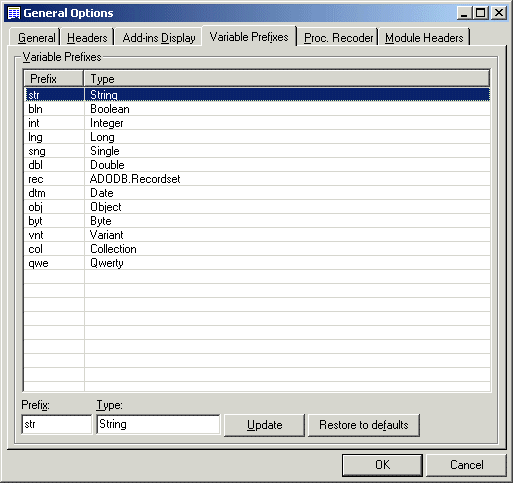
Tab 4 - Variable Prefixes
To amend the prefix for a variable type, select it in the ListView, amend the values in the TextBoxes and click 'Update'.
You can delete a type by selecting it and hitting the 'Delete' key. Add a new variable type by entering the new prefix and
type and click 'Update'. Click 'Restore to defaults' to return to the types and prefixes
created on install.
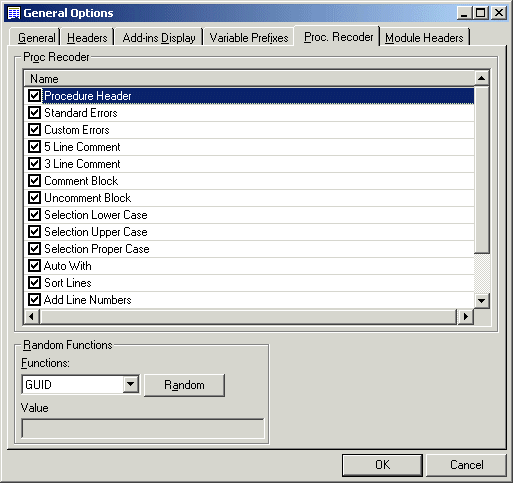
Proc. Recoder
Controls Proc. Recoder and provides some miscellaneous functions
Tab 5 - Proc. Recoder
First frame - Proc. Recoder
Controls the functions that are displayed in the Proc. Recoder Add-in.
Second Frame - Random Functions
Use this to get a random DLL base or GUID value.
Module Headers
Setup a header for modules
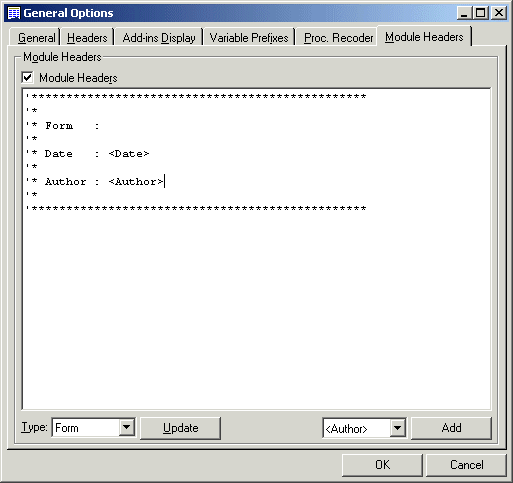
Tab 6 - Module Headers
If 'Module Headers' is selected the defined template for a module type if found will be written out when a new module is
added to a project. Select the module type in the 'Type' DropDown. You can use several 'Standard Elements' in the headers: -
- <Date> - The date, in the format specified in Tab 1
- <Author> - Replaced by the current username or by the setting in Tab 1
- <Project> - Name of the project
Save the header by clicking the 'Update' CommandButton.
'Add Module Header' can be added to the TurboVB menu and/or toolbar and is used to add a header to
existing modules.