
Select an object. > Modify panel > Modifier List > Parametric Modifiers > Slice
Select an object. > Modifiers menu > Parametric Deformers > Slice
Slice cuts through the cake
The Slice modifier lets you create a cutting plane that slices through a mesh, creating new vertices, edges and faces based on the location of the slice plane gizmo. The vertices can either refine or split the mesh according to the selected options.
The Slice modifier slices through groups, selected objects or sub-object selections of faces. It works similarly to the Editable mesh > Edge > Slice function but does not require the objects to be editable meshes. You can animate the cutting plane, changing its position and rotation over time. You can also use the Remove Top and Remove Bottom options to create the appearance and disappearance of objects by animating the Slice Plane gizmo.

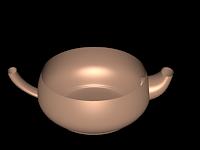

Original object, object without top, and object without bottom, respectively
To create multiple slices in an object you need to apply multiple Slice modifiers. If the geometry doesn't need to remain parametric, you can collapse it into an editable mesh and use the Slice tool available under Editable Mesh (Edge). This tool is easier to use when you need to make multiple slices in an object, but it does not stay parametric.
You can use Slice on sub-object selection sets by slicing or removing only the selected faces. However, because selected faces are sliced and unselected adjacent faces are not, there may be "holes" in the mesh on the edge where the slice occurs. These holes can be problematic, creating discontinuities in smoothing. Holes are created only when Operate On Faces is active.
Procedure
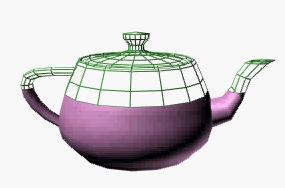
Example: To animate the appearance of a teapot using the slice modifier:
Create a teapot primitive. Set the viewport to wireframe.
Apply a Slice modifier.
The Slice Plane gizmo appears at the base of the teapot.
On the stack display, choose the Slice Plane gizmo.
Turn on the Animate button, and move the time slider to frame 100.
Move the Slice Plane gizmo above the top of the teapot. Play the animation to verify that the slice plane is animated.
Change the Slice type from Refine Mesh (the default) to Remove Top. Play the animation again.
Make a copy of the teapot in the same position (click the Toolbar Array button, and set Array Dimensions > 1D Count to 2).
Put a Wireframe material on the clone and change the Slice type on the clone to Remove Bottom.
Play the animation.
The wireframe teapot magically becomes a fully shaded one.
Interface
Modifier Stack
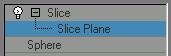
Slice Plane: At this sub-object level, you can transform and animate the gizmo like any other object to determine where the slice occurs. Scaling the gizmo has no effect, because its extents are effectively infinite. If you need to limit the extent of the slice, use it on a sub-object selection set of faces, rather than on the entire object.
For more information on the stack display, see Modifier Stack.
Slice Parameters rollout

Slice Type: Defines how the slice plane will affect the geometry to which it has been applied.
Refine Mesh: Adds new vertices and edges along the intersection of the geometry with the slicing plane. Faces cut by the plane are subdivided into new faces.
Split Mesh: Adds a double set of vertices and edges along the plane boundary producing two separate meshes (one on either side of the slice plane), which you can modify differently if desired. Use this to break a mesh in two.
Remove Top: Deletes all the faces and vertices above the Slice Plane.
Remove Bottom: Deletes all the faces and vertices below the Slice Plane.
Operate On: Choose one of these buttons to specify how the slice handles quads and other polygons.
 Faces: Treats the selection set as a set of triangular faces, slicing each one in turn.
 Polygons: Converts the object to a polygon mesh based on visible edges, eliminating hidden edges.


Operate on Face vs. Operate on Polygon