
Make selection. > Modify panel
The modifier stack ("stack" for short) contains the accumulated history of an object, including its creation parameters and the modifiers applied to it. At the bottom of the stack is the original object. Above the object are the modifiers, in order from bottom to top. This is the order in which modifiers are applied to the object's geometry.
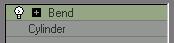
Object with two modifiers applied to it in the stack
See also
In the modifier stack display, objects and modifiers appear in normal type unless they are an instance or a reference. Here is how instances and references appear in the stack display:
The name of an instanced object appears in boldface.
The name of a modifier appears in boldface if it is part of an instanced pipeline.


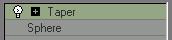
Left: Plain object displayed in plain text
Right: Object instance displayed in boldface

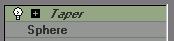
Left: Pipeline displayed in plain text
Right: Pipeline instance displayed in boldface
If a modifier is applied to two or more pipelines, it is called an instanced modifier. Its name appears in italic.
If a modifier is instanced and part of an instanced pipeline, its name appears in boldface and italic.

Left: Instanced modifier displayed in italic (modifier applied to two objects)
Right: Instanced modifier in an instanced pipeline displayed in italic and boldface
A referenced object appears with a dark bar above it. Modifiers below the bar are part of the current pipeline. Modifiers above the bar are unique to the reference object.
Note: You can also create instances of a reference. In this case, the modifier above the reference bar apply to the reference and to its instances.
A modifier above the reference object bar can itself be an instance and appear in other pipelines, in which case its name would be italic (either plain or boldface).


Left: Object reference shows a bar in the pipe
Right: Modifier applied to reference is not bold, as it is unique to this reference
 The Make Unique button makes a pipeline or a modifier instance unique. When you highlight the base object and then click Make Unique, the whole pipeline becomes unique. When you highlight a bold modifier and then click Make Unique, this also makes the pipeline unique. If the modifier is an instanced modifier that belongs to an instanced pipeline (it appears in boldface and italic), clicking Make Unique makes the modifier unique but not the entire pipeline (the modifier's name is no longer italic, but it is still bold).
See also
Understanding Object Data Flow
Procedures
To adjust an object's creation parameters:
Choose the object by clicking its name in the stack.
Primitive objects have a Parameters rollout. Other kinds of objects (such as meshes) have a variety of rollouts.
Use the controls in the rollouts to adjust the object.
To apply a modifier to an object:
Select the object.
Do one of the following:
Choose the name of the modifier from the drop-down modifier list.
Drag the name of the modifier from the stack display or the drop-down modifier list to the object in a viewport.
SHIFT+drag from the stack display moves the modifier, removing it from the original object and applying it to the new one.
CTRL+drag from the stack display copies the modifier, creating an instanced modifier applied to both the original object and the new one.
If the modifier buttons are visible and the modifier you want is one of them, click the button.
Choose the modifier from the Modifiers menu.
To remove a modifier:
Choose the modifier by clicking its name in the stack.
The modifier's name is highlighted, and its control rollouts appear below the modifier stack.
Do one of the following:
 Click Remove modifier from the stack.
This button is one of the tools beneath the display of the modifier stack.
Right-click the modifier's name in the stack, and choose Delete.
To turn the effect of a modifier off, do one of the following:
 Click to turn off the lightbulb icon to the left of the modifier's name in the stack.
When you apply a modifier, the lightbulb icon is on by default.
Right-click the modifier in the stack display, and choose Off.
To turn the effect of a modifier back on, do one of the following:
 Click to turn on the dark lightbulb icon to the left of the modifier's name in the stack.
Right-click the modifier in the stack display, and choose On.
To change the size of the modifier stack display:
Move the cursor over the shaded bar below the tool buttons beneath the stack list.
The cursor changes to an up-and-down resize arrow (as it does on the borders of a resizable window).
Drag the bar up or down to change the size of the stack display in the Modify panel.
To change a modifier's position in the stack:
Right-click the modifier's name in the stack, and choose Cut.
Right-click the name of the modifier you want the modifier to appear after (that is, above), and choose Paste.
You can also drag-and-drop the modifier to a different location in the stack.
Note: The original object is always at the bottom of the stack, and world-space modifiers are always at the top.
To use the modifier buttons:
 Click Configure Modifier Sets, and choose Show Buttons.
This menu item is a toggle. It is either on or off. When you turn on Show Buttons, the current button set appears between the drop-down modifier list and the stack display.
See Configure Button Sets Dialog for more information.
To turn the modified object into an editable mesh, do one of the following:
Right-click the modifier stack, and choose Collapse All.
A warning dialog appears to remind you that collapse is not undoable, and give you the option of performing a Hold before creating the mesh.

Right-click the object in a viewport, and choose Convert To > Convert to Editable Mesh in the quad menu.
Tip: You can also turn a modified object into an editable patch or editable polygon surface. Use the quad menu to do this.
To adjust a modifier's component such as its gizmo or center point:
 Click the plus-sign icon to display the modifier's hierarchy.
Choose the component you want to adjust, such as the Gizmo.
The component highlights to show it is active.
Adjust the component.
For example, you might use transforms to move a gizmo or a center point.
 When done, you can click the minus-sign icon to hide the hierarchy display. The modifier itself is highlighted again.
Tip: You can also right-click the stack and use Show All Subtrees to view the entire hierarchy, and Hide All Subtrees to view only objects and modifiers.
To go to a sub-object level for complex objects:
Click the plus-sign icon to display the object's hierarchy.
Choose the sub-object level you want to adjust.
The sub-object level highlights to show it is active.
Keyboard shortcut: INS cycles through the difference sub-object levels.
Adjust sub-objects.
When you add a new sub-object type, the modifier stack updates to show the new sub-object levels.
To leave the sub-object level, click to select the name of the top-level object or a different top-level object.
Tip: You can also right-click the stack and use Show All Subtrees to view the entire hierarchy, and Hide All Subtrees to view only objects and modifiers.
Interface
Modifier List

The modifier list is a drop-down list that lets you choose a modifier to add to the stack. When you choose an object-space modifier from this list, it appears above the object, or above the modifier that was currently selected in the stack. When you choose a world-space modifier from this list, it appears at the top of the stack.
For the distinction between object space and world space, see Modifier Types Defined and Object Space and World Space.
Use Pivot Points: The first item in the modifier list is the Use Pivot Points toggle. It is unavailable unless multiple objects are selected.
When turned on, gmax uses the pivot point of each object as the center of a modifier's operation. For example, if you bend a line of trees around the Z axis, they all bend along their trunks.
When turned off, gmax calculates a central pivot point for the entire selection set and modifies the selection as a whole. For example, if you bend a line of trees around the Z-axis, trees at the end of the line deform more than those at the center where the pivot is located.
Note: You must turn on Use Pivot Points before you apply the modifier to multiple objects. You can't change the setting afterward, although you can delete the modifier and start over without deselecting the selection set.
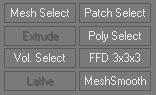
Modifier Buttons
Between the modifier list and the stack display, you can display up to 32 buttons. The buttons are a shortcut way to add modifiers to the stack.
To display the modifier buttons, click Configure Modifier Sets (below the stack display) and choose Show Buttons.
To customize the button set, click Configure Modifier Sets (below the stack display) and choose Configure Modifier Sets.
When a modifier's button is visible, clicking the button applies the modifier to the stack. Object modifiers are applied immediately above the currently selected object or modifier. World space modifiers are applied at the top of the stack.
Stack Display
The modifier stack is organized as follows:
At the bottom of the stack, the first entry always lists the object type. Click this entry to display the object's creation parameters so you can adjust them.
When you click to choose an entry in the modifier stack, its background highlights to show that the entry is current, and that the object's or modifier's parameters are available for adjusting, in rollouts that appear beneath the stack display.
Above the object itself are entries for object modifiers. Click a modifier entry to display the modifier's parameters so you can adjust them.
This section lets you go back to any modifier you've applied and rework its effect on the object. You can also delete the modifier from the stack, canceling its effect.
Reminder: gmax applies transforms after it applies object modifiers but before it applies world-space modifiers.
To the left of each modifier in the stack is a lightbulb icon. When the bulb appears white, the modifier is applied to the stack below it. When the bulb appears gray, the modifier is turned off. Click to toggle the on/off state of the modifier.
If the modifier has sub-controls such as a center or a gizmo, the stack also shows a small plus/minus icon. Click this icon to open or close the hierarchy.

Opening a modifier's hierarchy to access sub-controls
When the hierarchy is open, you can select a sub-control, such as a gizmo, and then adjust it. The available sub-controls vary from modifier to modifier.
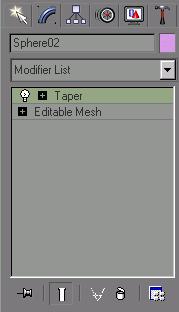
Objects that have a sub-object hierarchy, such as editable meshes also show a collapsible hierarchy in the modifier stack.


Opening an object's hierarchy to access sub-object levels
To work at a sub-object level, click to open the hierarchy, then click to select the sub-object level. Controls for that particular level or type of sub-object appear in rollouts below the stack display.
(Certain types of sub-object display an icon at the right of the stack, to help you see which sub-object type you are adjusting.)
Tool Buttons
Below the stack display is a row of buttons for managing the stack.
 Pin Stack: Locks the stack to the currently selected object so it remains with that object regardless of subsequent changes in selection. The entire Modify panel is locked to the current object as well.
Pin Stack is useful for transforming another object while keeping your place in the modified object's stack.
 Show End Result: Shows the selected object as it will appear after all modifications in the stack have taken place, regardless of your current position in the stack. When this toggle is turned off, the object appears as modified up to the current modifier in the stack.
Make Unique: Converts an instanced modifier to a copy that's unique to the current object. See Make Unique.
Remove Modifier: Deletes the current modifier.
Configure Modifier Sets: Click to display the pop-up Modifier Sets menu.