


|
Volume Number: 21 (2005)
Issue Number: 8
Column Tag: Programming
Getting Started
by Dave Mark
PHP, MySQL, And Forms
In our last PHP/MySQL exploration, we used the MySQL monitor to build a database, create a new table, then populate the table with data. We did use our PHP chops to query the table and spit out some HTML with the results, but that's a pretty bare-bones/hard-coded approach. A more common technique is to use an HTML form to populate the table. For example, suppose you were building an order-entry system for your sports memorabilia shop. You could use the MySQL monitor to enter all the data that represents your inventory. If you are really comfortable with the monitor, that's not a terrible approach. But, what if you want your assistant, who is a whiz at the web but has no MySQL experience, to manage the data? Creating a series of HTML-driven forms is definitely the way to go.
Before we dig into this month's sample code, I'd like to take a momentary detour to talk about a terrific new book I just got.
Hacking Mac OS X Tiger
Back in the early days of Macintosh, there were just a very few Mac programming titles. One of the best of these books was called Macintosh Programming Secrets. Written by Scott Knaster and Keith Rollin, the book quickly became a cult classic. Well, Scott is back and his latest book is every bit as cool as Macintosh Programming Secrets. The long title is Hacking Mac OS X Tiger: Serious Hacks, Mods, and Customizations. This is no idle boast. The book is chock full of wonderful insider info, and is just plain fun.
The book starts off with a collection of tips. For example, try holding down the option key, then pressing the volume up (or down) key on your keyboard. Cool! The Volume System Pref opens. There are tips for the Finder, the Dock, Dashboard, System Prefs, iTunes, and a lot more. To me, the book is worth the price of admission just for that part along. But wait, there's more!
The second part of the book is called Mods, and explores more developer-oriented things. Things like Automator, Xcode, Property Lists, and Application Bundles. Lots of great info here, especially if you are relatively new to Mac development.
The third part of the book might be my favorite. It's called Hacks, and is full of, well, um, hacks! You'll customize dock icon behavior, hack some Dashboard widgets, even redirect your web cam output to create a live video desktop.
All this stuff is presented in Scott Knaster's witty, irreverent style. I totally love this book! Hacking Mac OS X Tiger is part of Wiley's ExtremeTech series. You can find it at:
http://www.wiley.com/WileyCDA/WileyTitle/productCd-076458345X.html
And now back to our regularly scheduled programming...
Implementing a Form with PHP
The key to implementing an HTML form is the <form> tag. Typically, the <form> tag will include both action and method attributes. The action attribute specifies the name of the file to which to send the form's results. The method attribute specifies how form data is passed along to the action recipient and is either GET or POST. The primary difference between GET and POST is that GET causes the form data to be embedded in the action's URL, while POST passes the data to the action as an input stream (via stdin, for example). GET forms can be bookmarked, since the data is embedded in the URL. POST forms cannot be bookmarked.
In general, I use POST as my default unless I specifically need a URL to be bookmarkable. You've undoubtedly clicked on your browser's reload button and been asked, "Do you really want to reload this form?" or something similar. The page in question is a POST request.
Good to know the difference between GET and POST, use whichever works best in any situation. Note that GET is the default. Note also that if your form contains passwords and the like, the GET URL will include the password data. Not a great idea if you will be passing the URL around.
Embedded between the <form> and </form> tags is the form content. The form content is made up of HTML formatted text, along with a variety of <input> tags. Each <input> tag represents an HTML form element, such as a popup menu, text field, non-echoing text field (for entering passwords), checkbox, radio button, submit button (a pushbutton whose purpose is to submit the form) or a reset button (a pushbutton used to clear the form).
An example will make this a bit clearer.
A PHP Form Example
This example puts up a pair of text fields, with appropriate labels. One field is a standard text field, the second a non-echoing text field. We'll use the former to enter your name and the latter to enter a password. We'll end the form with a submit button. When the submit button is pressed, the same page will be reloaded. The technique of taking two different actions on the same page of PHP code is a common PHP theme. While this is not a particularly useful example, it demonstrates this concept nicely.
Using BBEdit, or your favorite plain-text editor, create a new plain-text file and save it as php_form01.php, then type the following source code into the file:
 <html>
   <head>
      <title>Sample PHP Form</title>
   </head>
   <body>
      <?php
         if ( !empty( $_POST[ 'name' ] ) ) {
            echo "Your name is {$_POST[ 'name' ]}.<br />";
            echo "Your password is {$_POST[ 'pwd' ]}.<br />";
         }
      ?>
      <form action="<?php $PHP_SELF; ?>" method="POST">
         Name:
         <input type="text" name="name" />
         <br />
         Password:
         <input type="password" name="pwd" />
         <br />
         <input type="submit" />
      </form>
   </body>
</html>
Save the file and copy it into the Sites directory in your home directory. For example, I placed my copy of this code into /Users/davemark/Sites/.
Once this is done, fire up your favorite browser and enter this URL:
http://127.0.0.1/~davemark/php_form01.php
Be sure to replace davemark with your own user name. Also, be sure to keep the tilda (~).
Once you enter the URL, you should see results similar to those shown in Figure 1. If you don't, be sure your PHP server is running. To do this, create a new, plain-text file named test.php, fill it with these 3 lines of code:
<?php
phpinfo()
?>
Drag the test file into your Sites directory and type this URL into your browser:
http://127.0.0.1/~davemark/test.php
Remember to replace davemark with your user name. If the large PHP table appears in your browser, PHP is running and you've got an error in your version of php_form01.php. If the large PHP table does not appear, go back to the installation instructions for PHP and make sure your server is up and running.
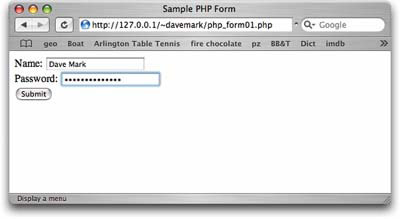
Figure 1. The Sample PHP
Form in action.
Click in the Name field and type your name. Next, tab over to or click in the Password field and type a password. Note that the password characters echo as dots. I'll show you why in a second.
Finally, click the Submit button. You should see something like the output shown in Figure 2. Notice that the name and password are both echoed and the form is then reloaded so you can try this again.
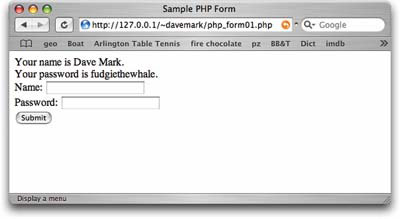
Figure 2. The name and
password are echoed and the form is reloaded.
Let's take a look at the code, see how this works.
We start with the basic <html>, <head>, <title>, and <body> tags. Nothing new there.
<html>
   <head>
      <title>Sample PHP Form</title>
   </head>
   <body>
The first thing we do in the HTML body is open a PHP tag and jump into an if statement. The if statement calls the PHP function empty() to see if the variable $_POST[ 'name' ] is empty, that is, see if it has been set to a value.
Whenever you see a PHP function and don't know what it is, make your way over to http://php.net, type the function name in the search for text field, select function list from the in the popup menu, then click the arrow to do your search. The result of my search for the empty function is shown in Figure 3.
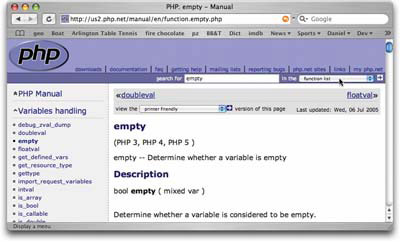
Figure 3. Searching for the
empty function on php.net.
What the heck is $_POST[ 'name' ]? What a weird name for a variable. The variable $_POST is an associative array. An associative array is an array that is indexed by name instead of by numerical index. For example, you might have an array of nicknames for all your friends, where $nicknames[ 'Fred' ] is set to the string 'Stubby', while $nicknames[ 'Phil' ] is set to 'Scooter'.
Note that the quotes are optional for single word strings. So you might see $nicknames[ Fred ]. Though that will work, leaving out the quotes will make your code a bit more cryptic, so use them unless you find yourself in a funky situation where they just get in the way (quoted string inside another quoted string, for example). And even then, be sure to comment your code so everyone can follow along.
$_POST is an associative array that contains an element for each of your form's input fields. So $_POST[ 'name' ] contains the contents of the input element with the name "name". $_POST[ 'pwd' ] contains the contents of the input element with the name "pwd". You get the idea.
The goal of the if statement is to see if the name field is empty. If not, we'll use echo to display the contents of the name field. Want to learn about echo? Go to php.net and type echo in the search field, search the function list. About ? of the way down the page, you'll see a nice comment about using braces. This is worth reading. In a nutshell, you can use braces as separators when a space character just won't do. For example, in the code below, we used the braces to set off the name $_POST[ 'name' ] without putting a space between the end of the variable and the period. This lets us put a period immediately after your name.
Note that we included the <br /> HTML tag in our output. Remember, the PHP code spits out HTML as its output and then the HTML is passed back to the browser. The <br /> tag is used to put a return after the name and again after the password.
<?php
         if ( !empty( $_POST[ 'name' ] ) ) {
            echo "Your name is {$_POST[ 'name' ]}.<br />";
            echo "Your password is {$_POST[ 'pwd' ]}.<br />";
         }
      ?>
If the name field was filled, we'll already have printed the name and password before we get to this point. If the name field was empty, nothing will have been generated yet. Either way, we are now going to put up the form.
The <form> tag takes an action attribute and a method. We already know about the method. The action is the file you want served up with the results of your action. We could have created a second page that displayed the results of our form. But this self-referential approach is pretty common in PHP. We used the variable $PHP_SELF to have the form pass the results on to the same file, sort of like a function calling itself. Want to learn more about $PHP_SELF? It's not a function, so we'll need to search the whole site instead of just the function list. When you search all of php.net, you'll get a Google list of pages to look at. Here's a good place to start:
http://us3.php.net/reserved.variables
You'll need to search the page for PHP_SELF. Note that the $ is not part of the variable name.
<form action="<?php $PHP_SELF; ?>" method="POST">
         Name:
The two <input> tags specify a text field and a password field. Both do the same thing, but the password field echoes input as dots instead of the actual characters. Note that the name attributes of each <input> tag are what link the results to the $_POST associate array index.
   <input type="text" name="name" />
         <br />
         Password:
         <input type="password" name="pwd" />
         <br />
Finally, the last bit of <input> for the form is the submit button.
   <input type="submit" />
      </form>
   </body>
</html>
Type your name and password again and again. Each time you click submit, the page reloads, draws your name and password, and then redraws the blank form. Cool!
Adding MySQL to the Picture
Our next step is to add MySQL to the picture. We'll build a database, using the MySQL monitor, create a new table, then use the form we created to populate the database. If you are new to the MySQL monitor, go back June's Getting Started column for a review.
Fire up Terminal and start the MySQL monitor. As a reminder, I set up an alias for mysql:
alias mysql='/usr/local/mysql/bin/mysql'
Here's my sequence for starting MySQL, building the database, and building the table:
Daves-Computer:~ davemark$ mysql -u root -p
Enter password:
Welcome to the MySQL monitor.  Commands end with ; or \g.
Your MySQL connection id is 16 to server version: 4.1.12-standard

Type 'help;' or '\h' for help. Type '\c' to clear the buffer.

mysql> create database myaccounts;
Query OK, 1 row affected (0.40 sec)

mysql> use myaccounts;
Database changed
mysql> create table passwords(
    -> name varchar(60),
    -> pwd varchar(60),
    -> userid int(10) auto_increment primary key );
Query OK, 0 rows affected (0.08 sec)

mysql> select * from passwords;
Empty set (0.09 sec)
In the above, I first created a database called myaccounts, set myaccounts as the current database, then created a table within myaccounts called passwords. Passwords contains a 60 character name, a 60 character password, and an auto-incrementing userid. We then verified that the passwords table was empty.
Let's switch back over to PHP and modify our code so we are writing our passwords into the table. Back in your plain-text editor, replace your existing code with this version:
<html>
   <head>
      <title>Sample PHP Form</title>
   </head>
   <body>
      <p>Connecting to the database...</p>
      <?php
         $host = 'localhost';
         $user = 'root';
         $pw = '';
         $db = 'myaccounts';

         $link = mysql_connect( $host, $user, $pw )
            or die( 'Could not connect: ' . mysql_error() );
         echo 'Connected successfully';
         mysql_select_db( $db );
      ?>
      <p>If we got here, we've connected!</p>

      <?php
         if ( !empty( $_POST[ 'name' ] ) ) {
            $tempname = $_POST[ 'name' ];
            $temppass = $_POST[ 'pwd' ];
            $query = "insert into passwords values ( '$tempname', '$temppass', 0)";
            $results = mysql_query( $query )
            or printf( "Query error: %s", mysql_error() );
         }
         mysql_close();
      ?>
      <form action="<?php $PHP_SELF; ?>" method="POST">
         Name:
         <input type="text" name="name" />
         <br />
         Password:
         <input type="password" name="pwd" />
         <br />
         <input type="submit" />
      </form>
   </body>
</html>
The first chunk of this code should be familiar from earlier columns. We use mysql_connect() to connect to the database and mysql_select_db() to make the database the current one for subsequent commands (just like use myaccounts; in the MySQL monitor).
<html>
   <head>
      <title>Sample PHP Form</title>
   </head>
   <body>
      <p>Connecting to the database...</p>
      <?php
         $host = 'localhost';
         $user = 'root';
         $pw = '';
         $db = 'myaccounts';

         $link = mysql_connect( $host, $user, $pw )
            or die( 'Could not connect: ' . mysql_error() );
         echo 'Connected successfully';
         mysql_select_db( $db );
      ?>
      <p>If we got here, we've connected!</p>
The next chunk of code looks like what we did earlier in the column. Instead of using echo to print out the form fields, we build a query instead and use mysql_query() to fire it off. This will insert the row into the MySQL table. It is important to note that the $query line is a single line of code. It wraps in this column, but you should enter it as a single unbroken quoted string in your source code.
After the if statement, we close the database. Each time this page is loaded, the data base is reconnected, worked with, then closed again. Some people put the mysql_close() at the very bottom of the file, just to make sure they don't accidentally place code beneath it.
   <?php
         if ( !empty( $_POST[ 'name' ] ) ) {
            $tempname = $_POST[ 'name' ];
            $temppass = $_POST[ 'pwd' ];
            $query = "insert into passwords values ( '$tempname', '$temppass', 0)";
            $results = mysql_query( $query )
            or printf( "Query error: %s", mysql_error() );
         }
         mysql_close();
      ?>
The rest of the code is pretty much the same as what you had above, the implementation of the form and the close body and html tags.
<form action="<?php $PHP_SELF; ?>" method="POST">
         Name:
         <input type="text" name="name" />
         <br />
         Password:
         <input type="password" name="pwd" />
         <br />
         <input type="submit" />
      </form>
   </body>
</html>
Running the MySQL Form
Let's take this puppy for a spin. First, be sure you saved your source code and copy the file to your Sites folder. In your browser, type this link:
http://127.0.0.1/~davemark/php_form02.php
Note that I saved this new version of the source code as php_form02.php. Be sure to change davemark to your user name.
Once the table loads, enter a name and a password (see Figure 4) and click the Submit button. Note that each time the page reloads, the database is reconnected.
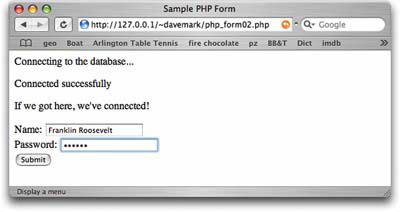
Figure 4. Entering the data
that will be written to the MySQL table.
Once you've entered enough data, go back to Terminal and take a look at your table.
mysql> select * from passwords;
+--------------------+----------------+--------+
| name               | pwd            | userid |
+--------------------+----------------+--------+
| Franklin Roosevelt | Delano         |    1   |
| Dave Mark          | fudgiethewhale |    2   |
| Dark Helmet        | spaceballs     |    3   |
+--------------------+----------------+--------+
3 rows in set (0.00 sec)
Cool! All the data is there.
Until Next Month...
There is just a ton you can do with MySQL and PHP. If you don't have a PHP library already, I found the books MySQL in a Nutshell and Programming PHP from O'Reilly and PHP 5 and MySQL from Apress a big help in getting started.
Not sure what I'm going to do for next month's column. I've been reading the galleys to Mark Dalrymple and Scott Knaster's upcoming Learn Objective-C from Spiderworks. Hmmm, might be fun to explore a bit of that. Well, we'll see. For now, it's back to Lake Anna for a bit more summer laziness. See you next month.
Dave Markis a long-time Mac developer and author and has written a number of books
on Macintosh development. Dave has been writing for MacTech since its birth! Be sure to check out
the new Learn C on the Macintosh, Mac OS X Edition at
http://www.spiderworks.com.
Warning: include(/home/cust10011/www/site001/includes-mactech/includefiles/mt_footer.inc) [function.include]: failed to open stream: No such file or directory in /home/cust10011/www/site001_files/staticcontent/articles/mactech/Vol.21/21.08/PHPMySQLAndForms/index.html on line 469
Warning: include() [function.include]: Failed opening '/home/cust10011/www/site001/includes-mactech/includefiles/mt_footer.inc' for inclusion (include_path='.:/usr/share/php:/usr/share/pear') in /home/cust10011/www/site001_files/staticcontent/articles/mactech/Vol.21/21.08/PHPMySQLAndForms/index.html on line 469