


|
Volume Number: 20 (2004)
Issue Number: 12
Column Tag: Programming
Unix in OS X
Getting More From OS X by Diving Deeper
by Ed Marczak
Introduction
As most of you know, with the advent of OS X, the remarkable power of Unix sits brewing just under the shiny, happy GUI surface. Although OS X was officially released over three years ago, may long-time Mac users have not yet availed themselves of all that this very powerful underbelly has to offer. If this sounds familiar, then this article is for you!
This is the first of a two part article (part two will run next month) that will help you get your bearings and make you more comfortable working in the belly of the beast.
The File System
As in the past, the preferred file system in Panther remains HFS+, but you can now view it from a whole new angle. It's time to fire up 'Terminal', which you'll find in /Applications/Utilities. At the prompt, type 'ls -l', which stands for 'list' and the '-l' (ell, not the number one) is for 'long format.' If you stayed in your home directory, the output you get looks something like this:
total 605424
drwxr-xr-x  18 edmarcza  edmarcza        612 27 Oct 23:19 Applications
drwxr-xr-x   6 edmarcza  edmarcza        204 22 Oct 00:32 Applications Alt
drwxr-xr-x   5 edmarcza  edmarcza        170 18 Oct 19:07 Audio Apps
drwxr-xr-x   4 edmarcza  edmarcza        136  5 Nov 07:48 Crapplications
-rw-r--r--   1 edmarcza  edmarcza   18644427 25 Oct 12:10 DLF.pdf
drwx------  36 edmarcza  edmarcza       1224  5 Nov 07:54 Desktop
drwx------  18 edmarcza  edmarcza        612 27 Oct 08:36 Documents
-rw-r--r--   1 edmarcza  edmarcza          0 14 Oct 17:54 IO.SYS
drwxr-xr-x   3 edmarcza  edmarcza        102 29 Oct 23:49 ISO
drwx------  34 edmarcza  edmarcza       1156  4 Nov 09:24 Library
-rw-r--r--   1 edmarcza  edmarcza          0 14 Oct 17:54 MSDOS.SYS
drwx------  22 edmarcza  edmarcza        748  5 Nov 08:52 Movies
drwx------  12 edmarcza  edmarcza        408  1 Nov 14:57 Music
drwx------  29 edmarcza  edmarcza        986 19 Oct 09:42 Pictures
drwxr-xr-x   4 edmarcza  edmarcza        136  6 Oct 08:46 Public
-rwxr-xr-x   1 edmarcza  edmarcza   25646592 27 Oct 16:16 SEVT.CDX
-rwxr-xr-x   1 edmarcza  edmarcza  265672965 27 Oct 16:38 SEVT.DBF
drwxr-xr-x   5 edmarcza  edmarcza        170  6 Oct 08:46 Sites
drwxr-xr-x   5 root      edmarcza        170 26 Oct 16:39 ZDE
drwxr-xr-x   4 root      edmarcza        136 14 Oct 01:01 bin
-rw-r-----   1 root      edmarcza       5715 25 Oct 08:18 edterm.term
drwxr-xr-x  12 edmarcza  edmarcza        408 11 Oct 21:13 ws
Listing 1
This should look at least a little familiar, as it's all of the files you see in the Finder when you view your home directory. In the listing above, you'll also see files and directories that I've added. The goop of letters that form the first column (running down the left of the listing) confuses many the first time they see it. Each letter describes the kind of file, and the permissions associated with that file. Let's take one line on its own:
drwxr-xr-x 18 edmarcza edmarcza 612 27 Oct 23:19 Applications
Listing 2
There are 10 bytes that make up this string. The first position contains a 'd', which means that this entry is a directory. A dash ('-') in this position would indicate a file. The following bytes are broken down into three groups of three: three for the file owner, three for the group and three for everyone else. Using our current example, the file owner has 'rwx', the group has 'r-x', and everyone else has 'r-x'. The first byte indicates the ability of the owner to read the file. In the case of a folder, it's the ability to list the contents of that directory (you can still change into that directory). The second position denotes the ability to write. If the entry is a file, this functions as a 'modify' right. If it's a directory, it's the ability to create files. The third byte indicates the ability to eXecute (run) the file, or, in the case of a directory, change into that directory. The second group of three are the same permissions (read, write/modify and execute/change dir), but applied to a group. The final group applies to everyone else. Figure 1 should give you a better idea of how this string breaks down into individual groups of permissions.
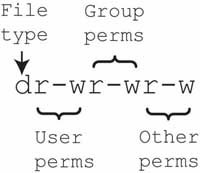
Figure 1 - Breakdown of
permissions
You'll see that the Finder concurs with this view. If you open your home directory in the Finder, highlight the Application directory that it contains, and press Apple-I, you'll see the 'Get Info' dialog box (Figure 2).
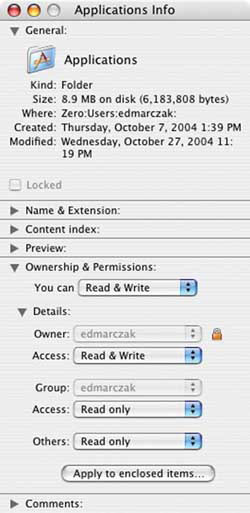
Figure 2: Get Info with
Permissions Showing.
You'll note that 'rwxr-xr-x' permissions are preserved in this view. Owner can read and write ('rwx'), the group owner can only read ('r-x'), and everyone else on the system can read this file/see this directory ('r-x').
The owners of the file or directory come in the third and fourth columns. In our Applications example from listing 2, the user owner is 'edmarczak' and the group owner 'edmarczak'. Yes, OS X creates a group with the same short name as any user ID that you create. This group is typically used in home directories where access to particular files and folders are usually restricted to a single account. In contrast, look at the main Applications directory:
drwxrwxr-x 166 root admin 5644 29 May 2002 /Applications
It's owned by the user 'root' and the group 'admin'. 'root' and users in the 'admin' group can read, modify and execute the contents of the /Applications directory. Everyone else can read and run those programs, but are not allowed to modify them (of course, some of that depends on the permissions on the applications inside that directory itself).
You can add, change and delete users and groups in several ways. Ultimately, though, that information ends up in the NetInfo database (see next paragraph), no matter how you add the information (OS X client only, as Panther Server can also use OpenDirectory). Also, if you view users through the Accounts Preference Pane, you'll only see a subset of all the users on your machine (technically, you'll only see users with a user id greater than 499).
NetInfo is OS X's central database for machine configuration. This is where OS X strays from a traditional Unix model. Typically, a machine will find its setup (static ip, static routes, hostname, hosts file, etc.) contained in text files in the /etc directory. On the other hand, OS X chooses to store, and subsequently look up, this information in a database. This is NetInfo. You can access the information in NetInfo via the command line (using niutil, nicl, nidump, niload and others), or through the NetInfo Manager.app found in /Applications/Utilities.
The NetInfo database is hierarchical, with nodes that NetInfo calls "directories" making up the structure. According to the NetInfo man page, "each directory may have zero or more NetInfo properties associated with it. Each property has a name and zero or more values."
If you launch NetInfo Manager, and navigate to the users directory (figure 3), you'll notice two things: the bottom pane that is ready to list the properties and values for this node, and that there are many users on this system. How did all of these users get there? Simple: they came pre-installed by Apple. These 'invisible' users help to run many processes in the background, while you sit and type an e-mail. We'll note the importance of these extra users when we explore Apache next month.
Each user id is composed of several elements. Let's examine this one using the command line this time. Hop back over to Terminal. You didn't close it, did you? Type 'niutil -read . /users/edmarczak' (without the quotes, and fill in your short user name as, I hope, you do not have an 'edmarczak' user on your system!). You should get output similar to this:
name: edmarczak
_writers_passwd: edmarczak
_writers_tim_password: edmarczak
_writers_picture: edmarczak
shell: /bin/bash
_writers_hint: edmarczak
home: /Users/edmarczak
gid: 504
authentication_authority: ;ShadowHash;
_writers_realname: edmarczak
picture: /Library/User Pictures/Animals/Dragonfly.tif
passwd: ********
realname: Ed Marczak
hint:
sharedDir: Public
_shadow_passwd:
uid: 504
generateduid: 9AD63C18-1795-11D9-8568-000A95E09504
NetInfo and user IDs are truly topics to themselves, so I'm only going to highlight the important bits here (OK, they're all important....). The 'name' entry is the login name, which matches the short name that you assigned when the id was created. 'Shell' is the default login shell used when opening a new terminal. 'home' is where the user's home directory is located. This can come in very handy if you need to relocate a users' home. 'gid' is a number representing the user's primary group. You can reverse this into a group name by looking under the NetInfo 'group' directory. 'passwd' is the encrypted password for this user. 'realname' is the person's full name. 'uid' is this id's user id. Every id on a system must have a unique user id. (This is, actually, how permissions on a disk are assigned deep down: by number (uid), not by name. Fortunately, you can do it by name, and the machine will convert for you.) These attributes are the ones you'd traditionally find in /etc/passwd on a generic Unix system.
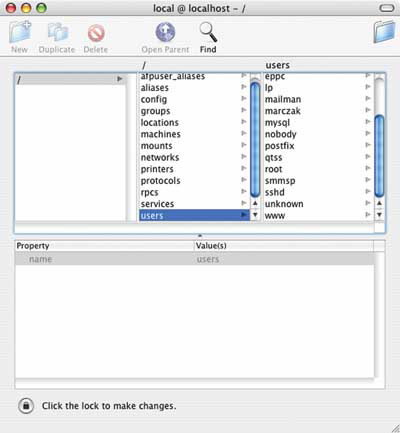
Figure 3: NetInfo Manager,
with the 'users' directory highlighted.
To change permissions, you can use the Finder's Get Info dialog, or, you can use the 'chmod' command in the terminal. Using 'chmod', you can do this through an absolute mode, or via a symbolic mode.
The absolute mode uses a numeric representation of permissions. You add the permissions together for each series, 'user', 'group' and 'others'. Execute is '1', write is '2' and read is '4'. It's all about flipping the right bits. So, if you want read and write permissions for the user owner, you would set the owner mode to '6' (read (4) + write (2) = 6). The command would be:
chmod 600 filename
You must fill out values for each group, hence the zero values for the 'group' and 'others' positions. '0' in a position clears all bits and means 'no access'. For the owner to have 'read and write', the group to have read-only, with no-one else allowed access, we'd issue this command:
chmod 640 filename
If you want to change an entire directory worth of files and its sub-directories, you use the recurse switch, with the wildcard:
chmod -r 640 *
The symbolic mode uses the group and permission letters that are shown in a directory listing. It's a little more cumbersome to use, but probably easier to understand. To add the write permission to the group owner of somefile.txt, you would:
chmod g+w somefile.txt
The group (g) gets the write permission (w) added (+). To take away that permission, you would:
chmod g-w somefile.txt
The group gets the write permission taken away (-). You can affect two groups at once:
chmod go+w somefile.txt
Both the group (g) and others (o) get the write permission added.
At this point, you should have a good grasp of permissions in the file system, how to view and set them. The real question is, "why would I ever want to change permissions on anything?" When it comes to system files, the answer is "never!" If you're really unfamiliar with permissions and System files, just consider "System Files" to be anything outside of /Users. Here, however, is an example why you may want to change permissions.
Let's say you and your house-mates all share the same Mac. You create an Excel file that is going to help with budgeting, and save it in /Users/Shared. Perfect, now everyone can access it, right? Well, everyone can access it, but only the originator will be able to modify it. See, OS X tries to create files in the most secure way possible. This causes the file to be created with the permissions '-rwxr-xr-x' (the owner can read and write, but the group owner and all others are read only). So, you can use one of the above methods to alter the permissions such that everyone has write permissions. If the file is called 'budget.xls', you could simply type 'chmod 777 /Users/Shared/budget.xls'.
If you're only changing one file, and don't use the Terminal that often, it's just as easy to use the Finder. However, if you had just saved a bunch of files in the Shared directory, pop open terminal and use the wild card to set everything at the same time. If you created a directory for everyone to share ("BudgetFiles"), you could get that directory and all it contained in one fell swoop with 'chmod -R 777 /Users/Shared/BudgetFiles'.
One final note about permissions: if you do think you've altered the permissions of System files, OS X includes a utility to set them back the way Apple expects them. Disk Utility, found in the Utilities folder, will allow you to run a 'repair permissions' routine that will only touch system files. It will not alter anything in your home directory. This is a nice balance between keeping the system running properly, and allowing you to make some customizations. You can also run this from the command line by issuing "diskutil repairpermissions /". I often urge people to script this to get run at least once a week. Hmmmmm...sounds like that could be the subject of a future column.
Everything is a File
One interesting aspect of Unix is that it treats everything as a file. Everything. Really. Tape devices are files, network sockets are files, pseudo-terminals can be treated as files, and there are many more. Just as you can read and write a series of characters to and from a file, you can do the same with anything on the system.
You can take advantage of this by using pipes. A pipe is a first-in, first-out structure (FIFO) that takes the output of one process and can feed it to another. This is analogous to a real pipe used in plumbing. You want the output of your hot-water heater to go to your sink and shower, so you connect them with pipes. You can connect data from applications the same way. The 'less' command is mainly used to scroll through a text file, forward and back, under your control, without it scrolling off the screen before you can read it. (You'll note that with Panther, we don't have a real 'more' command. It has been substituted with 'less'. They're the same, bit for bit. So less is more. I suppose someone must have found this amusing). You can also use 'less' to follow a file in real time.
You've probably already seen an internal pipe using the pipe symbol ('|'). This creates a temporary pipe for you:
history | grep ssh
...pipes the output of the 'history' command right into grep, without doing this:
history > histfile.txt
grep ssh histfile.txt
The issues with internal pipes is that they are typically limited to a circular buffer of 4-8k, and the fact that they disappear after use (desirable at times, though). We can also create a re-useable pipe that any application can listen to.
You create a pipe with the mkfifo command. Some people call them FIFOs, but I still call them pipes. You'll also note that the listing for a pipe is denoted by a 'p', as opposed to a 'd' or '-'. So, let's create a pipe:
$ mkfifo drain
$ ls -l drain
prw-r--r--  1 edmarcza  edmarcza  0  6 Nov 15:37 drain
This creates a pipe that uses the file system, so the size is almost unlimited. Again, note the 'p' that specifies this as a pipe, and the default permissions assigned to it. Then, you can do something like this:
ls -l  > drain &
ls -l / > drain &
and read it back later by:
cat drain
Or, keep a terminal open and use the 'less' command. Type 'less drain' and type 'F' for follow. Now, anything that comes into this pipe will be displayed on the screen using 'less', which also means that you can scroll back and forth through the information at will. This information will stay in the pipe until read. You'll notice that we run the commands in the background, because they will block until something reads the pipe. You can use pipes to pass information around between any applications running on the system. Postfix is an application that uses this to good effect. Take a look in the /var/spool/postfix/public directory sometime, and you'll see the pipes there. A good way to take advantage of pipes is to allow any number of smaller programs dump information into the pipe and have a master program that reads and acts on the data that it reads.
SYSLOG
Syslog is the system logger, the scribe for all programs that need to log information in a central place. It's the centrality that makes syslog so useful - we have one place to monitor information. And any program can send data to the log, from any machine (if you configure your syslog daemon to accept remote data, and configure each machine to send it).
OS X stores its syslog data in the file /var/log/system.log. Let's take a look at a short sample of my syslog file:
Nov  7 21:04:41 Jack-Kerouak kernel: AirPort:  Link DOWN
Nov  7 21:04:41 Jack-Kerouak configd[95]: AppleTalk shutdown
Nov  7 21:04:41 Jack-Kerouak /usr/sbin/AppleFileServer: AFPServer::AbnormalATListenerShutDown
                   - clear listener
Nov  7 21:04:41 Jack-Kerouak configd[95]: AppleTalk shutdown failed, status = 71 (retrying)
Nov  7 21:04:42 Jack-Kerouak configd[95]: AppleTalk shutdown
Nov  7 21:04:42 Jack-Kerouak configd[95]: AppleTalk shutdown complete
Nov  7 21:04:46 Jack-Kerouak kernel: AirPort:  Link UP:  "719Net" - 000393ec6465 - chan 1
Nov  7 21:04:46 Jack-Kerouak configd[95]: posting
                   notification com.apple.system.config.network_change
Nov  7 21:04:46 Jack-Kerouak mach_init[2]: Server 0 in bootstrap d03 uid 0:
                   "/usr/sbin/lookupd": exited as a result of signal 1 [pid 17935]
Nov  7 21:04:46 Jack-Kerouak configd[95]: executing /System/Library
                   /SystemConfiguration/Kicker.bundle/Contents/Resources/set-hostname
Nov  7 21:04:46 Jack-Kerouak lookupd[17963]: lookupd (version 324.7)
                   starting - Sun Nov  7 21:04:46 2004
Nov  7 21:04:46 Jack-Kerouak configd[95]: AppleTalk startup
Nov  7 21:04:47 Jack-Kerouak set-hostname[17970]: setting hostname to Jack-Kerouak.local
Nov  7 21:04:49 Jack-Kerouak configd[95]: posting
                   notification com.apple.system.config.network_change
Each entry has a date and time stamp, the name of the machine submitting the entry, which sub-system is reporting and finally, the message to log. You can see in the first line that the kernel is reporting that the AirPort link just went down. The second line shows configd noting that AppleTalk just shutdown.
Again, the important thing about syslog is that it provides a central place for all log messages. Using 'less', you can follow the system log and watch entries filter in. If you're a GUI person, the console app will do this (and a whole lot more). Find it in your Utilities folder.
Syslog not only writes messages into /var/log/system.log, but can separate messages to different locations based on the facility and the level. The facility is simply 'which part of the system is generating this message?' The built-in facility keywords are: auth, authpriv, cron, daemon, kern, lpr, mail, mark, news, syslog, user, uucp and local0 through local7 (user defined). The level is sometimes called 'priority' or 'severity'. It is broken down into 8 levels. From lowest (least critical) to highest (most critical), from the syslog(3) man page, they are:
LOG_DEBUG     Messages that contain information normally of use only when
                            debugging a program.
LOG_INFO      Informational messages.
LOG_NOTICE    Conditions that are not error conditions, but should
              possibly be handled specially.
LOG_WARNING   Warning messages.
LOG_ERR       Errors.
LOG_CRIT      Critical conditions, e.g., hard device errors.
LOG_ALERT     A condition that should be corrected immediately, such as a
              corrupted system database.
LOG_EMERG     A panic condition.  This is normally broadcast to all users.
C
You must include <syslog.h> and <stdarg.h> to use the syslog functions. After that, though, it's about as simple as calling:
syslog(LOG_ALERT, "who: internal error 23");
You can get much more specific with the openlog and setlogmask calls.
Perl
You'll need to have Sys::Syslog on your system (see HYPERLINK http://www.sunsite.ualberta.ca/Documentation/Misc/perl-5.6.0/ext/Sys/Syslog/Syslog.html). Sys:Syslog keeps the interface to syslog just about identical to the C couterpart. This comes installed out-of-the-box on Panther Server and Client.
PHP
There are several ways messages from PHP may end up in the system log (see the chapter titled, "Error Handling and Logging Functions" in the PHP Manual. Specifically, look at error_log). However, if you explicitly want to write an entry into the log (perhaps at a level of LOG_DEBUG or LOG_INFO, or any 'expected' event), simply use the syslog function:
syslog(LOG_WARNING,"Hack attempt from $REMOTE_ADDR ($HTTP_USER_AGENT)");
REALbasic
REALbasic can use the 'Log' command to write an entry to syslog under OS X or Linux.
Log(System.LogLevelError, "Error Message")
See the REALbasic Language reference for more information.
Shell Scripting
Want to know that your shell script completed successfully without putting in a echo statement? Want to output warning and debug messages to syslog? Use the 'logger' command. 'logger' picks up some default values to make your life easy. The command 'logger This is a test log entry' writes this to the system.log file:
Nov 8 07:42:43 Jack-Kerouak edmarczak: This is a test log entry
Note that it dropped my user id in as the origin of the message. But it will also do this in a script unless you specify the script name with the '-t' flag. '-p' can set the priority (default is user.notice):
logger -p local0.notice -t myscript
This gives us:
Nov 8 09:13:46 Jack-Kerouak myscript: This is the last test
AppleScript
Apparently, you can send messages to the log from AppleScript, too! Frankly, this is entirely untested by me. Details and the OSAX can be had here:
http://osaxen.com/additions/syslog.html
Sending and Receiving
You need to make some changes to syslog if you want to send messages to a remote system, or, if you want to be able to receive syslog messages from others. Sending is the easy part. Just tell syslog where you want to send each type of message. Modify your /etc/syslog.conf file to take the action '@remote.host.name', or '@ip.ad.dr.es'. So, an entry to send all mail related entries to a syslog host running on 192.168.1.7 would look like this:
mail.* @192.168.1.7
After modifying syslog.conf, you need to restart syslog, by sending it a hangup signal (-HUP), or by restarting your machine (but a little extreme, isn't it?).
Here's the tough part: setting up OS X to receive syslog messages. It shouldn't be difficult, really. In fact, it used to work just fine. Then, along came 10.3.4, or one of the intervening security updates, and, wham! No more remote syslog. At this stage, if you need a central logging machine, make it a Solaris box, or Linux. Heck, you can even make a Windows box into a remote syslog server easier than OS X at this point. I really hope this functionality comes back in an easy way. My Xserve made a great syslog server. I've traced network traffic, I've run in debug mode to no avail. If anyone can explain how to have OS X 10.3.6 actually log remote syslog messages, you'd be doing the world a great service (the built-in syslog, that is...it is, of course, possible to install a syslog replacement like syslog-ng. I'd rather stick to the 'blessed' version). On most implementations, launching syslog with an '-r' switch enables it to listen for remote messages. The syslog daemon under OS X has no such switch. Unfortunately, digging through the source for syslog simply reveals that it's completely out of sync with the man page.
Regardless of this last little difficulty, syslog remains a powerful tool in the Unix arsenal. As a programmer, you don't have to come up with your own logging routines, simply use the ones built into the system. As a system administrator, it's imperative to watch system logs, and know what is getting logged where.
FIN?
Hopefully this article gives you a greater understanding of what is going on underneath the covers in OS X. Understanding file permissions is essential to running, and writing programs that play nicely, in a multi-user system. Also, knowing how to perform these tasks from the command line make them easier to script, or to call from your own application.
Next time, we'll look at something that requires knowledge of each of these disciplines: Apache.
Ed Marczak doesn't like to be painted with the narrow brush of a simple by line. He
does whatever life demands of him. If that involves technology, so be it. He does that at
http://www.radiotope.com
Warning: include(/home/cust10011/www/site001/includes-mactech/includefiles/mt_footer.inc) [function.include]: failed to open stream: No such file or directory in /home/cust10011/www/site001_files/staticcontent/articles/mactech/Vol.20/20.12/UnixTipsForOSX/index.html on line 486
Warning: include() [function.include]: Failed opening '/home/cust10011/www/site001/includes-mactech/includefiles/mt_footer.inc' for inclusion (include_path='.:/usr/share/php:/usr/share/pear') in /home/cust10011/www/site001_files/staticcontent/articles/mactech/Vol.20/20.12/UnixTipsForOSX/index.html on line 486