Interactive Visual Effects
You can use visual effects in combination with DOM mouse and touch events to create interactive web applications—applications that allow the user to manipulate objects on the screen with the mouse or finger. The first step to building interactive web applications is to register for user events—specifically, register for mouse, touch, and gesture events. Next, you implement the event handlers to apply the desired visual effects. This article contains three step-by-step examples that show you how to combine event handling with visual effects. Each example uses different types of events and visual effects. For example, you can implement web applications that allow the user to manipulate a 2D graphics object using multi-touch gestures.
Using Click or Tap to Trigger a Transition Effect
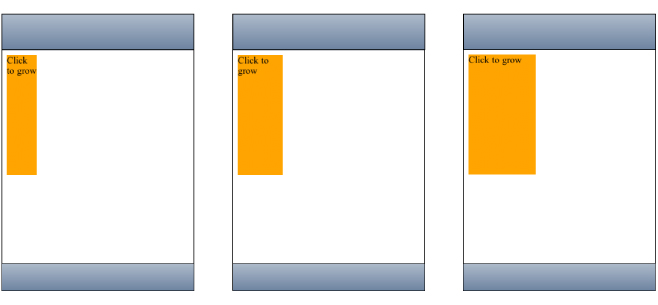
In this example, the user can click an element using the mouse or tap an element using a finger on an iPhone OS-based device to change the size of an element. The element is a box that increases in width by a multiple of 1.5 when tapped using a transition effect as illustrated in Figure 1.
Follow these steps to implement this example:
Create an element for the user to manipulate.
This CSS fragment creates a box element and uses the
-webkit-transition-...properties to create a smooth transition when the width of the box changes:div#box
{background-color: blue;
display: block;
position: absolute;
width: 50;
height: 50;
-webkit-transition-property: width;
-webkit-transition-duration: 0.5s;
-webkit-transition-timing-function: default;
}
Register for input events.
The following HTML registers an
onclickevent handler,grow(), for the box element:<body>
<div id="box" onclick="grow();"></div>
<h1>Click box to grow</h1>
</body>
Implement the event handlers.
The following
grow()JavaScript method sets the width of the box, which triggers the transition effect in step 1:function grow() {box = document.getElementById( "box" );
var old_width = box.offsetWidth;
box.style.width = old_width * 1.5;
}
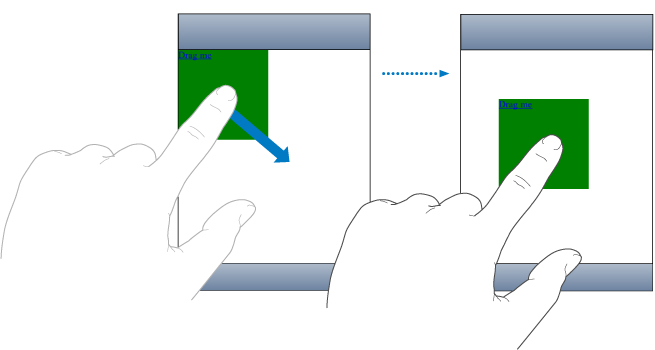
Using Touch to Drag Elements
In this example, the user can touch a box to drag it around the screen. The high-level steps are the same as before. You create an element to manipulate, register event handlers, and implement event handlers. However, in this example, touch events and transforms are used, and most of the application is written in JavaScript.
Create an Element to Manipulate
Follow these steps to create a simple box that can be dragged across the screen.
Implement the element creation method in JavaScript.
This
Boxcreation method sets the initial position of the box and registers a handler for thetouchstartevent.function Box(inElement)
{var self = this;
this.element = inElement;
this.position = '0,0';
this.element.addEventListener('touchstart', function(e) { return self.onTouchStart(e) }, false);}
Next create
Box.prototypeto contain additional methods for getting and setting the position of the box.Box.prototype = {...
}
Add a
position()get method as follows:get position()
{return this._position;
},
Add a
position()set method to set the transform using the-webkit-transformCSS property.// position strings are "x,y" with no units
set position(pos)
{this._position = pos;
var components = pos.split(',')var x = components[0];
var y = components[1];
const kUseTransform = true;
if (kUseTransform) {this.element.style.webkitTransform = 'translate(' + x + 'px, ' + y + 'px)';}
else {this.element.style.left = x + 'px';
this.element.style.top = y + 'px';
}
},
Add
x()andy()get and set methods to support theposition()get and set methods above.// position strings are "x,y" with no units
get x()
{return parseInt(this._position.split(',')[0]);},
set x(inX)
{var comps = this._position.split(',');comps[0] = inX;
this.position = comps.join(',');},
get y()
{return parseInt(this._position.split(',')[1]);},
set y(inY)
{var comps = this._position.split(',');comps[1] = inY;
this.position = comps.join(',');},
Now, add a
loaded()function that creates the box element:function loaded()
{new Box(document.getElementById('main-box'));}
Add this line of code to invoke the
loaded()method when the application launches:window.addEventListener('load', loaded, true);Finally, set the appearance of the box using CSS as follows:
.box {position: absolute;
height: 150px;
width: 150px;
background-color: green;
}
.box:active {background-color: orange;
}
Note: Elements have to be clickable to receive touch events. Read “Making Elements Clickable” in Safari Web Content Guide for how to make a nonclickable element clickable.
Register and Implement Event Handlers
The bulk of the work in dragging the box is implemented in the touch event handlers. The touch events are instances of the TouchEvent class. This example registers for all three types of touch events: touchstart, touchmove, and touchend events. It tracks single touches, not gestures, to implement dragging. Read “Using Gestures to Translate, Scale, and Rotate Elements” for how to handle gesture events.
First implement the
onTouchStart()event handler to start tracking touch events.The
onTouchStart()method was registered as an event handler in “Create the Element to Manipulate.” This method first checks to see that there is only one touch, not multiple touches. It then stores the current position and registers fortouchmoveandtouchendevents.onTouchStart: function(e)
{// Start tracking when the first finger comes down in this element
if (e.targetTouches.length != 1)
return false;
this.startX = e.targetTouches[0].clientX;
this.startY = e.targetTouches[0].clientY;
var self = this;
this.element.addEventListener('touchmove', function(e) { return self.onTouchMove(e) }, false);this.element.addEventListener('touchend', function(e) { return self.onTouchEnd(e) }, false);return false;
},
Next implement the
onTouchMove()event handler to move the element. Theposition()set method, implemented in “Create the Element to Manipulate,” uses the-webkit-transformCSS property to translate the element.onTouchMove: function(e)
{// Prevent the browser from doing its default thing (scroll, zoom)
e.preventDefault();
// Don't track motion when multiple touches are down in this element (that's a gesture)
if (e.targetTouches.length != 1)
return false;
var leftDelta = e.targetTouches[0].clientX - this.startX;
var topDelta = e.targetTouches[0].clientY - this.startY;
var newLeft = (this.x) + leftDelta;
var newTop = (this.y) + topDelta;
this.position = newLeft + ',' + newTop;
this.startX = e.targetTouches[0].clientX;
this.startY = e.targetTouches[0].clientY;
return false;
},
Finally implement the
onTouchEnd()event handler to remove thetouchmoveandtouchendevent handlers.This method is invoked after the last touch leaves the screen, so you no longer need to observe
touchmoveandtouchendevents until the nexttouchstartevent.onTouchEnd: function(e)
{// Prevent the browser from doing its default thing (scroll, zoom)
e.preventDefault();
// Stop tracking when the last finger is removed from this element
if (e.targetTouches.length > 0)
return false;
this.element.removeEventListener('touchmove', function(e) { return self.onTouchMove(e) }, false);this.element.removeEventListener('touchend', function(e) { return self.onTouchEnd(e) }, false);return false;
},
Using Gestures to Translate, Scale, and Rotate Elements
Gesture events are high-level events that encapsulate the lower-level touch events—they are instances of the GestureEvent class. Gesture and touch events can occur at the same time. Your application has the choice of handling touch events, gesture events, or both. The advantage of gesture events is that the location and angle of the fingers are already calculated when the events arrive. Thus gesture events support pinch open to zoom in, pinch close to zoom out, and pivoting to rotate elements. You simply apply the event location, scale, and rotation values to your element.
The steps in this example are similar to implementing the draggable box in “Using Touch to Drag Elements.” Instead of just dragging the box, the user can also pinch open and close to scale it and pivot to rotate it. To do this, you simply extend the example to handle gesture events for scaling and rotating. In summary, you create the element to manipulate, register for touch and gesture events, and implement handlers that translate, scale, and rotate the element.
Create the Element to Manipulate
Follow these steps to create a simple box that can be translated, scaled, and rotated.
Implement the element creation method in JavaScript.
This
Boxcreation method sets the initial position, scale, and rotation of the box and registers handlers for thetouchstartandgesturestartevents.function Box(inElement)
{var self = this;
this.element = inElement;
this.scale = 1.0;
this.rotation = 0;
this.position = '0,0';
this.element.addEventListener('touchstart', function(e) { return self.onTouchStart(e) }, false);this.element.addEventListener('gesturestart', function(e) { return self.onGestureStart(e) }, false);}
Follow steps 2 through 8 in “Create an Element to Manipulate” to create a box prototype, add the
position()accessors and associated support methods, and create the box.
Register and Implement Event Handlers
The bulk of the work in this application is in the touch and gesture event handlers. This example builds on the example in “Using Touch to Drag Elements” by handling gesture events, too. The touch events are used to implement dragging as before and the gesture events are used to implement translating, scaling, and rotating.
First implement the
onTouchStart(),onTouchMove(), andonTouchEnd()event handlers by following step 1 through 3 in “Register and Implement Event Handlers” to allow single-finger dragging.Next, implement the
onGestureStart()event handler to begin tracking gesture events for translating, scaling, and rotating.This method registers the other gesture event handlers,
onGestureChange()andonGestureEnd(), for thegesturechangeandgestureendevents.onGestureStart: function(e)
{// Prevent the browser from doing its default thing (scroll, zoom)
e.preventDefault();
var self = this;
this.element.addEventListener('gesturechange', function(e) { return self.onGestureChange(e) }, true);this.element.addEventListener('gestureend', function(e) { return self.onGestureEnd(e) }, true);return false;
},
Implement the
onGestureChange()event handler to translate, scale, and rotate the element.This method sets the element’s scale and rotation to the
GestureEventobject’s precomputed scale and rotation values. You do not need to compute the distance between multiple fingers or the change in angle to scale and rotate the element.onGestureChange: function(e)
{// Prevent the browser from doing its default thing (scroll, zoom)
e.preventDefault();
// Only interpret gestures when tracking one object. Otherwise, interpret raw touch events
// to move the tracked objects.
this.scale = e.scale;
this.rotation = e.rotation;
this.position = this.position;
return false;
},
Implement the
onGestureEnd()event handler to remove the handlers for thegesturechangeandgestureendevents.onGestureEnd: function(e)
{// Prevent the browser from doing its default thing (scroll, zoom)
e.preventDefault();
this.element.removeEventListener('gesturechange', this.gestureChangeHandler, true);this.element.removeEventListener('gestureend', this.gestureEndHandler, true);return false;
},
Last updated: 2010-05-26