
Automator is a powerful technology for building custom workflows. But sometimes
you need functionality that the existing actions don't provide—functionality
that could be easily accomplished using the shell with a scripting language like
Perl, Python, or Ruby. With Custom Shell Script actions, script developers can
quickly turn their work into Automator actions.
Creating an Automator action from an existing script has several advantages.
First, the user has a user interface with which to modify the parameters. Plus,
the script can be reused in multiple workflows. Workflows can be assembled,
and customized, by users with little or no knowledge of the command line or
scripting languages. An action can deploy a complex solution that consists of
multiple files or resources as a single bundle. By starting with an existing
solution, development time is minimal.
A Scripted Solution
To demonstrate how an existing shell script can be repackaged as an Automator
action, we start with a task familiar to many information technology (IT)
managers: keeping track of computer configurations. Automator includes a
System Profile action that produces a detailed report of a computer's configuration.
But the System Profile action only reports on the configuration of the system
the action is run on. What the IT manager needs is to extract the configuration
from multiple computers in a local network—preferably without having to
visit each one.
The shell script in Listing 1 accomplishes this by using ssh to execute
the system_profiler tool on a series of computers via an IP network. The XML
output is captured and filtered using an XSL transform. The transform
extracts a summary of each computer's configuration (model description,
processor type, amount of physical RAM, and so on) and turns the result into
a nicely formatted HTML report.
Listing 1: systemreport.sh
#!/bin/bash

# systemreport.sh
#
# Syntax: systemreport.sh <machine_address> ...
#
# machine_address	[user@]address used by ssh
#
# systemreport runs the system_profiler utility on each remote machine.
# It then transforms the system_profiler data into an HTML report using XSLT.
#

# HTML prolog
cat << _HEAD
<!DOCTYPE html PUBLIC "-//W3C//DTD XHTML 1.0 Strict//EN"
    "http://www.w3.org/TR/xhtml1/DTD/xhtml1-strict.dtd">
<html xmlns="http://www.w3.org/1999/xhtml">
<head>
<title>Macintosh System Inventory</title>
</head>
<body>
<h1>System Inventory Report</h1>
<h2>Generated $(date '+%v %R')</h2>
<table>
_HEAD

# reportheaders.xml contains a property list that produces the column headers
xsltproc sysinfo2inventory.xsl reportheaders.xml

# Add a report record for each machine listed on the command line
for m in $*
do
    # Pipe the XML from system_profiler through an XSLT to
produce an HTML table row
    ssh -n ${m} system_profiler -xml SPHardwareDataType
SPSoftwareDataType |
    xsltproc flattenplist.xsl - |
    xsltproc --stringparam NetworkAddress ${m} sysinfo2inventory.xsl -
done

# HTML epilog
cat << _END
</table>
</body>
</html>
_END
To generate a report, the script is run with a list of local machine addresses
on the command line. Its output is redirected to an HTML file. (You'll see the
finished report later on in Figure 4.)
The script depends on the fact that all of the computers under the IT manager's
control have been configured with password-less ssh login by first creating a
pubic/private key pair and adding the manager's public key to the
.ssh/authorized_keys file on each remote system. This allows the manager to
quickly access the computers via the network for diagnostics and maintenance.
Directions for configuring the authorized_keys file can be found in
Configuring
Your SSH Environment in the Xcode 2 User Guide.
The script also depends on three auxiliary files to do its work: flattenplist.xsl,
sysinfo2inventory.xsl, and reportheaders.xml. The first two are XSLT files.
For those not familiar with it, XSLT (eXtensible Stylesheet Language Transformations)
is a language for converting the contents of an XML document into another form.
The output document can be anything, theoretically, but is often another structured
document such as XML or HTML. Conceptually, an XSLT document is remarkably simple;
it is essentially the output document populated with XSLT statements—statements
that are replaced with data extracted from the source XML document. Think of an
XSLT document as a template and the XSLT statements as macros.
XSLT uses the XPath language for referring to elements in the source document. Much
of the power—and complexity—of XSLT is derived from XPath. XPath can
refer to XML elements relative to other elements. The syntax to do this can be
complex and difficult to understand. The flattenplist.xsl file addresses this
complexity by first taking the <key>key</key><value>...</value>
element pairs produced by system_profiler and transforming them into single
<value key="key">...</value> elements. This makes the
XPath statements in sysinfo2inventory.xsl substantially easier to write.
Using the flattened output of system_profiler, sysinfo2inventory.xsl extracts the
desired information from the profile and produces a single row of an HTML table.
This transform is repeated for each profile. XSLT condition statements
(<xsl:if>) control which columns are included.
The reportheaders.xml file is a static XML document containing the column headers
for the report. It is transformed by sysinfo2inventory.xsl to produce the first
row of the table.
Creating a Shell Script Action Project
The first step in transforming this script into an Automator action is to create
a Shell Script action project.
NOTE: This tutorial uses Xcode 2.4.1 and requires Mac
OS X 10.4.2 or later.
- Launch Xcode and choose New Project from the File menu.
- In the New Project assistant, select Shell Script Automator action.
- Give the project the name System Report, and a location, and create it.
Giving the project the name of the finished Automator action greatly simplifies
its configuration.
Adding the User Interface
For the IT manager, changing how much detail the report includes is a "simple"
matter of editing the shell script or the XSL. To provide the users of this
Automator action with similar choices, some input objects are added to the
action's user interface.
Using Interface Builder, we are going to add a text field, a text label,
and three check boxes to the action's view, which is stored in the
project's main.nib file.
- Begin by opening the main.nib file from Xcode; this will launch Interface Builder.
Make sure the palettes (Tools > Palettes > Show Palettes) and
Inspector window (Tools > Show Inspector) are visible.
- Add a Small System Font Text field by dragging it from the Cocoa-Text
palette into the View window.
- Add an NSTextField. Switch to the Cocoa-Controls palette, and add three
check boxes.
- Using the Attributes tab of the Inspector (show with Shift-Cmd-I), set
the size of each new control to small.
- Edit the attributes and placement of the objects so the interface looks
like the one in Figure 1.
NOTE: The Automator Programming Guide includes user interface design guidelines that recommend a 10-pixel
margin and the use of small controls. Hold down the Option key and hover over the
window to see the margin of selected objects. Use the arrow keys to nudge objects
into position.
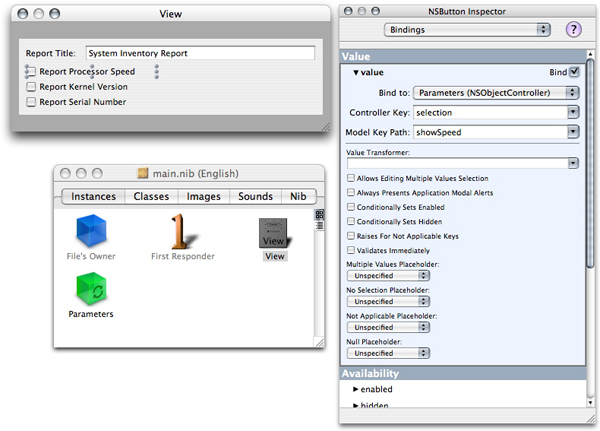
Figure 1: User Interface and Bindings
Next, we'll use the Inspector to bind the value of all four input controls to
the Parameters object, conveniently included in the .nib file.
The bindings will cause the values of the four controls to be stored in the
Parameters object using the variable names set in the Model Key
Path. These values will be passed to the script when it executes.
- Begin by selecting the
NSTextField object. In the
Bindings tab of the Inspector, expand the Value group and select
the Bind checkbox.
- Choose Parameters (NSObjectController) as the
Bind to target.
- Set the Controller Key to selection and type
reportTitle into the Model Key Path.
- Repeat these steps with the three check boxes, setting the Model
Key Path to showSpeed, showKernel,
and showSerialNumber, respectively.
The second part of an Automator action's interface appears in its summary pane.
This is provided by properties in the Info.plist file. Set the values shown in
Listing 2, both in the Info.plist file and the InfoPlist.strings file.
Listing 2: Info.plist values
<dict>
    <key>AMDSummary</key>
    <string>Inventories remote computers and reports their basic system configuration.</string>
    <key>AMDInput</key>
    <string>One or more machine addresses in the form [user@]address.</string>
    <key>AMDResult</key>
    <string>Web page containing system configuration report.</string>
    <key>AMDRequires</key>
    <string>All remote computers must be configured for password-less ssh access.</string>
</dict>
- Double-click the Info.plist file in the project to open it.
Each Automator property is stored in a pair of XML elements.
- Locate the
<key>...</key> element for
each key, and edit the contents of the
<string>...</string> element immediately
following it.
When you're done, locate and delete any remaining Automator properties
that include the text "(optional)" in their description.
- Delete the
<key> and <string>
element pair of every optional property.
- Save the file and repeat using the InfoPlist.strings file.
Inserting the Script
The main.command script is executed when the action is run. Copy the contents
of the systemreport.sh file and paste it into main.command.
The script needs some minor alterations to run as an Automator action. First,
Automator provides the script its input on stdin rather than as
command-line arguments. In Listing 3, the for m in $* statement
is replaced with a while loop that reads each machine address from
stdin.
Listing 3: Reading parameters from stdin
# Add a report record for each machine read from stdin
while read m
do
...
The values entered by the user are stored in the Parameters object.
When the script is executed, these values are passed to the script as environment
variables. The script will expect four environment variables, one for each of
the bindings created in Interface Builder.
The highlighted changes in Listing 4 show how these environment variables are
used to change the script's defaults and are ultimately passed on to the XSLT
as parameters.
Listing 4: Handing user options
if [[ ! "${reportTitle}" ]]; then reportTitle='System Inventory Report'; fi
if [[ ! "${showSpeed}" ]]; then showSpeed=0; fi
if [[ ! "${showKernel}" ]]; then showKernel=0; fi
if [[ ! "${showSerialNumber}" ]]; then showSerialNumber=0; fi

...

ssh -n ${m} system_profiler -xml SPHardwareDataType SPSoftwareDataType |
    xsltproc flattenplist.xsl - |
    xsltproc --stringparam NetworkAddress ${m} \
             --stringparam ShowSpeed ${showSpeed} \
             --stringparam ShowKernel ${showKernel} \
             --stringparam ShowSerialNumber ${showSerialNumber} \
             sysinfo2inventory.xsl -

...
Finally, add the three support files (sysinfo2inventory.xsl, flattenplist.xsl,
reportheaders.xml) to the project by dragging them into the Scripts group.
Select the Copy items into destination group's folder
option, and check the System Report target. The final project should look
something like the one shown in Figure 2.
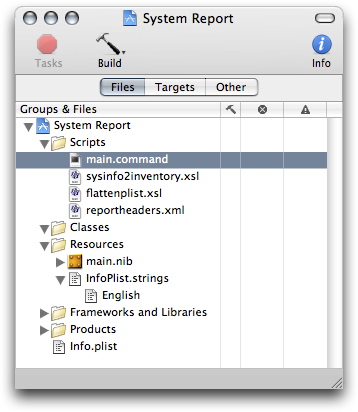
Figure 2: Finished System Report Project
Building a Workflow
The action is now created. Set the build configuration to Release and build
the project. If the script or action needs testing, refer to the "Creating
Shell Script Actions" document for various debugging techniques.
After the action is built, install it by copying the finished System Report.action
bundle to the ~/Library/Automator or /Library/Automator folder. The new action
will appear in the Terminal library group in Automator. Figure 3 shows an example
workflow that uses a fixed list of machine addresses to produce a report.
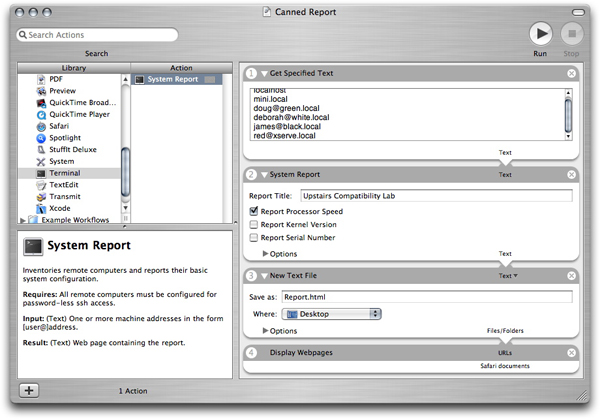
Figure 3: Workflow Using the System Report Action
Running the action produces a finished report that appears in a Safari window, as
shown in Figure 4.
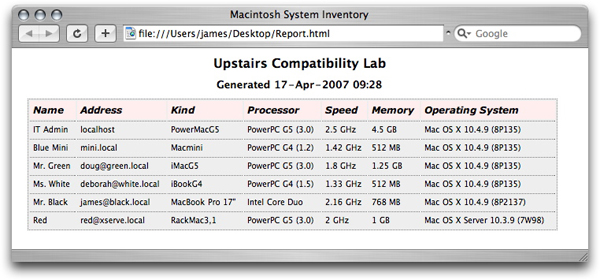
Figure 4: The System Report Output.
This action, and workflows that use it, can now be easily distributed to other
administrators or managers.
Variations on a Theme
To underscore the versatility of Automator actions, consider the following
uses:
- Replace the Get Specified Text action with an Ask for Text
action to create an interactive tool that prompts for a single
machine address.
- Replace the Get Specified Text action with a Combine Text
Files action and save the workflow as an Application to create a
workflow that produces a report for a list of machines contained in a
text file. The workflow can now be used as a droplet, producing different reports depending on the combination of machine list files that are
dropped into it.
- Replace the Display Webpage action with a New Mail Message
action to automatically send an email with the finished report to interested parties.
For More Information
Updated: 2007-06-05
|