Tutorial 1 - Create your first Artwork
This tutorial will give you a very quick overview of how to create an
artwork with ArtStudio.
The artwork in this tutorial was drawn with
a mouse but a WACOM pen & tablet is recommended.
They are fairly inexpensive and work very well. All of the drawings in
the Drawing Hand Art Gallery
were created with a WACOM pen & tablet.
Step 1 - Create an empty Artwork
Start ArtStudio and select a user. If you are
not currently an ArtStudio User, select the Trial User.
If you don't see the color
palette, click on the Show/Hide Color Palette button  .
.
You should see an empty white square. This is
the blank Artwork which is also an Art layer.
To move the Artwork, place the cursor within the
Artwork and press the left mouse button. While holding down the button,
move the mouse to move the Artwork.
To size the Artwork, place the cursor over one
of the sizing squares  and press the left mouse button.
While holding down the button, move the mouse to change the size of the
Artwork. The size is displayed in parenthesis in the status bar at the
bottom of ArtStudio.
and press the left mouse button.
While holding down the button, move the mouse to change the size of the
Artwork. The size is displayed in parenthesis in the status bar at the
bottom of ArtStudio.
or
place the cursor over a sizing square and use the arrow keys to size
the artwork.
Size the Artwork so that it is approximately 420x200.
If you are not logged on as a Trial User, click
on the Save button  . When prompted, name the Artwork "I
Love You".
. When prompted, name the Artwork "I
Love You".
Step 2 - Set the background color of the Artwork
On the left side of ArtStudio is the Layer
Toolbar. To change the background color of the Artwork, click on the
Layer Properties button  .
.
When the Layer Properties dialog appears, click on the Select Color
button. The Color Selector dialog
will appear.
There are two ways to select a color:
Select
a color in the Color Palette.
Choose a color
by clicking on the Choose Color button.
A color dialog will be displayed that will allow you to choose a color.
For this tutorial, leave the background color
white.
Step 3 - Create the Art layer
You can draw directly on the artwork but for this
tutorial, insert an Art layer to draw on by clicking on the Insert Art
Layer button  and selecting new.
Click on the Draw button  on the
main toolbar. When you move the cursor over the Art layer, it should change
to a pencil to indicate that you are in Draw mode.
on the
main toolbar. When you move the cursor over the Art layer, it should change
to a pencil to indicate that you are in Draw mode.
On the right side of ArtStudio is the Brush
Toolbar. On this toolbar, you can select the Brush Density, Brush
Size, Brush Transparency and Brush Hardness (if using a pressure sensitive
pen).
Select the Medium Brush and Low Transparency.
Select the color red in the Color
Palette by left-clicking on the red palette color.
Position the cursor over the Art layer and press
the left-mouse button to begin drawing. If you don't like what you drew,
click on the Undo button  or press Ctrl-z on the keyboard.
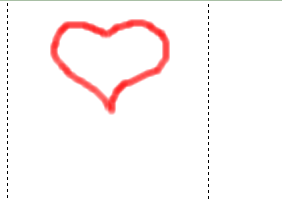
Draw a heart that looks similar to the one in the following image.
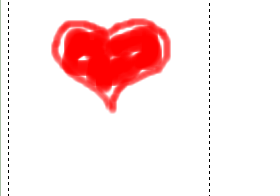
Select the extra large brush and fill in some of the heart so it looks
like the following image.
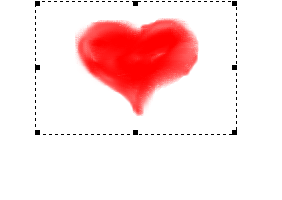
Now, hold down the Ctrl key while drawing to rub/smudge the colors so
that the heart has a softer appearance. Remember, you can Undo any drawing/rubbing
by pressing the Undo button or Ctrl-z.

Click on the Move/Size button  and change the size and
position of the Art layer so it appears as follows:
and change the size and
position of the Art layer so it appears as follows:
Click on the Save button to save the Artwork.
You won't be able to save your work if you're a Trial User.
Step 4 - Play the Art layer
On the main tool bar there are some buttons that
resemble the controls on a VCR. Click on the Play button  to play the Art layer.
If the Layer Properties dialog is not currently
displayed, click on the Layer Properties button .
One of the properties of a Art layer, is the Drawing
Speed. Change the Drawing Speed and then press the Play button to see
the new drawing speed.
Step 5 - Insert a Text layer
Click on the "Insert Text Layer" button
 .
.
A dashed rectangle will appear. This is the empty
Text layer.
If the Layer Properties dialog is not currently
displayed, click on the Layer Properties button .
A Text layer can have a transparent or opaque
background. Make sure Transparent is selected.
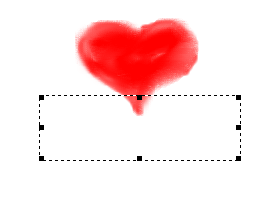
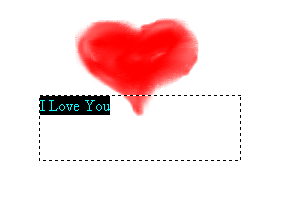
Move and size the Text layer so that it appears as follows:
In the main toolbar, click on the Text button
 to change to Text mode.
Click on the Text layer and type: "I Love
You!"
The color of the text will be the current color
in the Color Palette. To change the color,
select the text by holding down the left mouse button and dragging it
over the text and then release the mouse button.
Click on the black palette color so that the text
color changes to black.
Use the font size combo box  to
change the size of the font to 24.
to
change the size of the font to 24.
Un-select the text by left-clicking anywhere inside
of the Text layer.
Click on the Center button  to center
the text in the Text layer.
to center
the text in the Text layer.
Once again, size and position the Text layer so
that it appears a follows:

Step 6 - Insert a Doodle layer
Click on the "New Doodle Layer" button
 .
.
A dashed rectangle will appear. This is the empty
Doodle layer.
Size and position the Doodle layer so it appears
as follows:

Click on the Draw button to change to Draw mode.
Select the color blue in the Color Palette.
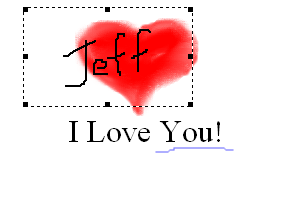
Draw a line under the word "You!".

Step 7 - Play the Doodle layer
If the Layer Properties dialog is not currently
displayed, click on the Layer Properties button .
One of the properties of a Doodle layer is the
Drawing Speed. Change the Drawing Speed so that it underlines the word
"You" fairly
slowly. Press the Play button to see the new drawing speed.
Step 8 - Sign the Artwork with a Doodle
Insert a new Doodle and write your name so that it appears as follows:
Increase the height of the Artwork by:
Clicking on the Rewind button  .
.
Place the cursor over the sizing rectangle at
the bottom of the Artwork and drag it down to increase the height of the
Artwork.
Click on the Fast Forward  button
to return to the last layer in the Artwork.
button
to return to the last layer in the Artwork.
Move the Doodle with your name in it so that it
is below the Text layer.
The Artwork should now appear as follows:

Step 9 -Play and preview the Artwork
To play the entire Artwork within ArtStudio, press
the Rewind button and then press the Play All Layers button  .
.
To modify one of the layers, press the Previous
Layer  and Next Layer
  buttons.
To play the Artwork from the current layer forward,
press the Play All Layers button without first pressing the Rewind button.
To see what the Artwork will look like when you
e-mail it to someone, press the Preview button  .
.
If you use an e-mail program like Microsoft Outlook,
you can e-mail the Artwork as an attachment by pressing the Send button
 . Your e-mail program will appear with a new e-mail opened
and the Artwork already attached.
. Your e-mail program will appear with a new e-mail opened
and the Artwork already attached.
If you use an e-mail service like AOL or Yahoo,
select Copy Path... from the File menu and then press the Copy button.
The path to the Artwork file on your computer will be copied to the clipboard.
Then, go to your e-mail service, create a new e-mail and attach the Artwork
to it. When you are prompted to select the file to attach, paste (Ctrl-v)
the Artwork path where it says "File name:".
If the person your are sending the e-mail to does
not have ArtStudio, you should include the following text in the body
of the message:
"To read the attached Artwork, you must have ArtStudio or the
Artwork Player installed on your computer. If you have not already installed
ArtStudio or the Artwork Player, you can download them from http://www.DrawingHand.com/ArtStudio".