


You can show the Appointment Custom View by pressing the
 button in the Shortcut bar in Diary mode. The Appointment Custom View lets you define the layout and span of
days shown in the view. For example, you could define the view to show two weeks of appointments without showing weekends. Alternatively, you might wish to show seven weeks of appointments including
weekends.
button in the Shortcut bar in Diary mode. The Appointment Custom View lets you define the layout and span of
days shown in the view. For example, you could define the view to show two weeks of appointments without showing weekends. Alternatively, you might wish to show seven weeks of appointments including
weekends.
To customise the view, press the  button in the Shortcut bar. The Customise dialog box is displayed.
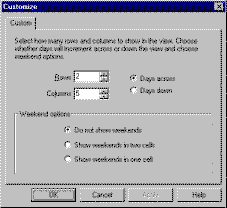
The Customise dialog box lets you specify how many rows and columns will be shown in the view. Additionally, you may specify whether consecutive days will be displayed from left to right or from top to bottom. You can do this by selecting either the Days across or Days Down radio button respectively.
For many people it is less likely that weekends will contain many appointments. For this reason, OfficeTalk lets you choose whether or not to show weekends in this view. Furthermore, if you choose to show weekends, you are given the additional option of showing Saturday and Sunday in a single cell.
Like the Weekly Appointments window, the default size of the Custom Appointments window is maximised such that it fills the Custom view. If you want to display the calendar and the task list in the Custom view then you can un-maximise the window by selecting {bmct help0049.bmp} from the drop down window menu.
You can change the date span shown by clicking on the {bmct help0050.bmp} and {bmct help0051.bmp} buttons. Alternatively, if the Custom Appointments window is not maximised, you can select a date from the calendar. The Custom Appointments Window will change to show the selected date.
More:
Adding and Editing Appointments