OfficeTalk lets you publish diary and contact data to an Internet Web page. OfficeTalk searches any HTML file that you provide, replacing certain text with a link to pages containing diary information for selected OfficeTalk users and a link to pages containing contact name and address information. Furthermore, OfficeTalk can connect to the Internet and copy the files onto a World Wide Web server, making them accessible to the Internet community. Alternatively, the files may be used in a local Intranet configuration.
You can specify options for publishing diary and contact data to the Web by selecting Data to HTML… from the File/Export menu in Supervisor mode. This will display the Internet Export wizard.
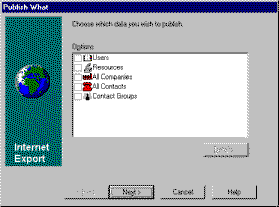
Choose which users' and/or resources' diaries you wish to publish to the Web. Do this by selecting Users or Resources and pressing the Details… button. A further dialog box is displayed showing a list of all OfficeTalk users or resources. Choose the required users or resources and press OK.
From the Internet Export wizard, you may choose to export all companies or all contacts by checking the All Companies or All Contacts check box. Alternatively, if you only wish to publish a subset of companies or contacts, you can select a contact group containing the relevant companies and contacts. Do this by selecting Contact Groups and pressing the Details… button. The Contact Groups dialog box is displayed allowing you to select the appropriate contact groups.
Press Next when you have chosen what data you wish to publish. The Upload page is displayed.
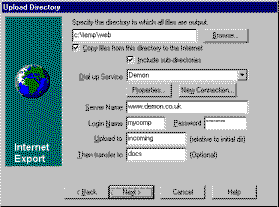
Specify a local directory to which the generated HTML files are output. If you want OfficeTalk to copy the files to the Internet for you then check the Copy files from this directory to the Internet check box. When OfficeTalk creates HTML files representing contact and diary information, the entire set of files is created in a single directory. However, OfficeTalk provides functionality for replicating the file structure of the specified directory to the Internet. This means that you could use OfficeTalk as a tool for transferring your Intranet Web files to the Internet. If you wish to replicate the sub directories of the specified directory in this way then check the Include Sub Directories check box.
Prior to uploading your HTML data to the Internet, OfficeTalk must first connect to the Internet, so you must supply information on how to connect to your World Wide Web server. Firstly, select a dial-up connection entry from the drop down list or create a new one by pressing the New Connection… button. Next, specify the address of your World Wide Web server, for example, 'www.webserver.com'. Specify your login name and password for gaining access to the server. In the Upload To field, enter the directory on the server to which you must upload files. This directory must be relative to the initial directory when you first log onto the server. Usually, you will need to move files from this directory to another directory on the server. OfficeTalk lets you do this by entering an optional relative directory name.
If you have elected to publish diary information then pressing Next will display the Diary Date Ranges page.
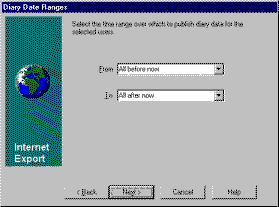
This page lets you choose a date range over which to publish diary information for the selected users and resources. The default is to publish all diary information.
Pressing Next will display the Diaries Template Page. This page lets you specify an HTML file which contains the character sequence <@UserDiaries> or <@ResourceDiaries> or both.
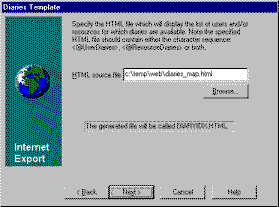
Occurrences of either of these sequences will be replaced with a list of users or resources with each element in the list being a link to that user's or resource's diary information. Enter the full path name of such a file.
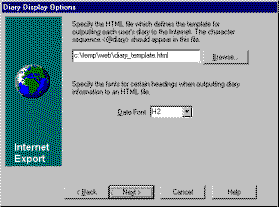
Pressing Next will display the Diary Display Options page. This page lets you specify an HTML file which is a template for the page which shows a specific user's or resource's diary information. You may also choose a font for displaying the date that is displayed above each day of appointments.
If you chose to output contact information, then the Contact Template page is displayed when you press the Next page. This page lets you specify an HTML file which will contain one or more of the character sequences: <@ContactIndex>, <@CompanyIndex> and <@ContactGroups>.
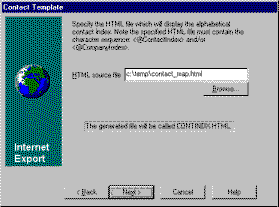
Occurrences of <@CompanyIndex> or <@ContactIndex> are replaced with an alphabetical index. Each letter of the alphabet is a hyperlink to a list of companies or contacts beginning with the associated letter.
Occurrences of <@ContactGroups> are replaced with a list of contact groups. Each contact group is a hyperlink to an automatically generated page of associated companies and contacts. Enter the full path of such an HTML file and press Next.
The next page shown is the Contact Display Options page. This page lets you specify an HTML file which is a template for the page which shows a specific company's or contact's details.
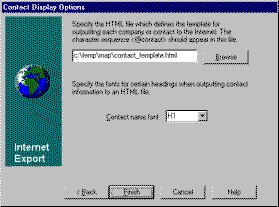
This file should contain the character sequence <@Contact>. This file also lets you choose the font for displaying the company or contact name which precedes the address information.
When you press the Finish button, OfficeTalk will generate the diary and contact information as requested and will place each generated file into the requested directory. If you elected to upload the generated files to the Internet, OfficeTalk will establish a connection with the World Wide Web server and will use the File Transfer Protocol (FTP) to copy the files to the requested directory on the server.
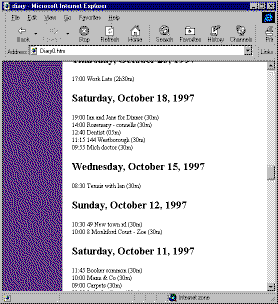
Browsing the generated files, using an ordinary Web browser, will produce a result similar to that shown below: